We’ve Moved!


If you aren’t redirected here is the link:


Remodelaholic!


THANKS!

Showing posts with label Boys Room. Show all posts

Amazing Teenage Boy's Room Reveal

13 September 2011

Amazing Teenage Boy's Room Reveal 

Mary Ann of Classic * Casual * Home, really has some STUNNING spaces in her home.  I wish that I lived there myself!  This room of her sons could EASILY be inspiration for a master bedroom too!  I hope you enjoy it!


This is our son, Tommy's remodeled room.  
When we bought the house, the room looked like this below.
The ceiling was pitched to the right.  We gave it a center pitch and added insulation.  
We removed the middle window and added two on the sides and new oak flooring 

Read more...

Little Boys Room Makeover

22 August 2011

Little Boys Room Makeover
submitted by Balancing Home


The much anticipated reveal of Quinn's room. The project took on a life of its own and took us longer to finish then expected, but it was totally worth it. Without Further Ado...


Before and Afters

Read more...

Amazing Superhero Boys Room!

11 April 2011


Hello Remodelaholics!  I'm Cheri from I Am Momma Hear Me Roar.  I love to blog about home decor, sewing, photography, crafting for boys, and whatever else interests me. 
Today I'm stopping by to show you the Superhero Bedroom I just finished for my little guy.  The room was lavender with an irredescent kind of shimmer from the previous owners.  It had hand-painted hearts and rhinestones around where the mirror used to be.  There was nothing boyish about it.  We needed a change.


Well, it doesn't look a bit like it did now.  You won't find any pink or purple in here.  Let me give you a quick tour.


Read more...

Adorable Boys Nursery with Painted Wall Mural

09 March 2011

 And I am so excited to be here on Remodelaholic!!

I guess I've always been a crafter, but I haven't always been a blogger. I started The Willow Bee in January of this year as a place to keep up with ideas, find inspiration, and share with others. It's my happy place!

The project I'm sharing with you today was one I completed before I had a blog, and the very first project completed in our new home...


Read more...

Nautical Themed Little Boys Bedroom

02 March 2011

Nautical Themed Little Boys Bedroom
contributed by 


Welcome to my son's bedroom!  Creating this "warm" space for my little guy was such a pleasure!  I adore this room and wanted to share it with you.

Read more...

Amazing Attic Renovation: Boys Bedroom and Bathroom

17 February 2011

Amazing Attic Renovation: 
Boys BedroomAnd Bathroom
contributed by ewe hooo!


This is the doorway to the bedroom my sons share. Funny, you'd think this would be the messiest room in the house— two boys sharing a room. But guess what? It's the neatest! Yes, after eleven months of paint-staking attic renovations (by my brother-in-law) and one home equity loan later, our boys prefer sleeping in the guest room downstairs. But I digress. The wooden arch was carved from a tree branch in my brother-in-law's backyard. Double pocket doors slide closed for privacy when they're older.


Read more...

Boys Room With Fish Theme

29 November 2010

Boys Room With Fish Theme
contributed by Entertain Exchange


I thought I would share my son's bedroom decor. I was down the path of decorating his room in burgundy and blue when I found these blue and orange fish sheets at Target a few years ago. They became the inspiration for his room. In the lower right corner of this photo you see my no-sew window valance - so easy and you can find the details here!

I used linen pillow covers and ceramic fish napkin rings I found on clearance at the Pottery Barn to create the window treatment.

The bright orange fish in the sheets inspired me to take a risk and paint a few accent walls in his very beige room orange. I did the three sided window bump out and directly across the room I did this single wall near his closet. I had these three pottery barn shelves I wasn't using that just pop off the wall. The three fish above the doors are 3 dimensional and made of painted metal -from Marshalls.

Linen striped frames are I found on clearance from Pottery Barn. The other accessories are from TJMaxx and Marshalls.
My son's bathroom serves two purposes. His bedroom is on the first floor and has a door for guest using the pool to use the bathroom. I no longer have soaking wet kids walking through my house to use the bathroom. I wanted this bathroom to be a little fun and reflect the pool.
I bought this glass sink on ebay and had the builder cut a hole in the granite top and lower the sink below the counter top instead of sitting on top. I had an outlet installed in the vanity so I can place a light underneath that can light the sink - this is fun! There are glass turquoise tiles in the shower stall and i loved how this lobster print picked up on the stripe pattern of the shower.
My dad is a wonderful watercolor painter and we have a few of his paintings framed in the room. I cropped in on the pictures so you could see them a little better. Boats in bright colors.
A few more fun accents from my favorite stores.
I recovered my baby rocker in a light blue denim to match the blue in the fish sheets. Hope you enjoyed the tour and possibly gave you a little inspiration! More about my son. 

Read more...

Baby Boy Nursery With Wall Stirpes

07 October 2010

I just wanted to show off this sweet little baby boy nursery.  It is a party link from House of Ficek.  I think they did a great job, check it out!


Okay, so I already have my baby toddler.  Gulp, BIG gulp and a little tear.  I just had to post his room because it is the only room in the house that is absolutely, completely, without a doubt done!  (I lie, I really should have added drapes).  When we moved in there were really old shutters mounted outside the frame and closet doors that wouldn't stay up.  Embarrassingly enough the room was in this state until we found out we were expecting and had to get our butts in gear.


Here are the new blinds that I got at Home Depot and cut down to size.


I wanted a nice upholstered glider, but I was 8 months pregnant 
and my husband won the battle after about 3 hours of debating in the store.

 We opted for these floating shelves from Ikea instead of your standard bookcase.


This is the picture in the white frame on the shelf.  I think it is my favorite picture, I adore my boys!


I didn't want anything too pastel and babyish so we went with a vintage baseball theme (I usually hate themes, but this is toned down).  I love the way it turned out, even over one year later.


I love the stripes and the shelves!
Also, if you notice in the first picture there is a 0 and a 9 framed separately for his birth year, and I love that idea!
What do you think?

Read more...

Kids Changing Table Repurposed: Playing Cars

02 October 2010

I thought that this party link form last week was such a fun way to fuel the imagination of your kids!  Check out what Helping Little Hands did to this old changing table!


My Boy is loving his new dresser!

This dresser started it's life (with our family) when I found it peaking out of the trash area at our student housing complex in California.  I knew if I left it there until Hubby came home to help move it, someone else would claim it, so I moved it by myself across the street and into our apartment.  Since that time we used it for toy storage.  (Here are the best "before" pictures I could come up with.)

When we moved into our current home, though, Boy got his own room.  That means it doesn't work for him to share a dresser with Firecracker anymore, and he needed his own.


The drawers were starting to fall out occassionally because the sides were splitting apart a bit.  It's just laminated particle board, so the whole thing needed to be taken apart and put back together and reinforced with glue.  I figured as long as (my Mom always said those were dangerous words) I was taking the whole thing apart, I might as well paint some roads on it for him.  He's had a love affair with matchbox cars since the first time he held one.

...And while roads are popular at our house, parking lots are even more beloved...

...So we have two layers of parking goodness.
Here's a quick rundown of what I did.

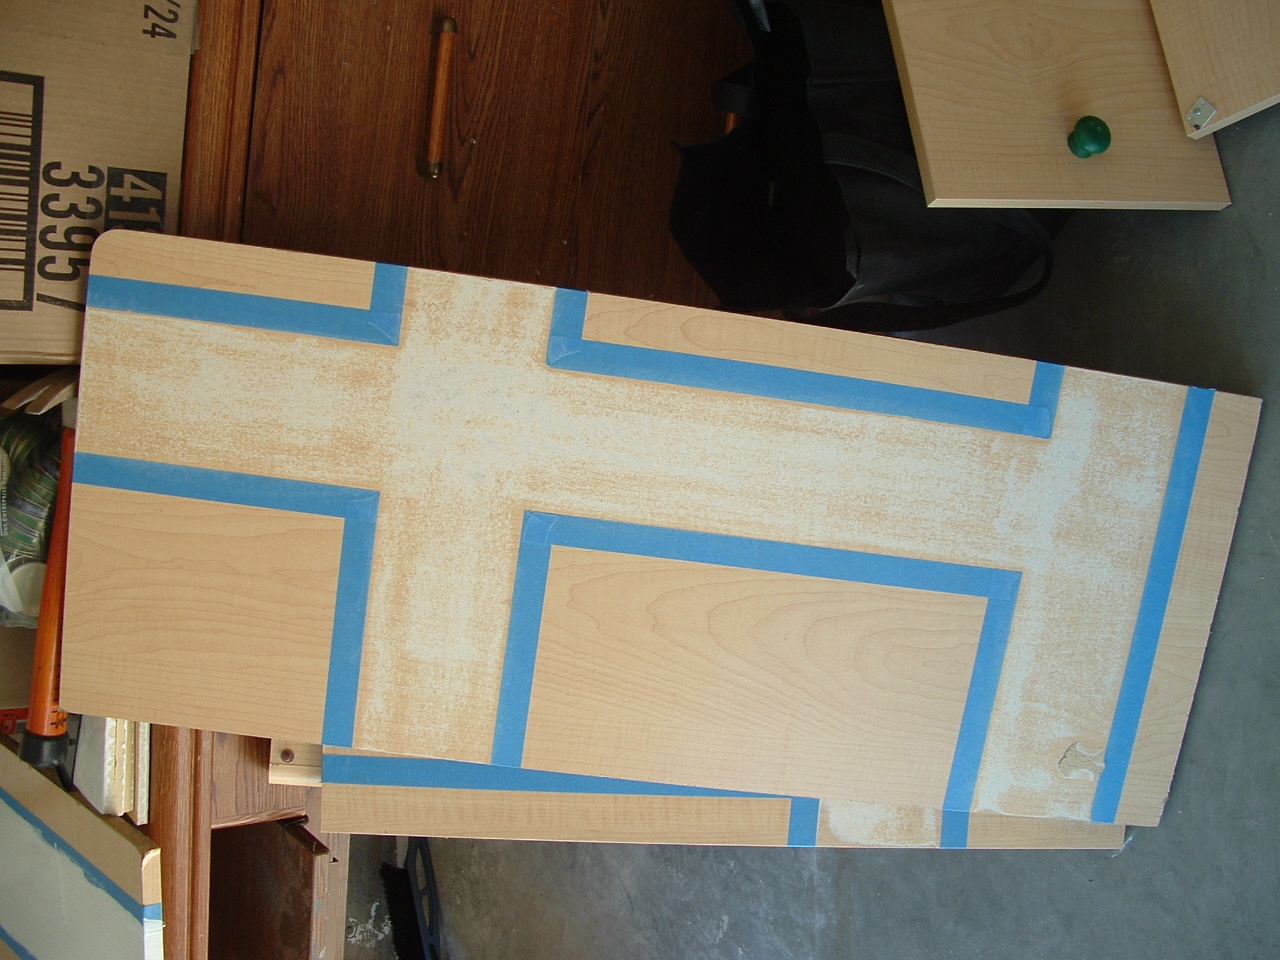
I made the roads approximately the same width as the fabric roads I made a while ago.  I measured it with my quilting ruler (they come in handy for a lot of things.)  One thing I would do differently next time would be to mark and measure all the roads BEFORE taking it apart.  I did it after.  After measuring it, I marked it all with blue painters tape and sanded it with a small electric sander.
Then I put on a coat of primer.  (It probably would have been better to use dark primer, but white was what I had.)
After the primer dried, I put on two coats of black acrylic craft paint.  I let that dry really well and peeled off the tape.  Then I used the painters' tape to mark off the yellow road lines. 
I went over that with two coats yellow acrylic craft paint (or white for the parking lots).  The yellow paint seaped under the tape a bit, so at the end I had to touch up those areas with more black paint using a really tiny brush.

The kids were so anxious to play with it, this is what it looked like by the time I was done nailing the backing on.
The handles took about 3 coats of paint because the color underneath was so dark.  Then I painted "Stop" and "Yield" on them, and were the last thing to be added.
Drive on...

Such a fun idea!  Don't you think?

Read more...

Boys Bedroom Interior Design Makeover!

15 September 2010

When I saw this boys room transformation I was so impressed that I had to beg them to let me feature it, so you all could enjoy Ellie's Magnificent (no lesser word can describe it!) makeover for her son on her blog Less Cake {More Frosting}.  The story of how it all happened is fun too!  Check it out I dare you not to be completely in awe:


When my son was born, 8 years ago, we had a new house....no money....and a brother-in-law living in his nursery. It was a stressful time. We got the brother-in-law moved into the basement, but that didn't fix the no money issue. I had decided on a "primary colors" theme for the nursery. Then, I decided to make really cheap artwork of some of my favorite characters and hang it throughout the nursery. I was actually pretty proud of it at the time.

Fast forward to his 3rd birthday, when we moved him into a "big boy" bed. My talented brother helped my husband and I build a REALLY awesome bed complete with giant shelving and lighted headboard.

I thought, at the time, that I'd change the bedroom into a "buzz lightyear" palette of lime and navy. So I painted the bed those colors, and made a duvet cover and curtains to match. However, we soon learned that my son couldn't handle the disposal of ALL of his favorite things. He pretty much lost it over the bed switch. And the thought of losing all his treasured pictures was just too much for him.

Soon after that we had some even bigger financial difficulties, and the addition of another child. Poor kid had to continue living in his eclectic and not cool bedroom.

He's was about to turn 8 in this awful room, and that's when it hit me. We'd have to get rid of him to make a smooth transition. Not permanently. Just for the makeover. Then he'd be more apt to deal with the changes. My sweet Mom hopped on board to watch him so we could make an


"Extreme Bedroom Makeover"

I asked my husband to snap some "before" pictures while I delivered my son to Grandma's house. So there aren't very many (he's not the photographer in the family) but it's a pretty drastic change, so I want to show you the "BEFORE" first.

Here's the bed area. Not sure what's under those covers.....eek! It's a mish-mosh of all his favorite toys, and treasures, and, let's be honest, CRAP! The kid keeps everything!

The white basket in the upper left is the "crap box". Full of rocks, and plastic kids meal toys, and who knows what else. It's our compromise. When it's full....he's required to edit.


Here's the giant bookshelf, and a better shot of some of the "foam-core" art. I actually couldn't get rid of it quite yet. I think it might be making it's home in our playroom. After all, it is all of my favorites....Sesame Street, Dr. Seuss, and Disney. (it's the Reluctant Dragon for heavens sakes!)


Here's a great shot of the mix of the Primary Colors and the Buzz Lightyear palettes. CRASH! Neither one was ever executed correctly. (And I'm SOOOO sad we don't have an "inside the closet" before picture. Because we really did a lot of stuff in there.... But just imagine that it was A DISASTER!!)


Here's what it looked like when you opened his door. This bedroom was cramped, and ugly, and a mess. Not okay for a little boy who's just turning 8 years old.


Wanna see what it looks like now????


Tah Dah!!! I LOVE IT!

I l-o-v-e it!


He loves it too. It took his breath away for a second. He's slowly realizing some of the things that are "missing". But overall, he's a happy camper. And I kind of want to move in there myself!

It's kind of Pottery Barn Kids/Teen (see how they use storage in the headboard?) meets IKEA modern, meets the ocean. And I think they get along GREAT!! Should we take a more detailed tour?


We wanted a modern/surfer theme. It was a color palette that my son had agreed to liking. Originally we had toyed with super-heros and other things that he's really interested in. But we decided to just pick a "color theme" and go from there instead. This certainly wouldn't be exclusive to surfing. So we feel it could grow with him. Or even change to a new child, if that's ever necessary.


The bed, although super awesome for storage, is HUGE. So it had to stay where it was located. However, we decided that painting it the same color as the wall would disguise how ginormous it actually is. And it WORKED! We also painted the chair rail the same color as the wall too. Our whole house has chair-rail and it's really not our style. We would actually take it out...but it would be SUCH A MESS! This is a good compromise for us.

All of his "special things" are now located in that awesome orange box. So it's not cluttered anymore. And some others are tucked away behind the doors. (yay doors!!) The other things displayed actually go with either the theme or the colors. And it's MUCH cleaner now!

The bedding started with an UBER cheap duvet from IKEA. And then I added the orange stripe. I also made the pillow on the bed. It turned out really great. (these pics don't really do it justice) And the technique is really easy. I have a tutorial coming on the pillow. You're going to want to make one too!


The closet area is so much cleaner now that we got rid of his armoire. I really liked it for baby clothes, but it was nearly impossible for him to keep clean. I wanted drawers.


The closet, thanks to my brother....again, now has built in drawers, double rods, and a single rod on the left. (which we actually don't need, and have stored our books there) The drawers are plenty to store all his "in season" clothes. With any out of season ones being stored in big bins under his bed. The drawers are a little high for him right now. But we just put a little stool in the closet, so he can see all the way to the top.


I've decided one of the keys to making a room feel both "decorated" and "personalized" is to unite the color palette. So the things that match are on display, the things that don't are tucked away. But still very accessible. This is an autographed CD that my son has from his favorite Children's artist Laurie Berkner. (she's amazing, by the way, both my kids ADORE all her music!!)

Anyway, we've had this CD sitting in a plastic bag so that little hands wouldn't smudge the signature. Now it's on display for him to admire. Not only is it completely special to him....but it MATCHES perfectly. I have a tutorial on this one too! So easy and simple!

Remember this little number? I made him way back in June! (and there's a really detailed tutorial HERE) It was finally time to give him a home. And he's very happy there. Go back up to the whole closet pic to see how he looks on the wall. I just think it makes the room look so surfer.


This is my son's favorite part of the room. He says that, "big kids have desks." And he's right. I hope he'll spend many happy hours doing homework and projects at this desk. I couldn't believe that IKEA's new line for 2011 included a desk with orange accents. (and a baby blue desk chair!!) How fortuitous! (that's your dictionary word for today....now you have to use it in a sentence.)

I was also delighted that Wal-Mart's college dorm line included gray AND orange. That lamp was a completely happy $5 accident.


All his little collections have homes in the drawers. He was happy to see that I didn't dispose of his various fake jewels and rocks. (and I don't mind them so much....as long as they have a home)


The centerpiece of the WHOLE ROOM is this awesome surf board. It is HUGE! And thanks to the genius of my little brother....it hangs about 3 inches off the wall. So it's very realistic.

It's made of some kind of wood. I should probably find out what kind....ooops! I made a template and then we used a saw to cut around the outline. Then we used a router to roll the edges.

We decided to paint it with our orange accent color. And it just pops off the wall! I also tried my hand at vinyl...without any fancy cutters. And guess what? You CAN do it! It would definitely be faster and cleaner with a die cut machine. But if you're determined...you can do it. And this design wouldn't be the same without it. Sometimes you just gotta try and see what happens.


One more look at the finished product.

AHHHHHH......

Granted, trying to do this in 5 days was a bit of a stretch. And the resulting massive migraine wasn't fun. But to have it ALL done, with no input from an 8 year old boy...might have been worth it.


I LOVE the colors!
I LOVE the decor!  
Basically I love it all, didn't she do a fabulous job!?!

Read more...
Related Posts with Thumbnails
Emealz - Easy Meals for Busy People!
Home & Garden Blogs Home & Garden Blogs - Blog Rankings

Blogging  tips, tutorials and SEO

From Here to Eternity

  © Blogger template On The Road by Ourblogtemplates.com 2009

Back to TOP