We’ve Moved!


If you aren’t redirected here is the link:


Remodelaholic!


THANKS!

Showing posts with label Wood Flooring. Show all posts

Brightening Up the Dining Room

03 October 2011


Brightening Up The Dining Room

I had to clean my house yesterday for company so I thought it would be a great time to take some photos of what work we've done in some more of our downstairs rooms.

Here's the before picture with navy walls and dated wallpaper. The chandelier that we got on Ebay is already installed (after 4 or 5 attempts).


Here is what is looks like now with the icky wallpaper gone and the dark walls and trim brightened up with light paint.


The table was a local Ebay purchase and the chairs came from the church where my dad and grandfather were pastors and where my parents were married.

The china cupboard was from the Pennysaver years ago and the curtains are from a junk shop in New Brighton called Capo's. It's the kind of shop that is cram-jammed with stuff and the guys who work there know exactly where everything is. Love it.


The opposite side of the room. The desk was my husband's grandma's.

This is one of my favorite things in the whole house. We call it our autograph wall and I got the idea from a wedding I attended last summer where they had everyone sign a picture of the new couple. I'd been raking my mind for wall art ideas and when this one came to me. I love the graphic quality of it as well as the happy feeling I get when I see the signatures of those we love. Makes a great conversation piece too.

This is the mantle...which changes frequently, of course.


The following are all pieces bought at junk shops for a few dollars each.


It's not finished yet. But then, no room in my home ever seems 'finished.'

Half the fun of a house is changing it!                          

                                                 
This project was contributed by one of our fabulous readers! We love to share your projects with this great blogging community. So, if you have projects from kitchen renovation ideas to small bathroom remodels, overhauled and repurposed furniture, spray paint updates you name it please send it in! Thanks for reading Remodelaholic!


Other beautiful dining rooms:

Read more...

Beautiful Entry Update Reveal

21 September 2011

house14
7801440_orig

Read more...

Updated Family Room & New Floor Before and After

15 September 2011

Updated Family Room & New Floor Before and After


It's taken me 19 months (give or take nine years) and DIY detours through just about every room in this house to finally get here...


Finally, already. Geesh.

I've been in my house nearly 12 years, and until about a month ago it never really felt like it was mine. I mean the dust, clutter, piles of laundry, Nerf darts, random Lego pieces and little green army men were all mine; but the feel of the space where I spent most of my time was all wrong. And I got it wrong really, really well.

Read more...

Living Room Makeover From Better To Best

23 August 2011


Living Room Makeover From Better To Best

Immediately I connected with this house because of the open floor plan and good placement of the formal and informal areas, large bedrooms and beautiful neighborhood. This home had loads of character but needed much love and with at least 2700 square feet of shiny white ceramic tile (the house has a total of 4000 sq feet) that had to be removed, it is obvious why few were up to the task. We lived in this house with white tile, bad fixtures and ten, yes ten, tacky metal floor to ceiling pillars in our living room for six years before we hit the ground running with a six month remodel that made this house our home.

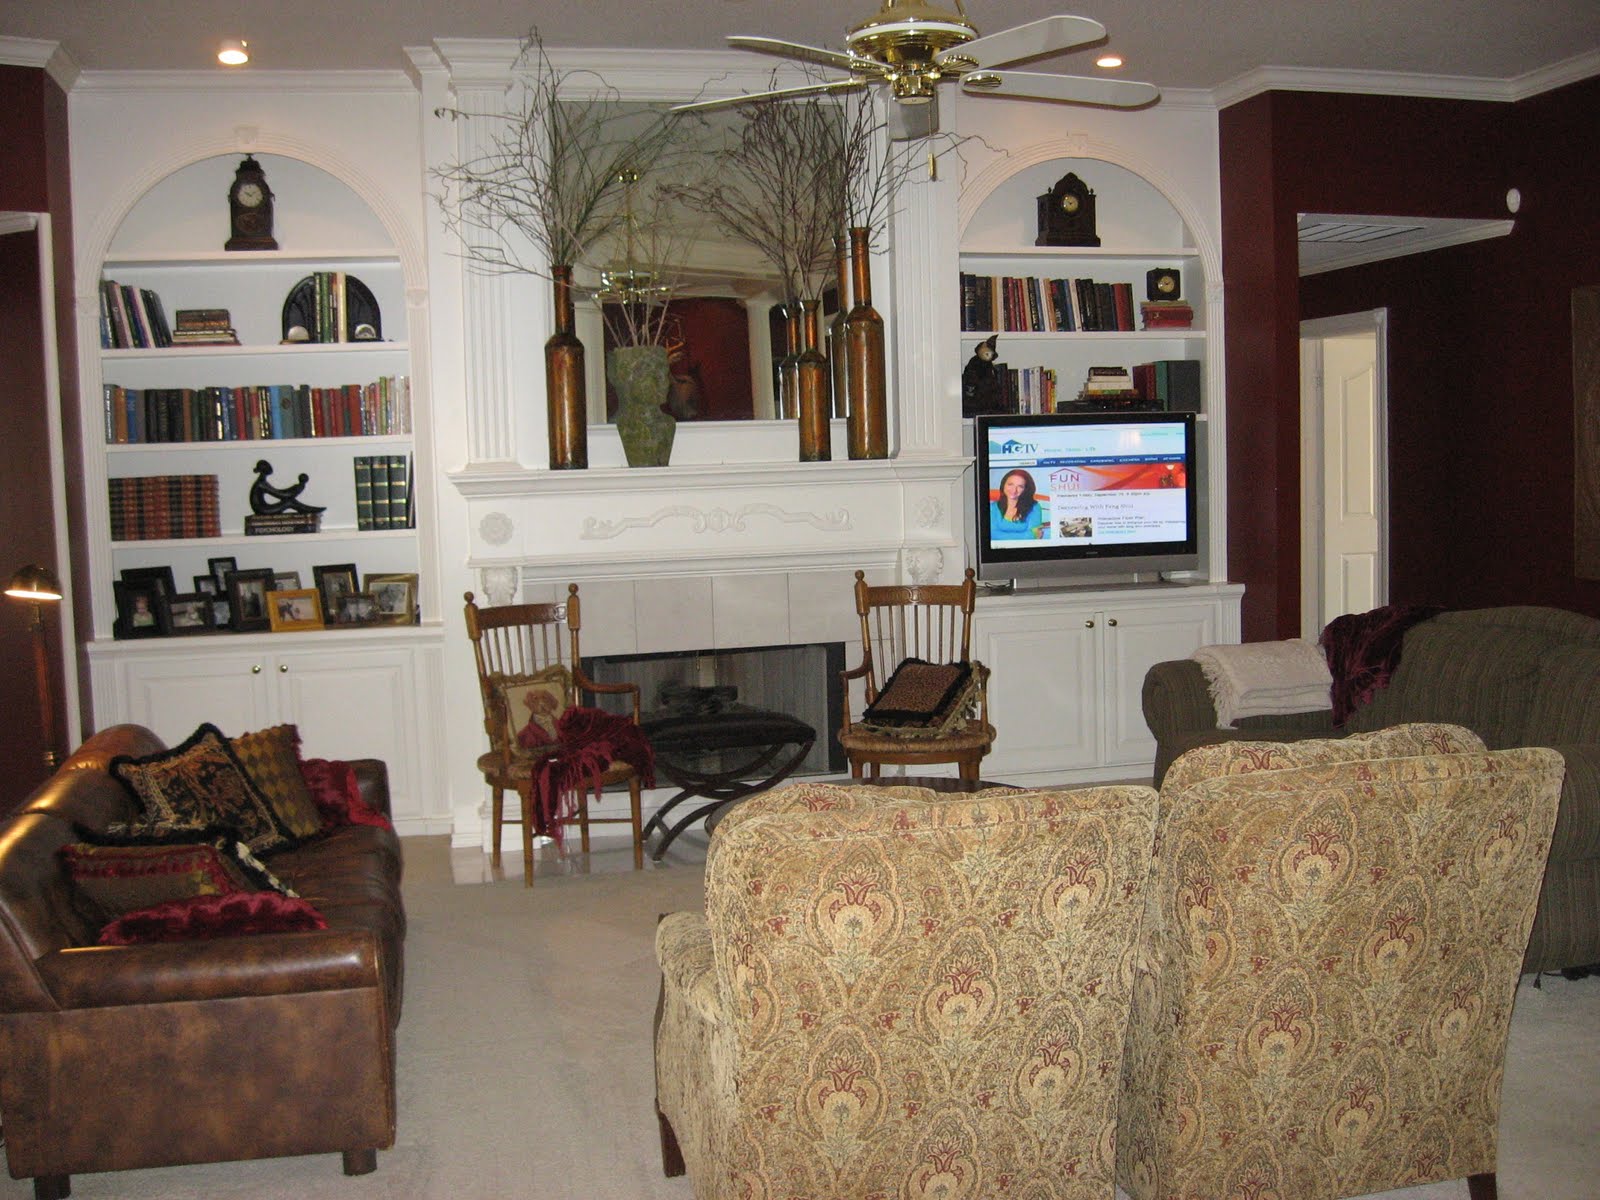
 I have been trying to post a group of before and after photos of our home each week featuring a different room or area. This week i feel that I need explain my way through the living room because at first glance it can be difficult to spot the changes that I found absolutely necessary. Of course we took out the white tile surround below the mantle, took away the white ceiling fan, removed the carpet and removed the mirror above the mantle (that was set into the wood), I got rid of the dark red paint and of course updated the furniture.

Before

We painted the walls and ceiling a warm gray and added black honed granite to the fireplace surround. The entire house, except for the bathrooms and laundry and mud room have these fabulous 5" solid hickory plank flooring accented with area rugs.  

Read more...

Walnut Stain... at last! Stair Update!

11 August 2011

In case you want to follow along, check out these posts too: The Plan, Part 1, Part 2, Part 3 and Part 4

AHH!  I am so sorry that I have let this go for so long!  I have been trying to catch up with life since we got back from North Carolina, and a million things have been on my plate... learning to juggle it all is NOT my forte yet... and can I (sheepishly  Ba- aad Girl!) admit that we are technically not done completely with the stairs so that is another reason why I haven't finished up.  But this is real life... and a hectic one at that, so I am not sorry I am not quite done, but I am sorry to keep you'all hanging!

Okay where were we?  

We just filled the gaps on the sides.  and I painted... and then we lived like that for 1 year (at least...)  Finally a few months ago, after we had installed our flooring I realized that we could finally move forward.  We had been waiting on choosing our living room flooring, because we were trying to match it!

One day while Justin was at work and I had napping babies, I stained the bottom two stairs.

Before the stain, I used a wood conditioner, remember this is pine we were working with soft woods require a stain conditioner to help with even coverage!

 After the stain conditioner is applied, you can't see much of a difference?... well the gloves are moved.

 And finally stained!  YEA! 

This happened to be stain that we just had on hand, Minwax Dark Walnut Oil Based Stain, but you can see below that it matches really well, and will look even closer with a coat or 4 of poly!

Read more...

Amazing Attic Renovation: Boys Bedroom and Bathroom

17 February 2011

Amazing Attic Renovation: 
Boys BedroomAnd Bathroom
contributed by ewe hooo!


This is the doorway to the bedroom my sons share. Funny, you'd think this would be the messiest room in the house— two boys sharing a room. But guess what? It's the neatest! Yes, after eleven months of paint-staking attic renovations (by my brother-in-law) and one home equity loan later, our boys prefer sleeping in the guest room downstairs. But I digress. The wooden arch was carved from a tree branch in my brother-in-law's backyard. Double pocket doors slide closed for privacy when they're older.


Read more...

Remodeled and Beautifully Decorated Dining Room

24 January 2011


Remodeled and Decorated Dining Room
contributed by View Along The Way

If I had had the opportunity to invite you to dinner at our home about a year and a half ago, we probably would've enjoyed a classic peanut-butter-and-jelly while perched atop five-gallon drums of paint or sheetrock mud.

But if you'd declined, and we rescheduled for a few months later, you would've enjoyed a much finer dining experience: something microwaved, enjoyed from the futon in our bedroom, because that was the only room with real chairs.

If you'd been smart enough to postpone once again, we would've greatly upgraded your quality of food (well, not that greatly - I'm still figuring out this cooking thing) and served from our couch and ottoman downstairs.

But today! Today we would feast from an actual table and actual chairs in an actual dining room, like grown-ups!

And of course, when it's just Andy and me, we always take our meals in the dining room, and never on the couch anymore. *Cough.*

But why would we have avoided the dining room in the beginning? Because it looked like this:

Gleaming brass chandelier, wallpaper remnants clinging to the walls, unsanitary carpet underfoot, and glorious popcorn ceilings.

From mid-demo: most of the wallpaper was gone, carpeting ripped up and popcorn ceilings removed.
Shortly after: my dad helped us install and paint the picture molding around the bottom of the room and the upgraded crown molding at the top. Then everyone put the pressure on me to choose a paint color.

Read more...

Kitchen Remodel With New Floor, Wall, Island, and More

18 January 2011

Kitchen Remodel With New Floor, Wall, Island, and More
contributed by A Whimsical Bohemian

Well it's been a 2 month process but we couldn't be happier with the outcome of our kitchen makeover 2010.  I am beginning this post with some "before" and "after"s of various elements that went in to the makeover and ending with full kitchen shots. Click on photos to enlarge them...some may not be as sharp or well lit as they should be but it took me forever to just get these.  It's really hard to tell in photos but although we did NOT enlarge one square inch of the space it seems WAY bigger now. It feels warm and comforting and over time, as we all do, bits and bobs may change around and it definitely needs a plant or two and some real flowers on the table. Soon we'll be adding a bit of Christmas in there as well.
At the end of this post I've listed some product information you may or may not be interested in.
**********************
I call it our "Urban Farmhouse French Italian Eclectic Kitchen" (quite a mouthfull, eh?) Just don't call it "country".
So to start with we earlier began by replacing the large sliding window.....long before we began anything else we had that done. That thing nearly broke my shoulder everytime I tried to open it.
Windowbefore
Old window....cluttered and the colors looking like an easter egg.
Newwindows
Changed to two double hung, energy efficient windows installed through Sears....AND new pendant lights BohoHandyman installed with can light conversions.

Read more...

Amazing Plank Look Plywood Flooring Tutorial

10 January 2011

Amazing Plank Look Plywood Flooring Tutorial

When recently redoing the room above our garage, we decided that we were DONE with the carpet. Our plans were to rip it up, plank the floor, and then paint it. We never expected the plywood planking that we made to look good enough to STAIN!

Yup, that’s plywood!


Here are the instructions:

Read more...

Wood Floors Over Concrete Slab

14 December 2010

Wood Floors Over Concrete Slab

So my sweet puppy Nala...ate a pen. She made this huge stain on our bedroom carpet. It was like the entrance to Hades. It was terrible.

After much threatening of staining our concrete floors, Stuart finally gave in to putting hardwoods in our bedroom. We planned to do hardwoods in our house but not this early and def not in the bedrooms. Oh well...


Thus began the Bedroom project...let me know what you think! We have a few more house projects coming up which I'm excited about but it sure is hard work.


So for a few days, this is what my bedroom looked like. Stuart had ripped up the carpets but saved 2 pieces for us to step on. But still, that concrete looks GROSS and we had tons of wood everywhere because hardwoods have to acclamate to the temperature in the specific room it's going to be in...


Then it was D-Day. All furniture moved out, we started painting the walls a very light gray which i'm currently IN LOVE with.

Stuart started with painting....we chose a light grey to kinda match the grey/teal/brown/tan theme we have going with our curtains and bedspread. Here's a tip when you choose gray. Use a FLAT gray otherwise you'll see streaks from your roller and paintbrush everywhere...and with Gray, you absolutely have to do the "cut ins" (which is what Stuart is doing in this photo), in two coats. We started out with one coat and then rolled the room with 2 coats and the cut ins stuck out like a sore thumb. They dried darker than the walls...so we cut in again and it looked perfect!


You have to lay a tarp! who knew? If you have a slab house, these floors are great but you have to lay something in between the slab and the hardwoods. I finally learned the real purpose of duct tape...=)
See my stool on the end? I was cutting in on my tippy toes while Stuart laid the floors. One thing about these floors is that you just have to keep hammering them in. Sometimes they look like they are sticking out, but as soon as you put the next row in, they will come back down. The trick is to pop in the sides first before popping in the entire row. Does that make sense?


We bought a kit for self-installating people. HOWEVER, the quarter inch spacers they gave us were TERRIBLE. So after much agony and cuss words  prayer, Stuart decided to screw in the spacers to the wall. The other tools like the black thing in Stuart's hand...was supposed to avoid breakage when hammering in the hardwoods...it had about a 98% success rate of not breaking off the tougue and groove parts.


Done! It took us about 1 day to finish it all. Do you like it?


Read more...

How To Finish Solid Wood Flooring; Step by Step

23 November 2010

How To Finish Solid Wood Flooring; 
Step by Step
 By Rebekah of Potholes and Pantyhose

It’s so great to be a guest blogger at Remodelaholic! I’m Rebekah from www.potholesandpantyhose.com and I blog about my life on the road with my musician hubby, my remodeling projects, my photography, and the arts and crap that I enjoy making from cast-offs. I try to maintain a somewhat normal life, however, normalcy keeps escaping me.

Let me give you a disclaimer on this tutorial-I am not a professional! There may be better ways to do this process, but this is what I have found to work for me over the many years of laying and refinishing hardwood floors.


You may be apprehensive about tackling something as ominous as hardwood floors. I am not apprehensive about almost anything, so let me be your guinea pig on things such as this.

You can sit back, sip some tea and learn from my mistakes.


When I first heard of this task, I ran the other way and hid in a dark corner for several hours. There was whimpering involved.

I mean, we’re talking scary, noisy machines that could inflict pain.

I could permanently damage the wood by sanding too deep.

I could pick the wrong stain and have to live with it that way FOREVER!

And, then I realized....these are just floors. Boo-hoo if I screw it up.


What you’ll need (get a pencil out):

Knee pads & dust mask for your own comfort
Polyurethane
Stain (if desired-I didn’t desire)
Pole Sander & 220 Grit pole sander pads
Lamb’s Wool Applicator (bahhh...)
Palm Sander and 110 Grit Sand paper
Mineral Spirits/Paint Thinner and rags


You’ll need to rent a belt sander and an edger.

You will need to also buy three grits of sandpaper at the rental place. Usually they’ll start you at 100 grit, then 80 and finally 36.

For new wood you can start at 80 like we did and then move on to 36.

You’ll also want:

Paint trays and liners for the poly
Rubber gloves to apply the poly
Foamy brush to get the poly in small places
Wood fill & applicators for wood fill
Sheets of Plastic & Blue Tape

Tape off all doorways, cabinets and anything else you don’t want completely covered in a thick, fine layer of icky brown dust.

I would recommend blue painter’s tape-however, when you run out, you may use masking tape as I did...

With the belt sander UNPLUGGED, insert your first piece of sandpaper. Since there are so many different kinds of sanders, ask the rental company how to put the sand paper in. Or, you can email me and I can show you how with this particular model.


Always sand in the direction of the wood grain with the largest grit sandpaper first. Because this wood was new, I started with an 80 grit.

Gently make contact with the floor while the machine is in the ‘ON’ position and you are moving forward. Walk slowly towards the other side of the room.

When you are a foot or so away from the wall (or another end point), lift gently up on the machine while still moving forward. Turn yourself & the lifted up machine around like you are mowing a lawn. Head back, baby, in the other direction. Do this until all of the floor is sanded.

Transitioning gently onto the floor with the belt sander will prevent large dips/ruts from being taken out of the wood.
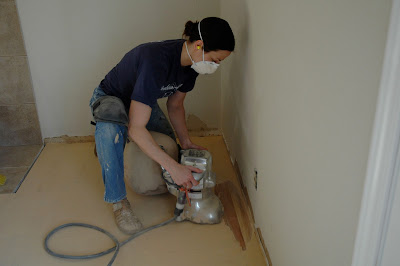
Now, that your floors have been sanded all the way through....time for the edger! Strap on your knee pads and get ready to bulk up on your forearm muscles.

You will use the edger to get right up against your walls and inside of your closets. This thing is a little tricky, but with the right positioning, it won’t get away from you.


Use your palm sander to get into those tiny places even the edge can’t get into.

Don’t I look lovely? I had brown boogers. Gross.

Because we were sanding new floors, after the first sand at 80 grit, we were able to wood fill all of the nail holes and knots in the floor next.

If you are sanding old wood floors, you will do wood fill after you have sanded/edged twice: once with the 100 and then the 80 grit.

After the wood fill has dried (read directions on the packaging), sand and edge the floors again, removing all of the wood fill with your last grit of sand paper.

This is how you will look after all of the sanding is completed. Now, go to bed and get some rest.

Blow out the brown boogers as much as possible.

Tomorrow is a big day-we’re going to finish this project and make your floors so shiny and new!

From our list in ‘Part Uno’, this is what you will need today:

Shop Vac
Rubber Gloves
Polyurethane
Stain (if desired, I did not desire)
Paint Tray & liners
Foamy Brush
Lambs Wool Applicator
Pole Sander & 220 Grit Pole Sander Pads
Mineral Spirits/Paint Thinner and rags
A good attitude


First things first; using your shop vac, suck up all of the dust particles from every square inch of your newly sanded floors.

This step sucks! heh heh.

I recommend dust mopping the walls and vacuuming off ledges and shelves, as well.

Spread a generous amount of the paint thinner/mineral spirits onto your rag and take a big wiff of it. Now that you are dizzy, wipe the entire floor with your smelly rag. This removes the fine particles left behind by the vacuum.

Guess what?!

If you want to apply a stain, this is the time to do it. Use a lintless rag to apply your stain evenly to the floor.

If you are like me and aren’t applying a stain, it’s time for Round 1 of polyurethane! Grab your rubber gloves, make a bird out of them (shown above) and get pumped.

You can skip the ‘bird’ step if you like.

Gently stir your poly in a clockwise rotation with a clean stir stick.

Don’t pull up from the bottom or stir quickly. This will create air pockets in your poly. And that is not good...

You will want to stir your poly (both in the can and in the paint tray) from time to time throughout the application process.

Pour your poly very gently into your paint tray. I recommend using a liner in your paint tray or you will have a sticky mess on your hands and everywhere else.

Dip the Lamb’s Wool Applicator gently into the poly, pulling back until the applicator is full.


Start in the furthest corner of the room and plan how you are going to get out of the room. (Don’t poly yourself into the corner. That’s just embarrassing.)

Using even strokes, gently pull the lamb’s wool applicator towards you, following the direction of the wood. Repeat this until the floor is coated with polyurethane.

It’s easy to miss spots or leave puddles. Review your work as you go, using different viewing angles.

Let the first coat of poly dry. Follow the amount of time recommended by the manufacturer.

Every poly is a little different. I’ve always said that.

After the floor has had enough time to dry, use your pole sander and your 220 grit sand paper to smooth out any bubbles or high spots from pooling poly (can you say that 10 times fast?) following the direction of the wood.

You can also rent a buffing machine, but I like to get a shoulder workout. And, I’m cheap.

Vacuum the floor thoroughly after you are done sanding.


Now, it’s time for Round 2 of polyurethane!

(Follow the same instructions from Round 1 for applying the poly).

Let ‘er dry. YEAH!!!!

You are finished. Look at that floor! And you did it all by yourself.

Follow your manufacturer’s instructions on dry time. Usually you can walk on the floors 2 days or so afterwards.

You did a great job.

And THAT’S how a woman does it.

Come visit me at www.potholesandpantyhose.com and let me know if you want to see more crazy projects completed by me!-Rebekah

Read more...
Related Posts with Thumbnails
Emealz - Easy Meals for Busy People!
Home & Garden Blogs Home & Garden Blogs - Blog Rankings

Blogging  tips, tutorials and SEO

From Here to Eternity

  © Blogger template On The Road by Ourblogtemplates.com 2009

Back to TOP