


Walnut Stain... at last! Stair Update!
11 August 2011
In case you want to follow along, check out these posts too: The Plan, Part 1, Part 2, Part 3 and Part 4
AHH! I am so sorry that I have let this go for so long! I have been trying to catch up with life since we got back from North Carolina, and a million things have been on my plate... learning to juggle it all is NOT my forte yet... and can I (sheepishly Ba- aad Girl!) admit that we are technically not done completely with the stairs so that is another reason why I haven't finished up. But this is real life... and a hectic one at that, so I am not sorry I am not quite done, but I am sorry to keep you'all hanging!
Okay where were we?
We just filled the gaps on the sides. and I painted... and then we lived like that for 1 year (at least...) Finally a few months ago, after we had installed our flooring I realized that we could finally move forward. We had been waiting on choosing our living room flooring, because we were trying to match it!
One day while Justin was at work and I had napping babies, I stained the bottom two stairs.
Before the stain, I used a wood conditioner, remember this is pine we were working with soft woods require a stain conditioner to help with even coverage!

After the stain conditioner is applied, you can't see much of a difference?... well the gloves are moved.

And finally stained! YEA!

This happened to be stain that we just had on hand, Minwax Dark Walnut Oil Based Stain, but you can see below that it matches really well, and will look even closer with a coat or 4 of poly!

Now here they are from the opposite direction with a coat of Poly they pretty much disappear! NICE!

Okay, I had to stain the rest, and we could have removed each tread but I was too impatient- so I just taped them off and stained away. I actually stained every other stair, I'm not sure I would have thought of this, but that is what Kate did, and it was a genius idea. If bloggers are good at one thing, it is using great ideas they find on other blogs... gotta love blogdom!

Okay conditioner again! See if you notice my little help in the picture. I have an object sitting on each unconditioned stair so that I wouldn't mix them up!

Stain...

At this point we had the two landings to deal with. We decided to use a 2 x 6 as the nose, since it would match the existing treads, and was a lot cheaper than the alternative.

Before:

One 8' 2 x 6 is all we needed, and Justin cut it on the table saw, so that the back was as thick as the left over flooring we had from the living room (Actually, this is where it was good luck came in. You see, when you install flooring you are supposed to add 10% or so for waste, so we had just enough for the stairs!... without wasting any flooring! I LOVE that!)


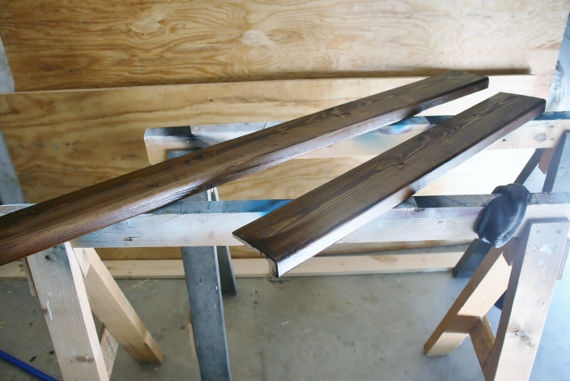
Before they are installed:

After:


You can see that the nose matches the other stairs perfectly! YEA!
and yes I realize the risers look awful! Good things come to those who wait...
and yes I realize the risers look awful! Good things come to those who wait...

Dry fitting the flooring.

Then, after cutting the boards to fit, we just glued it down... and stacked as many heavy things on there that we could find for the night to make sure they would stick down- FOREVER!


Oh, and my college Chartpak markers come in handy every now an then for quick fixes... good thing cuz we almost went broke buying these babies, that are like $4.00 EACH!! YIKES!...bikes... name the movie!


A quick coat of poly... by the way I went with water based... I will go with oil next time, it is just so much stronger and considering the traffic a much better choice. We've already had a few nicks... but we just chalk it up to character! ( I have an explanation for everything!)

A look down at the finished treads!

And a look up... obviously the risers are in need of some finishing... coming soon!

Here is a reminder of the before for fun:

Apparently Buddy likes to have his picture taken, which on a personal note makes me So sad because we had to place him in a new home a few weeks ago, due to some aggression issues he had with our other cat, that made it to unsafe to be around the babies. We miss you Buddy, but love you.


What is next... besides risers...
Excuse me while I do a happy dance in my painting clothes...
and hug a tree, uh- I mean newel post, it was a tree once, right?
In case you want to follow along, check out these posts too:
 Remodelaholic is written by Cassity and Justin. Cassity has a degree in interior design and Justin is a landscape architect, so we adore everything that makes up a HOME! We love to share home remodeling ideas and projects we’re working on. From huge kitchen renovation ideas to small bathroom remodels, there isn’t anything we won’t try to tackle (at least once!). We are in the midst of our third whole home renovation, (check out house 1 and house 2 as well, so there should be a lot more inspiration coming your way. We hope that you will stop by often for home design inspiration, tutorials, interior design tips, delicious recipes and what going on in our family life.
 Labels:
Our Projects,
Park House,
Park House Entry,
Stairs,
Wood,
Wood Flooring
Labels:
Our Projects,
Park House,
Park House Entry,
Stairs,
Wood,
Wood Flooring


19 comments:
wow- those are BEAUTIFUL and i want to hug them, too!
Beautiful things come to all those who wait....(and have patience, and vision and a great eye for color..haha) love the walnut stain, what a perfect choice! Its so elegant and timeless.......love it!
Absolutely beautiful! I wish we I had guts to do big reno's like that! It's gonna be well worth it.... congrats!
Pamela @ pbjstories.blogspot.com
You're too funny! The stairs look really great- so classy.
Um, fantastic. I love that you opted to stain the treads which match perfectly. Seriously jealous of your amazing staircase.
We did a similar project a few weeks ago - and we used the same "every other step" method too - LOL! It's a lot of work - but sooooo worth it when it's done :) They look amazing!
The stairs look terrific! I wish I could do this to my stairs that go down to my workshop.
So so sooooo beautiful!!! You guys rock!
I really want to rip up the carpet on my stairs. But I know it would be such a huge process that I can't do it for a few months (or years!).
Gorgeous! Almost makes me want to rip out the carpet we have on the stairs going down to our basement... but then there's no telling what we would find underneath, haha! Maybe in our next house. ;) But I LOVE love LOVE your stairs! They're gorgeous and totally worth the effort and wait!
~Chelsea
What a fantastic transformation!
I LOVE it!
xoxo
So much work, but totally worth it...looks great!
I am a new follower on your blog site it would be so kind if you could follow me back in return thank you so much :)
Tara
They look amazing already! Can't wait to see the whole thing finished.
So pretty! And of course that line is from Never Been Kissed! Love it all- your stairs, that movie, you and your happy dance.
The stairs look wonderful!
Just thought I'd let you know that I included this post in my coud de coeur of the week post.
http://dreamitbuilditstyleit.blogspot.com/2011/08/coud-de-coeur.html
How many coats of walnut stain did it take you to achieve that look. Gorgeous!!
Angie,
Just one good coat, I lay it on thick and don't forget to use the conditioner before! But that was it, then wipe up the excess!
Cassity
Post a Comment