We’ve Moved!


If you aren’t redirected here is the link:


Remodelaholic!


THANKS!

Showing posts with label Our Home. Show all posts

Filling the Gaps: Stair Remodel

21 June 2011

In case you want to follow along, check out these posts too:  The Plan, Part 1, Part 2 and Part 3

If you remember the last time we talked "stairs", we were left with these huge gaps on the side of each stair- ugh!  I have seen people handle theses gaps in a number of ways.  One that sticks out in my mind is covering it with moldings and sort of wrapping the molding around the stair nose etc.  

But I have to admit, I was not a huge fan of the finished look, and I usually LOVE moldings.  But wrapping them just seemed like an after thought, and one of my main wants for our stairs, is that they look like they had always been done properly.  Which means we had to do a little more deconstruction before hand.  (You don't call me Remodelaholic for nothing!)


When we cleaned up the stairs, we took off each tread and sanded and routed the nose.  Then put them back in place with some screws for a temporary hold.   Later as we finished the project they would be easy to remove when necessary but we could still walk up and down safely -just a little tip in case you are trying this at home, until you are DONE don't re-glue and nail yet!

Anyway, to fill the gap we started off by adding a diagonal molding that runs just above the nose of each stair tread from the bottom stair to the top.  This created a triangular space above the stair support.  Which meant all we had left to do was fill that space.  We (meaning Justin- good thing someone is really patient in this family!) carefully measured each triangle that was left below the molding and cut out a piece of MDF to fill it up.


Nailed in place it looked like this(below).  We also traded out the molding we had in the pictures above to a simple basically rectangular molding to simplify the profile.

We had to trim or straighten the cuts on some of the treads, but for the most part, this little triangular molding, just filled the existing huge gaps.

When they were all nailed in place, I caulked any gaps, and we installed the risers (even though they will be covered) and painted a few coats of white paint.


Then we screwed the treads back in place  (so we could still move them later if we needed to!) 
Finally it looked like this:

And do you want to see a preview of the next post or two?  I am just giddy to almost have this done after 2 years!  By the way, in the picture below, Etta does this new thing.  When I say "Smile"  
she closes her eyes really tight it is pretty funny!


For the rest of the story, check out these posts too: The Plan, Part 1, Part 2, Part 3, Part 4, Part 5, Part 6 and Part 7

Remodelaholic is written by Cassity and Justin.  Cassity has a degree in interior design and Justin is a landscape architect, so we adore everything that makes up a HOME!  We love to share home remodeling ideas and projects we’re working on. From huge kitchen renovation ideas to small bathroom remodels, there isn’t anything we won't try to tackle (at least once!).  We are in the midst of our third whole home renovation, so there should be a lot more inspiration coming your way.  We hope that you will stop by often for home design inspiration, tutorials, interior design tips, delicious recipes and what is going on in our family life.

If you like this post please check out these other project updates:

Read more...

Black and Decker Rapid Roller Review and Giveaway!

This Giveaway is Now Closed!

My sweet little Lydia is now 4 months old...
(your welcome!)

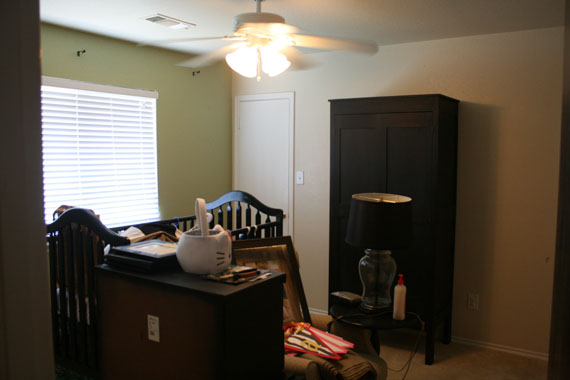
Busy mother that I am, I am just now starting to decorate her room.  I had a different plan about switching the girls rooms at first but Lydia had a different plan.  She would only sleep on her tummy- so bassinettes were out.  I was having panic attacks every night with worry about her not being on her back, and finally in the end just bought another crib of her own so there would be plenty of clear space- no bumpers and fans on at all times.  

About 2 weeks after she was born, we moved around about every piece of furniture that we own to make it all work, and that was about as far as it got.  BUT finally Lydia's room is painted... she won't remember the first 4 months of randomness... right? (Let's be honest, I'm really not concerned even if she does, she is loved and wanted, that is what counts- not wall colors!)

Anywho, for this project, I got to try out Black and Decker's Rapid Roller.  It made super quick work of this project!! Thank Heaven!!  Time savers are essential because with two girls under 2 (and running this blog) I really don't have a lot of extra time.

Before most of the furniture moved to center of room:
 

Opening up the box. WOW!

Cutting in.  So according to some pictures I have seen of this product, you might be able to avoid cutting in if you use painters tape, BUT I hate painters tape- I never use it.  A good quality (like Purdy) angled 1 1/2 inch brush is all you need.
 

Justin felt like he should take a picture of me using it... yikes.  I should start putting makeup on when I work on projects... and maybe brush my hair, maybe.

  I had to show this image(below), so you can see how the head pivots in different ways. COOL feature!

It also had this cool stand, which reminds me of a bike... don't know why I just mentioned that.

The color is off in this picture, it was 12:00 pm at night... and I really have poor camera skills!

The next day, I did a little decorative painting which I LOVE.  I wasn't quite sure if it would work but I am super happy with it.  I will show you more pictures soon as I actually finish the room.  And more of the process.
Paint color: Martha Stewart Lagoon MSL125

But for now...

Do you all need a new tool? ( I know how you feel!)
Good, I am here to help-or rather Black and Decker is!
Key Features:
Just Use the Paint Can Lid
Holds Paint in the Handle 
Exclusive Pivoting Roller Frame has 3 Angles 
EZ Fill System 
40 Degree Angle 
Easy to Use 
High Quality Perforated Roller 
80 Degree Angle 
Use only perforated Rollers 
Exclusive Kick Stand 
Includes Spatter Shield
Want one?
One reader will win their own Rapid Roller!

To enter:
Leave a separate comment for each entry (on the blog please for it to count)

1) Like Black & Decker on Facebook leave a comment saying you did.
2) In another comment let us know what kind of painting project you’d tackle with a RapidRoller.

Optional Entries:

3. Pin, or Stumble your favorite Remodelaholic post or image.
4.  Write a post, on your facebook wall, or tweet about this giveaway (include a direct link to the giveaway in your post, etc. please)   Add the url link to the comment you leave here.
5. Add Remodelaholic to your blog roll!!!  Become a Google Friend Connect public follower, Like Remodelaholic on Facebook, become a twitter follower an RSS subscriber 


Read more...

The Next Step, Staircase Remodel Project

08 June 2011

Sorry I am so slow with posts.... honestly it drives me crazy not having the time to do it, but hopefully when I grow up I will be really good at it!  (that is IF I ever grow up...hum)

The last time we talked about the staircase remodel we had removed the railing and all the carpeting, and begun to redesign the newel posts.

The Plan


So let's show you what we did next.  We were left with this:


If you remember our plan rendering, the bottom two stairs are wide to help make it feel more custom and not so builder grade.  Which means we needed to build them out a bit.  Well, that translates to a longer "Honey Do List".

Poor man, I am not sure he was planning on a life of servitude when he asked me to marry him.  (good thing he actually likes this kind of work!) THANK YOU HONEY!


When working on these sort of projects, we usually put the babies to sleep, grab a treat, and a bunch of scrap paper and wood so that we can discuss (in 3d) how we each see it working, and what looks right.  We move these little scraps around, do a lot of measuring, discuss a little, draw a lot of little sketches and then when we are happy and the project gets on it's merry way!


Once the pieces were all measured and ready to install, we (okay, maybe not we exactly just Justin) cut the flooring out of the way.  Then nailed and glued the new stairs supports in place.


We also took off all the stair treads one at a time and sanded them, to get all the junk off- namely the heck-a ugly plaster texture that landed on the stairs from the walls- (my love for this house would be so much more if it didn't have that darn texture on the walls (and everywhere else it landed...urgh!)

Anyway, while the stairs were off we also routed the front two edges, to give them a prettier nose.  Then we put them back down temporarily held in place with a few screws (there were still a few problems that needed  to be addressed- that I will show you next time)

Like all the Christmas and other holiday storage boxes under my stairs?... No I didn't spend money on pretty boxes, darn!


Next Justin installed the bottom two treads, by gluing them with construction adhesive and the framing nailer.

We actually had to buy two more 2 x 12's, and since the stairs were so much bigger, and we couldn't use the original.  In order to make them look sorta older like the others, we choose to just nail them right in and not hide the nail holes, because the other boards still had theirs showing.


The second stair tread slid into place around the future newel post support.


Okay, so now the treads are in place, sanded and ready to be finished, the problem?  A minimum of 1/2 inch gaps on either side of the treads (see picture below).   So we had to figure out a way to fill the gap.  Which I will explain next time.


Read it all: The Plan, Part 1, Part 2, Part 3, Part 4, Part 5 and Part 6


Remodelaholic is written by Cassity and Justin.  Cassity has a degree in interior design and Justin is a landscape architect, so we adore everything that makes up a HOME!  We love to share home remodeling ideas and projects we’re working on. From huge kitchen renovation ideas to small bathroom remodels, there isn’t anything we won’t try to tackle (at least once!).  We  are in the midst of our third whole home renovation, so there should be a lot more inspiration coming your way.  We hope that you will stop by often for home design inspiration, tutorials, interior design tips, delicious recipes and what is going on in our family life.


Read more...

Off with their heads....I mean doors? PR 7

01 June 2011

Removing Kitchen Cabinet Doors
Progress Report 7

The next project that I am DYING to work on is my kitchen.

Maybe that is why I am so fixated on showing you great painted kitchen remodels... like somehow if I post about someone else's awesome remodel ours will magically -  Bippity- boppity - BOO! - start and finish itself.

A girl can dream right?

Anyway, our neighbors told us they are planning a garage sale in a couple of weeks so I have been filling up junk boxes so we can join them on the same day and maybe bring in a few more shoppers.  I just want freedom from junk... and plenty of extra space.

So, while cleaning of the top of the fridge (and removing all items from that top cabinet to sell, since I haven't even opened it in about 2 years) I decided to go ahead and remove the upper cabinet doors.

Before (from a while ago!):

After:

It may not be a huge "wow" project, but I can finally use that space, so YEA!

Before the doors were always blocked some dishes that sit on top of the fridge, and the cook books were on the book shelves in the front room(which bugs me, I'm a bit of a purist- cook books should be in the kitchen, where they are used or given away.  But now, I have a place in my kitchen for them and am not wasting that cabinet space.

So, for about 30 seconds of my time (the time it took to unscrew the doors) I have a much more useful space... until we rip out this cabinet in a few months!!!  Or maybe next week if I get too antsy!

What do you think?


Remodelaholic is written by Cassity and Justin.  Cassity has a degree in interior design and Justin is a landscape architect, so we adore everything that makes up a HOME!  We love to share home remodeling ideas and projects we’re working on. From huge kitchen renovation ideas to small bathroom remodels, there isn’t anything we won’t try to tackle (at least once!).  We  are in the midst of our third whole home renovation, so there should be a lot more inspiration coming your way.  We hope that you will stop by often for home design inspiration, tutorials, interior design tips, delicious recipes and what is going on in our family life.

Read more...

Working With What We Have Stair Treads PR 6

10 May 2011

We left off our stair remodel with a big huge MESS! And it was about to get messier pretty quick.  If you noticed in the plan, from before we had the newel posts moved back to open the space.  So we got to work on that deconstruction/construction next:

We plan on re-using the railing so we took it apart carefully and actually left a lot of it intact.  Anything we did cut we made sure to cut a little long.  Here Justin is cutting back the railing and removing it all:


 In the next few photos we should play the game, Where's Buddy?


You can see behind Justin that the railing is still mostly in one piece.  (and technically it still is...just sitting in the closet, not on the stairs, but hopefully soon!)  The next side is on the chop list!!  The space already feels SO much bigger!!
Then we started to remove the portion of the wall where the newel post is going to be.


Not photographed we nailed in a support for those boards in the wall (above).  Then installed the structural part of the post.  Don't laugh at us if we don't do it exactly right we wanted to make sure it was nice and strong, and you better believe this thing is not coming out.  When we are closer to getting done, we will put the pretty part on top of it.  We also re-used bits and pieces of 2 x 4wood that we already had, so some of it is randomly painted.

Below Justin is showing what it will look like once it is in.
 The actual building begins.


So the newel post structure is in, but the stairs are still atrocious.  More to come.


In case you want to follow along, check out these posts too: The Plan, Part 1, Part 3 and Part 4


Remodelaholic is written by Cassity and Justin.  Cassity has a degree in interior design and Justin is a landscape architect, so we adore everything that makes up a HOME!  We love to share home remodeling ideas and projects we’re working on. From huge kitchen renovation ideas to small bathroom remodels, there isn’t anything we won’t try to tackle (at least once!).  We  are in the midst of our third whole home renovation, so there should be a lot more inspiration coming your way.  We hope that you will stop by often for home design inspiration, tutorials, interior design tips, delicious recipes and what is going on in our family life.

Read more...
Related Posts with Thumbnails
Emealz - Easy Meals for Busy People!
Home & Garden Blogs Home & Garden Blogs - Blog Rankings

Blogging  tips, tutorials and SEO

From Here to Eternity

  © Blogger template On The Road by Ourblogtemplates.com 2009

Back to TOP