Showing posts with label Stairs. Show all posts
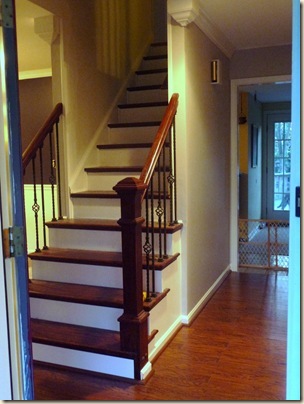
Beautiful Open Staircase Reveal
29 August 2011
Beautiful Open Staircase Reveal
We finished the floors two days before Easter.
Oh yeah - down to the wire and stressing out about having a floor to walk on for all the people coming to the house for Easter.
That's how we roll....
Just to give perspective, here are a few before pictures.
The dining room looking into the entry hall and the sitting room beyond.
The other side of the wall. The sitting room looking into entry hall.
Nice and open now....
The stairs are rebuilt (here, here and here the dreaded floor is being installed.
And FINALLY....drum roll please.....
AFTER!!
The stairs - looking in the front door.
And Baxter Boy makes an appearance....the dogs were never far from theconstruction.
The sitting room looking into the entry hall and dining room. Notice the lack of wall - ha!
And Chauncey - the wonder dog.
Dining room looking into the entry hall and sitting room
The sitting room.
I still need to finish the furniture, change the light fixture and hang pictures.
The little green chair belonged to my great-great Aunt Pearl. Love it.
I love how cozy this room is at night.....
So, there you have it. Whew!
Now I have a lot of furniture to refinish.
Which is good because Brian told me that if I start another project, he's sooooo outta here.
I'll give him until the fall before I start something else - ha!
Which is good because Brian told me that if I start another project, he's sooooo outta here.
I'll give him until the fall before I start something else - ha!
This project was contributed by one of our fabulous readers! We love to share your projects with this great blogging community. So, if you have projects from kitchen renovation ideas to small bathroom remodels, overhauled and repurposed furniture, spray paint updates you name it please send it in! Thanks for reading Remodelaholic!This absolutely took my breath away! If you loved this too, you'll also love these!
Labels:
r,
Remodeling,
Stairs
How We Built Our Custom Newel Posts; Tutorial
23 August 2011
How We Built Our Custom Newel Posts Tutorial by me
Most recent picture like 2 exactly minutes ago!...still not done but really getting there...
Okay guys, as you know (or I hope you do) we love to amp up the style in our home with architectural elements. So, when it comes to our stair project the newel posts were a really important feature. I wanted big and chunky- no skinny "model sized" newel posts for me- give me some meat!
I know I haven't shown you the final... I am still working on finishing caulk and extra coats of paint, but we were asked a while back on how we built our newel posts. I passed the job on by asking my handy hubby to make a tutorial up for you all! He broke the project down into 10 simple images to show you the steps he took to accomplished the look that we wanted -simple, yet elegant. Now this may or may not be the "correct" and "proper" way to build a newel post, but it worked for us and they are super solid and easy to make happen.. so there you go!
Feel free to use our ideas and make a beautiful version of your own, ***all I ask is that you please link back to this tutorial if you blog about it AND I wanna see what you do, so please just be sure to submit them to be featured! Please let us know how yours turn out. We would love to share it with everyone.
On to the -uh- quasi tutorial!
Labels:
Entry Hall,
Journaling,
Our Projects,
Park House,
Park House Entry,
Stairs
On the Rise; Adding the Stair Risers, Finishing the Runners
18 August 2011
Well, today yesterday was one of those days, we ran out of diapers, forgot about our play date (but did make it a little late), the babysitter just didn't show up, or call... I'm still sorta ticked about that... we ran out of towels...(which means 4 loads of just towels to wash, and I am not exaggerating...) I feel like nothing got done... and really the ONE thing I did get done (cleaning off the kitchen counters) was undone when I made dinner, which is still there since I am typing this...... sigh.
But, I thought I would show you a little more of the stair project. In case you want to see the rest of the story, check out these too: The Plan, Part 1, Part 2, Part 3, Part 4 and Part 5
A quick preview of things to come!
Sorry in advance these are so long! It takes me about 3 days per post just to narrow down images.
This is where we left off, I stained the treads in place. But, if you will notice, actually- I take that back Buddy is in the way. The bottom stair tread is technically not all there. We needed to finish the side walls of the stairs in order to add the treads. We waited on finishing the walls since we weren't sure how it was all going to work out when the stairs got finished... But that is how we do things- figuring them out as we go.
You can see in the picture below how the tread just sort of ends. But the whole point was to have it wrap around the side. In order to figure out all the dimensions, we measured everything out so we would know what exactly we would need, and Justin got to work... of course we had some "help"
Labels:
Our Projects,
Park House,
Park House Entry,
Stairs
One Step Up! More Stair Inspiration!
11 August 2011
I thought since today's earlier post was about my stair project. It would be fun to see some beautiful stair inspiration. Sometimes these pictures may seem too out of reach or daunting but the trick is to look for what you really love in the image and try to make it work for your home. That is what Justin and I do when working on projects... it works for us! Give it a try!
Remodelaholic is written by Cassity and Justin. Cassity has a degree in interior design and Justin is a landscape architect, so we adore everything that makes up a HOME! We love to share home remodeling ideas and projects we’re working on. From huge kitchen renovation ideas to small bathroom remodels, there isn’t anything we won’t try to tackle (at least once!). We are in the midst of our third whole home renovation, (check out house 1 and house 2 as well, so there should be a lot more inspiration coming your way. We hope that you will stop by often for home design inspiration, tutorials, interior design tips, delicious recipes and what going on in our family life.
I so want a spiral staircase. i love the railing and worn wood on this one!
source: eat.live.modern
I love the nook that this staircase creates!
source: Google
I absolutely love this railing. Although it really is not up to code... it is really beautiful!
source: Martha Stewart
I love how this staircase creates that perfect little space for the entry table!
I also love the black handrail! (I might just copy that little feature!)
source: Houzz
I love the trim detail under the upper stairs in this one! NICE!
source: Birch and Lily
Love the window seat,
source: It's Always Something
The nook under this stair is just dreamy! I love built in furniture!
I love the rope railing! (in this picture and the one above)
Remodelaholic is written by Cassity and Justin. Cassity has a degree in interior design and Justin is a landscape architect, so we adore everything that makes up a HOME! We love to share home remodeling ideas and projects we’re working on. From huge kitchen renovation ideas to small bathroom remodels, there isn’t anything we won’t try to tackle (at least once!). We are in the midst of our third whole home renovation, (check out house 1 and house 2 as well, so there should be a lot more inspiration coming your way. We hope that you will stop by often for home design inspiration, tutorials, interior design tips, delicious recipes and what going on in our family life.Read more...
Labels:
Inspiration Post,
Pinterest,
Stairs
Walnut Stain... at last! Stair Update!
In case you want to follow along, check out these posts too: The Plan, Part 1, Part 2, Part 3 and Part 4
AHH! I am so sorry that I have let this go for so long! I have been trying to catch up with life since we got back from North Carolina, and a million things have been on my plate... learning to juggle it all is NOT my forte yet... and can I (sheepishly Ba- aad Girl!) admit that we are technically not done completely with the stairs so that is another reason why I haven't finished up. But this is real life... and a hectic one at that, so I am not sorry I am not quite done, but I am sorry to keep you'all hanging!
Okay where were we?
We just filled the gaps on the sides. and I painted... and then we lived like that for 1 year (at least...) Finally a few months ago, after we had installed our flooring I realized that we could finally move forward. We had been waiting on choosing our living room flooring, because we were trying to match it!
One day while Justin was at work and I had napping babies, I stained the bottom two stairs.
Before the stain, I used a wood conditioner, remember this is pine we were working with soft woods require a stain conditioner to help with even coverage!
After the stain conditioner is applied, you can't see much of a difference?... well the gloves are moved.
And finally stained! YEA!
This happened to be stain that we just had on hand, Minwax Dark Walnut Oil Based Stain, but you can see below that it matches really well, and will look even closer with a coat or 4 of poly!
Labels:
Our Projects,
Park House,
Park House Entry,
Stairs,
Wood,
Wood Flooring
Filling the Gaps: Stair Remodel
21 June 2011
If you remember the last time we talked "stairs", we were left with these huge gaps on the side of each stair- ugh! I have seen people handle theses gaps in a number of ways. One that sticks out in my mind is covering it with moldings and sort of wrapping the molding around the stair nose etc.
But I have to admit, I was not a huge fan of the finished look, and I usually LOVE moldings. But wrapping them just seemed like an after thought, and one of my main wants for our stairs, is that they look like they had always been done properly. Which means we had to do a little more deconstruction before hand. (You don't call me Remodelaholic for nothing!)
When we cleaned up the stairs, we took off each tread and sanded and routed the nose. Then put them back in place with some screws for a temporary hold. Later as we finished the project they would be easy to remove when necessary but we could still walk up and down safely -just a little tip in case you are trying this at home, until you are DONE don't re-glue and nail yet!
Anyway, to fill the gap we started off by adding a diagonal molding that runs just above the nose of each stair tread from the bottom stair to the top. This created a triangular space above the stair support. Which meant all we had left to do was fill that space. We (meaning Justin- good thing someone is really patient in this family!) carefully measured each triangle that was left below the molding and cut out a piece of MDF to fill it up.
Nailed in place it looked like this(below). We also traded out the molding we had in the pictures above to a simple basically rectangular molding to simplify the profile.
We had to trim or straighten the cuts on some of the treads, but for the most part, this little triangular molding, just filled the existing huge gaps.
When they were all nailed in place, I caulked any gaps, and we installed the risers (even though they will be covered) and painted a few coats of white paint.
Then we screwed the treads back in place (so we could still move them later if we needed to!)
Finally it looked like this:
And do you want to see a preview of the next post or two? I am just giddy to almost have this done after 2 years! By the way, in the picture below, Etta does this new thing. When I say "Smile"
she closes her eyes really tight it is pretty funny!
For the rest of the story, check out these posts too: The Plan, Part 1, Part 2, Part 3, Part 4, Part 5, Part 6 and Part 7
Remodelaholic is written by Cassity and Justin. Cassity has a degree in interior design and Justin is a landscape architect, so we adore everything that makes up a HOME! We love to share home remodeling ideas and projects we’re working on. From huge kitchen renovation ideas to small bathroom remodels, there isn’t anything we won't try to tackle (at least once!). We are in the midst of our third whole home renovation, so there should be a lot more inspiration coming your way. We hope that you will stop by often for home design inspiration, tutorials, interior design tips, delicious recipes and what is going on in our family life.
If you like this post please check out these other project updates:
Under $100 Carpeted Stair To Wooden Tread Makeover DIY
New Enclosed Loft Space At The Top Of The Stairs
Labels:
Our Home,
Our Houses,
Our Projects,
Park House,
Park House Entry,
Stairs
Subscribe to:
Posts (Atom)