


On the Rise; Adding the Stair Risers, Finishing the Runners
18 August 2011
Well, today yesterday was one of those days, we ran out of diapers, forgot about our play date (but did make it a little late), the babysitter just didn't show up, or call... I'm still sorta ticked about that... we ran out of towels...(which means 4 loads of just towels to wash, and I am not exaggerating...) I feel like nothing got done... and really the ONE thing I did get done (cleaning off the kitchen counters) was undone when I made dinner, which is still there since I am typing this...... sigh.
But, I thought I would show you a little more of the stair project. In case you want to see the rest of the story, check out these too: The Plan, Part 1, Part 2, Part 3, Part 4 and Part 5

A quick preview of things to come!
Sorry in advance these are so long! It takes me about 3 days per post just to narrow down images.
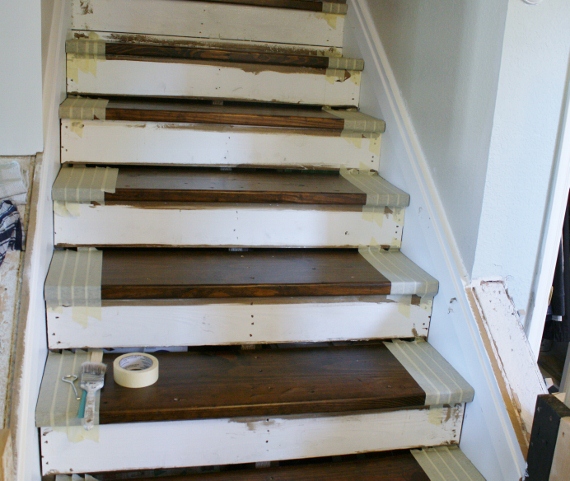
This is where we left off, I stained the treads in place. But, if you will notice, actually- I take that back Buddy is in the way. The bottom stair tread is technically not all there. We needed to finish the side walls of the stairs in order to add the treads. We waited on finishing the walls since we weren't sure how it was all going to work out when the stairs got finished... But that is how we do things- figuring them out as we go.

You can see in the picture below how the tread just sort of ends. But the whole point was to have it wrap around the side. In order to figure out all the dimensions, we measured everything out so we would know what exactly we would need, and Justin got to work... of course we had some "help"

We decided to put up a backer board, which I may or may not do in the rest of the living room too, cause I am so sick of the heavy orange peel, or whatever it is called on my walls.
By adding the backer board, the panel is smooth, and makes it look more professional, and not just like we nailed molding to a plaster wall (which is what we did ;)
I had to show this funny picture of Etta doing her best impression of Vanna White... (even though she doesn't know who that is)

Getting the moldings up (these match the wainscoting we did in the rest of the front room.)
This picture is Etta "Knocking on wood" that someday we will actually finish this project...

Okay once the moldings were in place we could install the ends of the treads. Below is what that looked like


After it looked like this...

Then I stained them in place, and yes, I was too lazy to tape.

A few coats of poly and we are set to move on.
Technically the stairs treads hadn't been nailed back in place yet, so Justin did that now. He glued and nailed those babies all in.
**Disclamer here is one of the little truths about the stairs that some people might hate - we left the holes from the nails open. It is sorta rustic anyway, since the wood we used was existing and beat up to begin with. I like the look, but it may not be for everyone. You could fill the holes and sand and stain, and then poly... we just went a different route.
AND, just so you know, I am happy to say that when I knocked our packing tape roller off the ledge upstairs and it gouged out a 1 inch long hole into one of our stair tread just the other day, well you can't even tell it happened!

I somehow lost the image of the construction adhesive that we put under the stairs before nailing! SO keep that in mind, glue and screw... or nail in this case.
We LOVE our Bostitch framing nailer. We bought it to nail the big huge beams when we removed the wall in our Asheville house way before we blogged, but that baby is worth every penny! I almost cried when I thought it was stolen (from the thief in the night.. jerk!), but luckily it wasn't! PHEW! Although, we technically haven't had the cash to replace the compressor, so it is sorta useless at the moment!

When I stained the stairs treads, I got stain everywhere, so I had to repaint the sides. I was extra careful to tape because I didn't want white paint to get into any of the holes that are in the stair treads.

Painted...

Now for the risers! Justin measured each riser... all of which were totally different by the way! Then he had to cut each riser to fit perfectly on their respective stairs. We painted them before installing. In the image below he was dry fitting them.

To put them up we just liquid nailed them in place. No holes to fill! NICE!

Holding them in place for a bit!


Oh my goodness it looks so much better! You can all breathe a sigh of relief!


I will hopefully be back in the next week with the newel posts. I asked Justin to build us a 3-d model so you can have instructions on how he built it, which may or may not be the proper way, but it worked perfectly in this situation!
Are you all working on any stair remodels?
If you want a chance to be featured, submit your post links so I can show them off!
In case you want to see the rest, check out these posts too: The Plan, Part 1, Part 2, Part 3, Part 4 and Part 5
 Remodelaholic is written by Cassity and Justin. Cassity has a degree in interior design and Justin is a landscape architect, so we adore everything that makes up a HOME! We love to share home remodeling ideas and projects we’re working on. From huge kitchen renovation ideas to small bathroom remodels, there isn’t anything we won’t try to tackle (at least once!). We are in the midst of our third whole home renovation, (check out house 1 and house 2 as well, so there should be a lot more inspiration coming your way. We hope that you will stop by often for home design inspiration, tutorials, interior design tips, delicious recipes and what going on in our family life.
 Labels:
Our Projects,
Park House,
Park House Entry,
Stairs
Labels:
Our Projects,
Park House,
Park House Entry,
Stairs


14 comments:
Looks awesome. I have been trying to convince my husband we need to remove the carpet from the stairs and do hardwood.
It looks awesome! I love how you're so honest about not taping and messy staining. This series has been so awesome and inspirational. Can't wait to see the finish.
That's looking so good! It's pretty much exactly the look I want for my stairs, so this is great inspiration. I can't wait to see the final product!
Looks Awesome!
Great job!
xoxo
Looking good Cassity! I love the dark stain.
Oh my goodness - thank you so much for your series. we are in the middle of redoing our stairs, too. It is our first real DIY project and it is taking us for-eh-ver. We have done many of the same things, only I have not mastered my picture taking and post writing to document it as well as yours. I am hooooping to knock alot out this week-end.
Yours look incredible!!
Thanks!
Susan
http://lifeondovehollow.blogspot.com/
amazing!!! I'm your newest follower, thanks for inspiring me!
We are not doing a stair remodel, but we are planning to do one. This is great, exactly what we can do our basement stairs. I am a new follower.
Really appreciate you linking up this fantastic post at the Creative Bloggers' Party & Hop. Hope you'll continually share your creativity with us at the weekly party :)
My husband totally wants to do this! But with a little boy on the way (due in January) I'm not sure it's a good idea. How do you guys deal with the safety issue?
Hi there~ Your stairs look amazing! Even though they were a lot of work- they are so worth it!! They came out beautiful! I can't wait to see the finished newel posts too!! Thank you so much for coming over and linking up at Feathered Nest Friday!! Hope you come back and share again soon! :)
It's me again. I know you don't need any more features because of your excellent project but I just want to give you the courtesy that I just featured this today here and pinned on my Pinterest. Thanks for sharing at the Creative Bloggers' Party & Hop :)
Mrs. Brittany,
We actually now have the handrails up, but we didn't have them for the last year. If I am downstairs I almost always have a gate up so that my daughter doesn't go up the stairs unless I am with her, and I don't really let her linger.
As far as other safety concerns, I know that the stairs are really not soft, but luckily our staircase bends, so there isn't the long stretch of bare stairs.
I just really try to police the no playing on the stairs rule...
Hope that helps... It really has taken a long time for us though, so unless you know that you have the time, it might be nice to wait... but it also gets a LOT harder after the baby comes.
Wow! Those are going to look awesome all done up! You've already completely changed the look there! Thanks for sharing on Fancy This Fridays Cassity!
Post a Comment