We’ve Moved!


If you aren’t redirected here is the link:


Remodelaholic!


THANKS!

Showing posts with label Catalog Inspired. Show all posts

Pottery Barn Inspired Painted Number Canvas Tutorial

18 November 2010

Pottery Barn Inspired;
Painted Number Canvas Tutorial

When I saw this on Pottery Barn's website I knew that it would be perfect for my sister. It's totally her style. It's not for sale through the website anymore, but I can only imagine the price tag on something like this!
Photos from Pottery Barn here.

So, I decided that I should just make my own! I used a 20x16 canvas that I got at a garage sale for $2. I read on Little Blue Boo's blog about mod podging newspaper or phone book pages on your canvas to be able to sand it down at the end, and give it a more rustic and distressed finish.
 Here's what it looked like after it was covered in phone book pages.
 Then, I painted over the whole thing in an antique white acrylic paint. When that was dry I went over that with a bright white acrylic paint. I didn't cover the whole thing, but more in random places to give it a streaky effect.
 Once that was completely dry, I found my center and drew lines in pencil so that I could work in sections. For the numbers I used my Silhouette to cut out vinyl letters. I google searched "Pottery Barn Numbers Canvas Font" just to see if anyone knew which font they were. Lucky for me, Stephanie Lynn over at Under the Table and Dreaming had made a cute mini version and told us what fonts she used to make hers. So, I played around with mine until I liked it the best. I ended up using two fonts: Engravers MT and Century Schoolbook. I typed them into word and then went back and forth between my document and the picture that I had from Pottery Barn to decide which number fit best.
 I kept working in sections to make sure that all of my numbers fit correctly.
After I got all of the numbers places where I wanted them I used my brayer to make sure that all the edges were really stuck well. At this point I was busting at the seams to go spray paint it and see what the finished product would look like! 
I took it outside and gave it two good coats of flat black spray paint. I made sure it was completely dry and then brought it in and peeled away the vinyl letters! Loved it! But I knew I would love it better after I sanded it. I just used a piece of fine grit sandpaper, wrapped it around a block, and really hit the edges and where my phone book pages were a little crinkled.
 I was so super happy with it!
 I had to test it in my house before I gave it to my sister. I thought for a minute that I should just keep it!! :) Just kidding! I love the way the edges look and the crinkles. It really makes it look like a sheet of canvas.

Read more...

Ballard Design Inspired DIY Striped Bench Tutorial

17 November 2010

Ballard Designs Inspired 
DIY Striped Bench Tutorial


I love Ballard Designs.  I get giddy when I open the mailbox and find a clean, crisp Ballard Designs magazine waiting for me.  I love the simplicity mixed with some vintage and mixed a little more with modern…unbelievable inspiration is found on every page.
Sweet P loves Ballard Designs too…taking an old magazine and designing a house for her ZhuZhu pets with cut out pictures of tables, chairs, mirrors and accessories.  I think we have a budding designer on our hands.
So this bench has been on my radar for years.  I love the honeycomb fabric that is all the rage and that was always how I envisioned the bench in my entry.  We definitely cannot nor would I ever pay the big price tag for the bench but I really, really wanted it.  So I was on a mission and searched the internet for ‘how to’ projects and tutorials but found nothing that looked like the Ballard Designs style bench.
And then my partner in crime, Angie, posted this and changed everything…for the good.  I fell in love with that chair!
After looking in a 10 mile radius of my house ended in utter failure, I drove clear across Houston to mother of all fabric stores, Glick’s.  I walked in and sweetly asked if they had a ‘large black and white stripe’ fabric.  She smiles and says ‘I don’t think so but let’s go look’.  My heart sank but I followed her to the back…it was like slow motion in a crazy dream where Javier Bardem is waiting for me in a dark alley.  Oh, sorry…did I just say that?
Ok, so I followed her, she points and says ‘something like this?’  I screamed YES!  Jumped up and down and I think I might have hugged her too….
$10 bucks later and I walked out with the most perfect black and white stripe fabric ever.
So…my wheels starting turning.  I couldn’t find a tutorial on a bench like I wanted…so the next best thing was to make it myself.  And I drove to Lowe’s…and this is how it all went down:
72″ MDF, cut down at Lowe’s to 60″:  $2.14
4 pine legs, 15″ tall: $6 each on sale
Valspar Black spray paint, satin finish:  $3.97
Foam padding from Hobby Lobby:  $16 after 25% off coupon
Quilt batting for softness:  $4.99 at Hobby Lobby
Fabric: $10
Dowel Screws: $3
My neighbor’s drill because ours was dead:  FREE
ballard designs bench
I measured the center of the pre-drilled hole in the table leg and marked the same spot on the corner of the MDF board.
do it yourself bench
I found old spindles in Round Top for $1 each…kept going back and eventually couldn’t figure out what I would do with them so left them behind.  Got home the next day and cried a river because I could have used them for my bench legs…live and learn.
Laid the legs in the driveway on painter’s plastic which has been used over…and over…and over….
do it yourself bench legs
This is 1 coat…I eventually used 4 coats of paint…did not take long at all.
do it yourself bench legs black
My thought was to use the below screws, drill them in the board from the top and after the board was covered, screw the legs up into them.  That is WRONG! HA!  Didn’t work at all….
Another trip to Lowe’s and learned “Dowel Screws” are just what I needed.  They are double ended…one end screws up into the board underneath and the legs screw onto the other end.  Simple.  Who knew??  Now you do too!
dowel screws
Laid the foam on top of the board.  It was pretty wide and I was able to cut 3 layers of foam:
do it yourself bench foam
Using my kitchen serrated knife…don’t hate me because I am inventive…or crazy…or weird for using my knife.
Covered the 3 layers with quilt batting to give a more softer look and feel…
Stapled the quilt batting underneath to help stabilize the foam….and you can see one end of the dowel screw underneath.
dowel screw
Tightened it up with pliers…those are pliers, right??
Okay…this is interesting….the fabric I bought was only 54″ wide which is pretty much the standard.
Since I am making a ‘custom’ bench, I had to make custom fabric to fit the 60″ length.
So I laid the fabric on the bench, cut a piece to fit the remaining 12 inches.  I choose to match up the black stripe.  I flipped it so right sides were facing eachother, and pinned the pieces together…
Borrowed my neighbor’s sewing machine…because mine bit the dust and I haven’t had time to buy another one.  But I am completely in love with her machine, which she admits she never uses.
Sewed a straight line…and there you go…62″ fabric created..and no seams Mom!
Laid the new 62″ fabric on the bench (notice my little helper…she keeps me company)
Flipped the entire bench over.
Got out the staple gun which I did NOT borrow….and went to town.
Screwed the legs into the dowel screws once all the fabric was pulled tightly and stapled.  I did trim all the fabric underneath too.
There she is…standing on her legs for the first time.  I feel so proud…sniff, sniff.
And here she is…her new home in my entry.  The pillows are not staying…that is another tutorial coming your way.
black and white stripe bench fabric
Making this bench was my first ever ‘made from scratch’ piece I have ever done. I can paint the heck out of anything but was completely intimidated by drilling, cutting, tools, and stapling.
It was definitely a learning process and had I not made the second trip to Lowe’s for the dowel screws, the entire project probably took less than 2 hours to make.
$599 for a ready made bench OR 2 hours of creating and learning and about $65 of my pennies saved?
I’d do it again in heartbeat and it was so much fun.
Now I don’t know if I would sit on the bench but it sure does look pretty in my house!
Now go build something!

Read more...

Pottery Barn Inspired Pillows Tutorial

09 November 2010

Pottery Barn Inspired Pillows Tutorial
Party Highlight by Michele @ The Scrap Shoppe

I'm just going to tell you up front that this is my 1st knock-off project.

And now I'm thinking I may need to do more of them! I can see why they are so addicting!
Back in the spring I found the most amazing ginormous pillow at Rugged Wearhousefor only $5. It was a blank canvas just waiting to be transformed. But it sat around my house for months and months until... Crafting with the Stars inspired me to finally do something with it! I scoured Pottery Barn for inspiration pillows and stumbled across two that would look great in my living room: the poppy pillow and the lavendar monogram pillow.

Both of these pillows are embroidered and, if you've been hanging around my blog long enough, you know that I DO NOT sew nor own a sewing machine. But that's okay. I had other plans to get these looks!

I used colors that would match my living room (red, olive, and gold) for each side of the pillow.
(Yes, in case you didn't realize, I put both of these designs on the same pillow. You know how I love reversible projects!)

Let's start off with the pillow itself. Like I said, its ginormous! 2 ft x 2 ft. Seriously!


Next up, let's talk about the poppy side of the pillow.

I remember (way back in the day) in high school doing a very fun project in my Spanish class involving Huichol yarn art. Its a technique of creating a design using yarn and moving the yarn in such a fashion as to give your artwork movement. I loved it! And thought it would be perfect for this project.

I scoured several stores looking for the "right" yarn. I tried to find some that looked crocheted to match the Pottery Barn pillow better, but ended up finding this fun ribbed yarn in all of the right colors.


I printed off a full 8.5" x 11" image of the pillow to use as a guide, found a starting point on my pillow, and proceeded to draw out my first poppy.

I drew one poppy at a time, filling each in with yarn befor moving on to the next because adding the yarn actually made the image slightly larger than the original drawing. I didn't want to mess up my spacing and wind up overlapping my images!

Also, I only drew the outline of the red part of the poppy because I knew it would eventually be completely covered with yarn in the end and the marker would never be seen.

I adhered all of my yarn with my favorite fabric adhesive, Fabri-Tac from Beacon.
(This stuff is seriously amazing. Better than a glue gun!! I swear!)

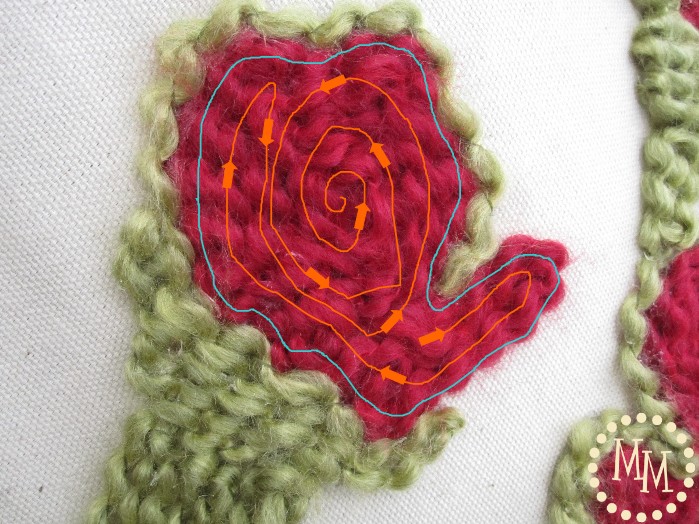
The turquoise line in the above photo represents the outline of the flower (where I drew it with the marker). I always did the outline of the flower first with the yarn then went back and filled it in the rest.

The orange line with arrows represents how I filled in my yarn. There was no specific technique. I just wanted to create movement by keeping the yarn in what would look like a swirly manner.

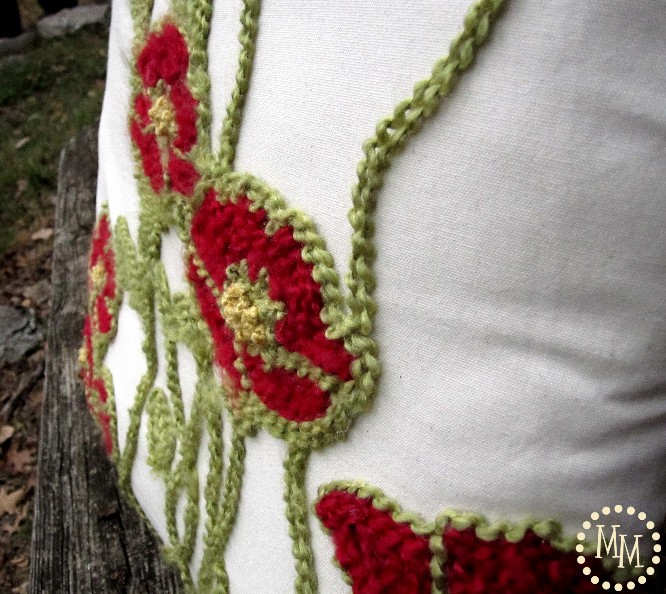
After finishing a flower with the red yarn, I went back and outlined it with the green yarn. I saved the stems and leaves until the end so I would not overlap them with any of the flowers I had yet to create.

I stopped periodically to compare my version to the Pottery Barn printout and update my star partner, Beckie, of my progress. I was really starting to see it come together!


After finishing with the red and green yarn, I went back to fill in the centers of the fabric with the gold yarn. I tied a knot in the yarn then, to thicken it, tied two more knots on top of the original knot. I trimmed off the knots and layered them in the centers of some of the flowers.

I love the texture the yarn adds to the pillow.


I ended up leaving off the little flowers that Pottery Barn scattered around the pillow. I really like the extra white space and the asymmetric look.

For the monogram side of the pillow, I took some liberties from the Pottery Barn version and instead of using a lavendar plant, I used a poppy floral design to help tie it into the reverse side of the pillow.

I created the design on my computer then separated the images into two so I could cut them out using my Silhouette.


 I cut my images out on freezer paper to iron on and use as a stencil (this is also my first freezer paper stencil project!). I ironed down the floral design first. The little detail images in the poppies were so tiny that I just left them off. I did, however, keep the detail images in the smaller flowers.

I still had all of my acrylic paint from my Custom Wall Art project from last year which is also in my living room so I already had on hand the paint colors I would need. I mixed the paint with some acrylic paint fabric medium and went to work.

Once the floral design was dry, I went back and ironed on the M and painted it also.

This side of the pillow literally only took a couple of hours to complete, including drying time. Whereas the poppy side of the pillow took a good 6 hours or so!


Can you see that I traced around the M with a fabric pen?

Since my pillow was prestuffed with no way of getting the stuffing out without ripping out threads and resewing, I just painted on a stuffed pillow. Probably not the greatest for freezer paper stenciling, but it worked okay. I just used the fabric pen to tidy up the edges of my monogram.


So let's do a tally, shall we?  :)

Pottery Barn Poppy Pillow: $49
Pottery Barn Lavendar Pillow: $29

Total: $78
--------

Pillow: $5
Yarn: ~$4 each so $12
Glue: $5
Paint and Medium: $4
Freezer Paper: $5
Fabric Pen: $4

Total: $35

I had the paint, freezer paper, and fabric pen on hand already so really my total could be ~$22!
Not bad, especially considering it is completely customized to match my living room

Read more...
Related Posts with Thumbnails
Emealz - Easy Meals for Busy People!
Home & Garden Blogs Home & Garden Blogs - Blog Rankings

Blogging  tips, tutorials and SEO

From Here to Eternity

  © Blogger template On The Road by Ourblogtemplates.com 2009

Back to TOP