We’ve Moved!


If you aren’t redirected here is the link:


Remodelaholic!


THANKS!

Showing posts with label Lighting. Show all posts

Learning From Mistakes: Lamp Makeover

15 October 2011

Learning From Mistakes: Lamp Makeover


It might not be the most beautiful manicure that you’ve ever seen, but one thing is certain…there is heart in the paint that polishes my fingertips!
Some may take their pampering sessions into a nail salon (which probably should be the preferred method) but I find craft projects to be much more effective for relieving my stress.  To each their own, I guess!
This weekend I posted about my thrifty shopping spree to a little store called Savers, but what I failed to mention was the fact that I dove right into my first project for these items within the first 10 minutes of getting home.

Read more...

Beautiful Faux Capiz Chandelier Tutorial

04 October 2011

Beautiful Faux Capiz Chandelier Tutorial


Grab yourself a soft-drink, and make yourself comfortable.
Prepare for the details of the long-awaited chandelier project that I've been pre-posting about for the past few weeks.
I've teased, "coming soon" over and over again, and for that I am sorry. It wasn't deliberate.  I guess that's just what happens when a project takes longer than anticipated.  Much longer!
I am hoping that once you have read through this "how to" post, you'll have compassion on this blogger's soul (and her torn and tattered typing fingers that made hundreds of faux capiz strands)!
Let's start at the very beginning...
A few months ago, I was staring (enviously) at this dreamy chandelier from West Elm:
...and staring angrily at the $299.00 price tag.  I wondered, why must pretty things be so dang expensive?  
As much as I loved this little lady, I couldn't find it in my heart (or wallet) to take the plunge and commit. But then one day, I had a light-bulb moment, when I stumbled across a DIY'd faux capiz lamp project and realized I could probably make the fixture myself for an affordable price!  (And, yes...I think there was a little bit of dancing that took place during that moment..)

Read more...

Beauty of a Basement; Renovation!

26 July 2011


Beauty of a Basement; Renovation!

There was a time in my life (like 2 years ago) when I thought that basements were dumb. What was the point? Seriously. They're dark, dank, and smelly. If you put things down there in storage, they'd either end up ruined or completely forgotten behind a stack of moldyNational Geographics. Plus there's bugs--those nasty centipede things that I abhor. I was NOT a fan of basements. I'm surprised that we actually have some pictures of the befores since I seriously hated going downstairs into our dungeon.

Warning: crappy pictures ahead (to match the surroundings).


You get the idea: nastiness. And you know it's gotta be bad when I give Mitch free reign in the decor department anywhere in our house. So when up to him, he painted the walls bright orange (once a Flyer's fan, always a Flyer's fan) and I never stepped foot down there again. That is until we decided to finish it.


There were several "rooms" down there. Mitch removed one wall to open it up.


 Smashing the wall. I did partake in this event. It was fun, but dang, was that sledge hammer heavy!


And it went from looking like that, to this.


The room is divided up into two zones. One half is the lounging/tv zone and the other half is the work zone. This is Mitch's side of our work zone. Notice the tasteful sports theme. Out with the orange walls, yet the Flyers are still represented. And that's a picture of Jackie Robinson sliding into home and the Babe hitting a homer. Classics. And I'm cool with that.


Mitch made this little shelf. It's the perfect spot for his collection of Philly sports team glasses.


And this is my side.
Mitch bought the 50s dining table for me for Christmas one year when we were dating. I spotted it when we were out at an antique store, fell in love, then he went back and bought it for me. It makes the perfect desk. I made the inspiration board. The lamp we got at Target years ago. And that cute owl I picked up at a thrift store.


We're really happy with how it all turned out. It gives us another room to retreat to--which in a small two bedroom rancher is much needed. We did the demo part ourselves but hired out the construction aspect. Now I can't imagine our house without our finished basement. If you haven't seen it already, here's a little clip of our basement taken by our friend Keith.


Read more...

Dining Room Remodel

14 July 2011

OAK House Dining Room Remodel

 Before

After


Before


After

Before

After

The Mother Ship


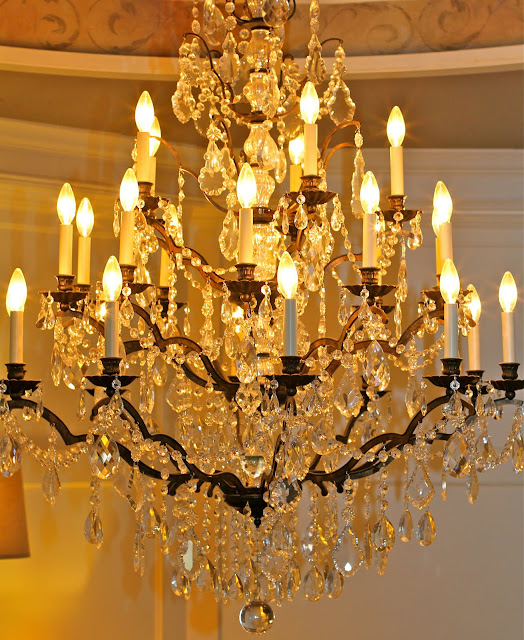
   I admit, I'm a little bit proud of her, the chandelier, I mean.  I had to sacrifice a few other details so that I could afford to put her in the room but it was definitely worth it. She is the crowning jewel of my formal dining room and the centerpiece of the house. Just a little piece of heaven.

Read more...

Pottery Barn Knock Off Lantern Made from Picture Frames!!

11 July 2011

Pottery Barn Knock Off Lantern Made from Picture Frames!!


Hello!  I am Kari from the Sunset Lane.  I am so excited and flattered to be writing a guest post for Cassity!!  I thought I would die when she asked!  The Sunset Lane is a blog about making life beautiful without emptying your bank account.  I see anything and everything in magazines, on Pinerest, random things I google, anywhere really and make a knock off version for pennies compared to the retail cost.  

Pottery Barn is my main source of knock-offery (yes, I made that word up!).  I have imitated quite a few of their items.  Like the Pottery Barn Bellora Chandeliers I DIY'd, the Belgium Train Signs, the numbered art, or the monogrammed mugs.  I love their things, but not their prices.   

After dealing with my less than appealing (okay downright f-ugly) light in our master bedroom.  My latest DIY Pottery Barn adventure was to create one of these:


Pottery Barn Gothic Lantern
Pottery Barn Blacksmith Taper Lantern

I had been plotting it for a while when the idea came to me on the toilet.  I was going, but rather giving my baby a bath when a picture frame fell on the back of my head breaking the glass....for the millionth time.  I was staring at it and came up with this :)  

How to make one for yourself!
Step 1: Have a picture frame fall on your head Collect 4 matching picture frames.  Mine were 8x10 frames, you can choose smaller or larger-the lantern police won't arrest you for not following directions!
Can you guess which one broke?!? :)

Step 2: Collect your supplies. I used hot glue, gorilla glue, a speed square, needle nose pliers, and painters tape!


Apparently I didn't picture all my supplies-ADD kicking in!


Step 3: Remove all the glass and "guts" of the picture frame and the little metal tabs that hold it all in. (Please note: if you plan to leave the glass in the lantern, you should leave the little tabs in-but I didn't think about that before I removed all mine!) You could always glue the glass in, but this may be messy if you accidentally break one.


Step 4: Use your speed square or other 90 degree angle tool to keep it square and put on the Gorilla Glue, then quickly shoot some hot glue on the ends, just to keep it in place.  I'm sure there is an easier way, but I try to look for the hardest way possible and do it that way.  I usually open packages and then find the easy 'pull here to open it' spot!

Sorry it's blurry!

Step 5:  Repeat step 4 until it looks something like this


Step 6: Tape around the sides with painters tape to keep it together while the glue dries.  When all sides are done, you should have something like this.

Yes, that's the grout stirring paddle in the background!


Step 7: Find some light source to donate it's guts to your new lantern!  I picked this one up from H4H for $5.

Step 8: After I took the H4H light apart I attached eyelet screws on the corners of my frame cube and ran chain I had from a previous project (like 3 years ago) from the eyelet screw to the ring on the top of the H4H light.  Spray painted it all black and install. 


Here is the light that was there before: GAG!!


And Now:


 Thank you again to Remodelaholic for letting me guest post!!

-Make your life beautiful!


Read more...

Beautifying a Ceiling Fan with a Shade Tutorial

16 June 2011

Hi everyone! I'm so glad that Cassity has asked me to come on over and wreck up her blog.. Err, I mean have a grand ol time with you! :) If you're not familiar with me my name is Rachelle 
and I'm the writer over at Fingerprints on the Fridge. 
Photobucket

I tend to blog about decor, and my silly little girls. It's a fun time, feel free to stop by and say hello! 


 Today however, I'm going to show you the quickest, easiest way to switch up a ceiling fan and take it from blah, to ahh! Ready? Let's go.


So we had a very u-g-l-y fan in the playroom. White, one light, very standard and blah.


Something just like this.


I wanted something with a little more pizazz and searched lots of tutorials online but they ALL needed a fan with two lights so you could screw a rod/finale into the fan to attach your shade too.  Young house love did it a few times. Did you hop over and see what I mean? Yeah, mine couldn't uh..do that. So I used my thinker.. and thunk some more.

And. BAM.

This is what you'll need.
-Some wire, try to go on the thin side so it's super bendable and easy to work with while you're a hundred feet up in the air 2 feet off the ground on a chair.
-Scissors
-A pretty lamp shade, I purchased mine from Target and I love the pretty burlap looking texture.


You're going to take your wire, and start on one arm of the shade, wrap it all the way around and move to the next one. Make sure you leave lots of room in between the arms so that there's "haning" room. 

The longer you leave in between determines how low your shade will hang. But, don't worry if you want to shorten it, it can be done. That's why we worked with thinner wire.


Then made sure it was all semi-even and bent the wire a bit so that it would hang on the screws that used to hold in the ugly white spaceship looking globe. That's the best part of the wire, it's bendable so it's totally workable and if it looks crooked, scoot it over a bit, bend some more and you'll get it right. Trust me.


See how freakin' easy that was? I KNOW. Imagine all the awesome shades you can put up now! Awesome. It's not super pretty from below, but no one will be looking right up at it, since the kiddy table is below. If you're worried about it from below you could also add some fabric to the bottom of the shade with some hot glue and it would be fantastic. It was exactly what the playroom needed.


Thanks again so much for Cassity for having me. Hope you enjoyed!
Please visit Fingerprints on the Fridge

Wanna get some more lighting inspiration?  Check out these posts:
DIY Wine Glass ChandelierRecycling Glass Insulators Into Pendant LightDIY Dish Lamp Tutorial
How to Build a Tripod LampThe Moooi Random Pendant Knock Off, and Turning a Glass Vase Into a Lamp Tutorial


Read more...
Related Posts with Thumbnails
Emealz - Easy Meals for Busy People!
Home & Garden Blogs Home & Garden Blogs - Blog Rankings

Blogging  tips, tutorials and SEO

From Here to Eternity

  © Blogger template On The Road by Ourblogtemplates.com 2009

Back to TOP