We’ve Moved!


If you aren’t redirected here is the link:


Remodelaholic!


THANKS!

Showing posts with label Re-Use. Show all posts

Learning From Mistakes: Lamp Makeover

15 October 2011

Learning From Mistakes: Lamp Makeover


It might not be the most beautiful manicure that you’ve ever seen, but one thing is certain…there is heart in the paint that polishes my fingertips!
Some may take their pampering sessions into a nail salon (which probably should be the preferred method) but I find craft projects to be much more effective for relieving my stress.  To each their own, I guess!
This weekend I posted about my thrifty shopping spree to a little store called Savers, but what I failed to mention was the fact that I dove right into my first project for these items within the first 10 minutes of getting home.

Read more...

Reuse- Ladder into a Laundry Rack Idea

28 April 2011

Reuse- Ladder into a Laundry Rack Idea by Bec

Hey there!  I'm Bec from Little Lucy Lu, and Cassity has kindly offered to let me guest post on her fabulous blog today.  I'm pretty new to the world of (real) blogging, so this is a huge honor, and I'm so thrilled to be here!

I started Little Lucy Lu shortly after my daughter was born as a way of tracking milestones and important events in her life, but over the last few months, I have kicked it into high gear and have become blog-obsessed!  My blog is a mash up of my life -- being a mom, wife, and kindergarten teacher,  my vintage-inspired style and craft projects, my shopping addiction, living in the country, a recipe here and there, and most importantly - my Little Lucy Lu!  I'd be so happy to have you stop in for a visit sometime!

A few weeks ago, I took an old wooden ladder and made it into a laundry rack ...


Read more...

Recycling Glass Insulators Into Pendant Light

16 March 2011

Recycling Glass Insulators Into Pendant Light 


Oh how I wish I had all these fabulous colors!!
  
Ever wonder what you could do with those old glass insulators??
How about a pendant light!?

Read more...

From Dresser To Kitchen Island

27 January 2011

From Dresser To Kitchen Island
contributed by Binkies and Briefcases


Remember this u.g.l.y dresser? (Ok, not this actual one, I stole this picture from ebay, but it's the exact same dresser I bought from ReSource York, except mine didn't come with the hutch.)


This was the best before picture I could get of our actual dresser in the awful light in our garage.

I wanted to turn it into a kitchen island like I saw Jonni do at House of Johns.


Read more...

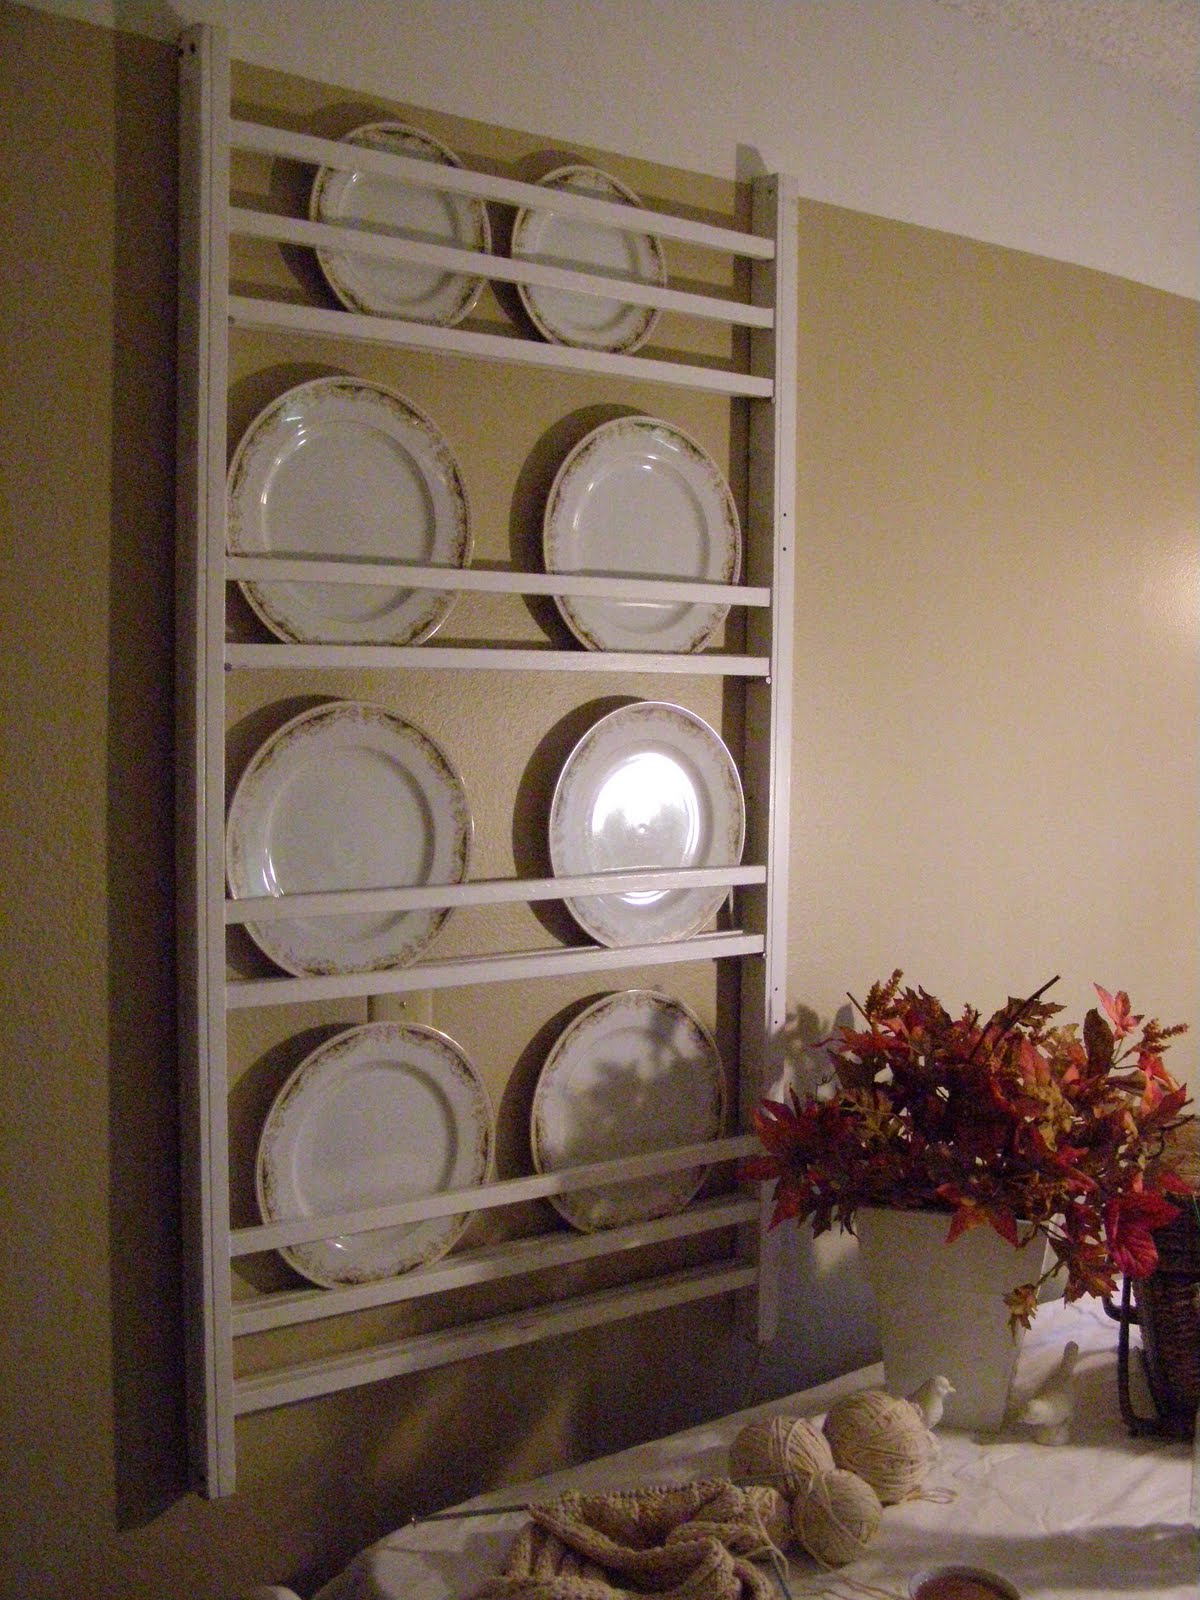
From Crib to Plate Rack; Up-cycle project

27 September 2010

I was just surfing blogs when I came upon this project, and I had to ask if I could share it with you!  It is from Erin at The Little Apartment on the Prairie.  Anyway, she had a crib that her little one just didn't love!  So she made a beautiful dish display it is TOO COOL check it out:


Once Upon A Time I had this baby.

The baby that I waited nine years for. This baby with the polka-dot nose. The baby that sings songs to herself and tries to train the dog. The baby with the grandma name.

The baby I refinished a crib for when I was 8 months pregnant.
Who also happens to be one of those babies that screams in enclosed beds like cribs or playpens.


 No it wasn't a stage, the behavior never went away. So the crib did.
But on the upside, it became a farmhouse style plate rack:


I saw this picture in an inspired by post over at the Brabourne Farm blog.
Pretty, Simple, and Rustic. So I went to work to see if I could create a plate rack for me!


I took the two sides of the crib railing and removed the hardware. 

I put them side by side to to determine where I would need to remove the rails.

I even held them up against the wall while measuring to ensure my plates would fit into the space.


And removed the pieces that I needed out with a small hand saw. 

It was really a lot easier than I thought it would be.


I used Gorilla Glue to cement the two side pieces together.

 I even caulked a little and touched up the white paint where it was needed. But I don't think the caulking was highly necessary. The Gorilla Glue that I used expanded a little while setting and filled the space in between the two pieces very well.


Below is a picture of the bottle top. A bit was on top from my last use and dried. See how it's bubbled? It expands as it dries. I just thought this looked cool. I know I'm weird. And you think the lid would be stuck on tight. But no, it slid right off. 


 I wasn't going for a finished look.


This is me attempting to cover up an extremely poorly placed phone jack... in the center of the dining area wall! What?!


Here you can see the general idea of how the plates are supported.


Here is my plate rack. I might add a shelf to it later, we'll see. Or maybe paint it green.
No not turquoise or hammered zinc. I think I'll have to find some cute plates with color for it too.


Isn't that just plain awesome? 
And for those old school cribs that aren't up to code, 
this idea is perfect!

Read more...

DIY Serving Tray From Old Cabinet Door

19 September 2010

Sharyl at The Little Brown House has created a great project using an old cabinet door as a serving tray.  I think that this is a great way to reuse and repurpose something.

So, my oldest sister has a birthday this month.
And she mentioned to me that she would like a serving tray.
Don’t tell her you saw this!
She doesn’t read my blog but others she knows do -
you know who you are!
I decided to make the tray out of cabinet door
(big suprise!)
And where would I go for one but the Habitat Restore Store!
I found an incredibly ugly one – not on purpose, but it was the right size and shape.
Ugly? Am I right or am I right?
I sanded it with my palm sander -
(Quite the tool Diva aren’t I?)
Then sprayed it with a primer coat of….
wait for it…
Heirloom White! (heavens own color)
Then I brush painted it, so that I could get the look
I was going for. I used a Behr paint that is really close
to Heirloom White (heavens own color)
It is called Table Linen if anyone is interested.
Please forgive this photo – night, small dark room, that is all…
I knew that I wanted to put something vinyl on the tray, and was planning
on ordering something, but as usual time got away from me!
I went into my never fail dollar store, Dollar Tree, and found this great
vinyl with the word Welcome on it. Perfect! Guess how much it cost?
That joke just never grows old.
While I was at the Restore I picked up some cabinet hardware to use for tray handles.
They were .25 cents each, and the cabinet door was a dollar.
My sweet hubby screwed in the handles, and then all that was left was putting on the vinyl.
Isn’t it too cute!
She can display it when she isn’t using it as a tray.
Here is is ready to serve coffee and treats to guests!
What are those treats, you ask?
Why, those are my failed attempt at Bakerella’s Cake Pops,
I call them Cake Bombs…
So there you have a Diy serving tray -
Not bad for $2.50 huh!
I really like it, and of course now want to make myself one!

I just think that this is a cool idea.  Great job on making a serving tray from an old door!

Read more...

Painting Glass Bottles, Recycled Decor Idea

10 September 2010


Don't forget to link up to our Remodelaholic Anonymous party today
for a chance to be featured on Remodelaholic!


Bliss Bloom Blog has painted a bottle inside and out.  See what she is up to.


I've been wanting to try this out for a while and had a chance to experiment today.  We finally have weather warm enough for the boys to have a "water day" in the backyard.  I set-up a water park of sorts in our backyard to keep them busy as I played around with fabric puffy paint, glass bottles and acrylic & spray paints.


Empty bottle, ready for upcycling...
BTW, if you haven't tried it, Trader Joe's sparkling lemonade is delish!

I don't trust myself with freehanding anything, so I drew a simple design on the bottle using a dry erase marker... Love dry erase-- if you don't like it, wipe it off.  If you're like me, it takes at least 3 tries to draw a simple flower.

Now the fun part... add the puffy paint.  Unless you're a puffy paint guru, I recommend dots... Lots and lots of dots.  Let dry for a couple of hours.

::Glass Bottle with Acrylic Paint::

For the clear bottle, I poured in a creamy antique acrylic paint. While I like the contrast of the acrylic paint against the white puffy paint, if I were to do it again, I'd use an oil-based or regular interior paint instead.  The acrylic doesn't adhere to glass readily and I had to constantly rotate the bottle to get complete coverage and avoid streaks.  Next time I'm going to dip into one of the cans of Dunn-Edwards that we have stacked in our garage.

::Glass Bottle with Spray Paint::

I spray painted the green bottle with "Ivory Silk" in a satin finish.  Very quick and easy.

Hmmm... I do like the flower pattern, but the rest seems a little flat.  I can't decide if I should add more white puffy paint to add more detail.... or spray paint it with a clear gloss... or just spray paint over it in a glossy white.    I'm leaning toward glossy white... even though I'm trying to achieve a Fall vibe... Decisions, decisions...
  
This is a cool project showing the reuse of glass bottle something that most of us just get rid of.  Painting glass bottles inside and out, 
who would have thought?

Read more...
Related Posts with Thumbnails
Emealz - Easy Meals for Busy People!
Home & Garden Blogs Home & Garden Blogs - Blog Rankings

Blogging  tips, tutorials and SEO

From Here to Eternity

  © Blogger template On The Road by Ourblogtemplates.com 2009

Back to TOP