We’ve Moved!


If you aren’t redirected here is the link:


Remodelaholic!


THANKS!

Showing posts with label Glass. Show all posts

Adding Privacy to Sidelights! Faux Stained Glass

20 October 2011

Adding Privacy to Sidelights! Faux Stained Glass


Do you have a little and long window next to your front door?
Do you ever struggle with what to use for a window covering?

I did.
When we moved in, I couldn't stand the old sheers that hung over our window.
They looked a little too fussy for me. I knew they 'had to go.'

I wanted something that allowed light to filter inside.
It also had to provide privacy... but still allow me to peek outside and see who was at our front door.
And, of course, it had to be simple.

My solution: DIY stained glass.


See: privacy and I can still peek out!


Want to know how create your own stained glass window?

Follow these steps:

1. Grab some stained glass paint, "lead" strips and  liquid "leading" from the craft store.


2. Clean the glass.

3. Come up with a design for the windows. I kept ours simple with framed rectangles and boxes. Straight lines are easy to make with the lead strips.

4. Adhere the "lead" strips to the glass in your desired design. I first used 1/2 inch painter's tape on the glass to guide my straight lines.


5.  "Solder" the joints of the lead stickers with the leading liquid.

6. Take your stained glass paint and fill in the desired areas. You can vary the paint techniques to achieve different textures in the 'glass'. You can just brush it on thick for a smooth look - like the amber corners in mine. Or you can use a sponge and dab it on for a mottled look - like my frosted wavy glass in the center.

7. Allow to dry and enjoy your pretty new window!

The beauty of working with these paints is that if you make a mistake, the paint can be scraped off. The paint is not permanent. This is also an advantage when you go to resell your home. Let's face it, not all buyers may appreciate your personalized design in glass.

I did this project about 4 years ago. When we want to sell our house, I can just scrape the design off.

And I can prove that the paint will not last forever. I have one area that is thinning and needs some touching up:


 But I think I'd be fighting a losing battle to keep that area maintained.    Why?

Well, here is the reason for that thinning spot:


Someone's hot little breath is slowly making a 'hole' in our stained glass.
Oh well. It's hard to be upset about the reason, especially when she is so darn cute!


This project was contributed by one of our fabulous readers! We love to share your projects with this great blogging community. So, if you have projects from kitchen renovation ideas to small bathroom remodels, overhauled and repurposed furniture, spray paint updates you name it please send it in! Thanks for reading Remodelaholic!


More classy glass:

Read more...

Remodeled Master Bathroom With Tile and Glass Shower

05 January 2011

Remodeled Master Bathroom With 
Tile and Glass Shower
contributed by Mama Schell Says...


Part I

About a month ago, I noticed a wet spot on the wall in our master bathroom. It was about 3 inches in diameter right where the glass shower door meets the wall. My husband and I were a little worried about mold, so we knew that we needed to do something about it...and soon!

My hubby had planned a week of vacation for himself this week, so last week he decided that he would tackle this project while he was off. The first conversation that we had about it was just talking about repairing the drywall and resealing the door to prevent further leaks. The next day we talked a little more and decided that maybe we would instead take apart the shower and tile the shower like we had always wanted to...

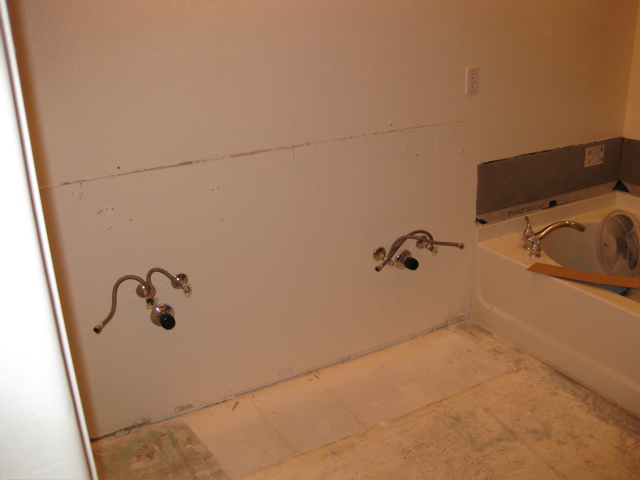
But instead this is what happened...


Yep...everything except the tub came out and we, or I should say my hubby is, changing it all! New shower, new floors, new pedestal sinks, new tub surround, new mirrors and light fixtures. We are going with the whole shebang!

So far my hubby has stripped the shower down to the studs, replaced the drywall in the shower and tub surround with concrete board, taped and mudded the new board, and he has built a shower pan from scratch. Tomorrow has the first of the tiling on the schedule...and if everything goes well he should be done by the end of the weekend!

I will post updates as we progress!


Part II

So, I guess that my timeline was a little bit off...it's Friday night and my hubby is only just finishing up on tiling the shower, so I my estimate of being done by the end of the weekend is probably wrong. I would now say that maybe we will be done by Memorial Day(?), but that might just be a little too tight also...we will have to see. ;-) 

On the other hand, what is done looks absolutely wonderful! My hubby, might be methodical at his tile work, but I will have to say that everything is absolute perfect. If anything, my hubby puts his all into whatever task is at hand, and he makes sure that it is done correctly. He doesn't like to have to come back and fix mistakes, so he makes sure that it is done right the first time. I have started to notice this tendency in my son now also...when he plays with his cars they all have to line up just right, when he helps me to put away his clothes they all have to be in the correct place and when he is doing an art project everything is straight and even. That is definitely something that he gets from his daddy...I am the exact opposite. I am more creative, emotional and a little more scattered in my thoughts and how I approach life. I think that is why my husband and I work so well...we balance each other out!
 

Here are a couple of photos of the progress so far...please cross your fingers that we can finish it up quickly!


And here is my favorite part so far...the shower floor. I just LOVE this tile!


Part III
It has been a long month since we started on our master bath remodel, but the wait was definitely worth it! It turned out absolutely beautiful.

My husband worked so hard on it (working every day that he had off and before or after his shifts at work) and did all of the work himself. (Except for installing the glass on the shower.) There were a few little hiccups along the way--like the 5 gallon bucket sized hole that the original builder left under the shower pan--but he did such a great job. We estimate that by doing all the work ourselves and using the supply discount offered at my work that we saved roughly $10,000!

Here are some before and after photos of the remodel:


The old vanity, double sinks and plain large mirror.


The new tiled floor & wall, separate mirrors & lights and new pedestal sinks. 


The old shower, complete with frosted glass and a cultured marble surround.


The beautiful new seamless glass enclosed, tile shower.


I am just so happy with the results. I told hubby that I think it looks like something out of a magazine! While it was hard work, it is nice to know that we saved a lot of money doing it ourselves and I think that we will appreciate it more knowing that WE did it all by ourselves!

Read more...

How to Make a Glass Wine Bottle Pendant Light DIY

22 September 2010

This is such a fun pendant light idea!  You can make it from a recycled glass bottle.  The project is from Rachelle at Adventures in Creating, Thanks for linking up to the party!!:


Finally! I finished my secret project I have been working on that involves that light kit I got from Ikea I've been talking about for the past 2 weeks. I decided that it was time to replace my star lamp that I wired long long ago:


I still like it and will probably find another home for it but I have been itching to make a light out of one of these:


I know what you're thinking- wine bottles again! What is the deal with this girl? Well I ended up with quite a few of them after I made my wine glasses and citronella candles; I told everyone I knew to save their wine bottles for me and I now have a pretty good collection. So I had to do something with them!

So I came up with this:


Like them? I love them! They are my new favorite project I have done. Want to make some of your own? You can!

All you need is:
Wine Bottles (I used the large ones)
Dremel tool with Cutting Wheel and Grinding Bit (Or a wine bottle cutting kit)
Pendant light Kit
Plug
Safety Goggles

First I soaked my wine bottles in warm soapy water to take the labels off. Then taped off a section on the bottom and drew a straight line along the tape. This indicates the line I am going to cut along.


Next I was ready to cut. (Remember to wear safety goggles and a mask!) Using the Cutting Wheel of my Dremel I cut along the line I had drawn on the tape. 


Take your time and let the tool do the work. If you apply to pressure you'll just wear down the Cutting Wheel faster, but you won't make your progress any quicker. (Trust me I tried!)


Making some progress! I like to keep the tape on the whole time to keep any glass shards in check. Also remember to periodically dip the Dremel in water and spray some on the glass to keep both from getting to hot. The Dremel can over heat and the glass could crack if not. 


Yay success!! Next you'll use the Grinding Bit for the Dremel to smooth out any rough edges.


Once your are done with this step you can use the polishing bit to make the edge extra smooth and shiny. Once your all done it's time for wiring! I had 2 different wiring kits, the one from Ikea and the one I already had.  I was hoping I could just slip the plug through the neck of the bottle and be done with it but the plug is to wide, so it was off to plan B (and C). The wiring kits were different so I had to use two different ways of wiring the bottles.


For the first one I was able to  take the light housing apart, being sure to keep everything in the same order. Once I had it all apart I just ran the wire through the neck of the bottle, then put the housing back together.


Once it was run through I tied a knot in the wire so the bulb would hang inside the bottle in the position I wanted.

For the Ikea light kit I couldn't figure out how to take the housing apart, so I had to resort to other measures. I had bought a wireable plug from Home Depot and used that.


To attach the wire to the new plug, I had to cut the old one off. Then I ran the wire through the neck of the bottle.


Then just run the wire through the slot of the plug and snap it closed. Done, easy! Now you're ready to light it up!


I love the light they give off! (I'll have to paint the wire the same color as the wall this weekend!)


A few close ups:


And one shot of them off:


So what do you think? Do you think this is something you would want to make?

Read more...

Frosted Glass With A Modern Look

21 September 2010

Lynn at Glorious Today is excited to share with us her new frosted glass with a modern look.  


I am thrilled to post my first project!  I love reading other people's blogs and seeing all their great ideas and projects, and now I get to take part!

I think my husband will just be thrilled that I finished a project (within a week of starting it, no less).

Our house has kind of an odd-looking front entrance, which is a long story we won't go into, but our front door is actually a set of french doors with glass insets.

Before

The previous owner had put sheers over them on flimsy top and bottom curtain rods.  They came loose on the bottom a lot and got stuck in the door.  Since this is our main door for going in and out of the house, and much of our traffic is small children, this was not convenient.

I took the curtains off, but it seemed odd to have uncovered windows where anyone could look into our family room and see us prancing around naked sitting on the couch, so we needed to do something.  Inspired by another person's frosted glass doors she did for a bathroom cabinet, I decided frosting spray was the way to go.

But I didn't want to just spray the whole window--too boring, no personality--I wanted to stencil something.  I debated on several floral or leaf or branch designs, but decided putting our address on the door would be much more timeless.  It reminds me of offices who have names on the glass doors.  Plus it might make it easier for people to find our house and know that these are the front doors (not sure if that will work).

Here's how it came out:

After
I am very happy with it.  The frosting isn't completely even, but it looks different from different angles and is opaque enough that you can't see in at night.  I'd like to paint the front doors now--I'm thinking a nice olive green maybe (any suggestions?).

The cost for this project was only about $5!  I bought two cans of frosted glass spray paint, but only used one, and the only other thing I bought was a contact paper remnant from the thrift store for 50 cents, so if you have some leftovers laying around, you can just use that.

Here's how to achieve similar results:
Print out whatever design or letters you want on your computer.  I ended up using a font called Hiragino Kaku Gothic Std, which I believe was one included with my Mac operating system.  My letters are 475 point in size.  I also used the outline feature when printing to save ink.


I taped them up on the glass and went outside to look them, figuring out where I wanted to align the letters and if they were big enough.  Then, thinking long and hard to make sure they would face the right way once I stuck them on the window, I taped the numbers and letters onto pieces of contact paper.  Since I was spraying on the inside of the doors, I taped the letters face up on the back side of the contact paper, taping in several places so it stayed in place
Then cut out the letter, cutting through both layers.  Take your time to do this well, since the quality of your stencils depends on it.  

After washing the whole window, I used a ruler and a wet erase marker (like for an overhead) to  make a straight line for the bottom of the letters.  Peel the contact paper letters off and stick them on the window.  I used the straight line for the bottoms and eyeballed the spacing between.

Letters taped on to look at them again before peeling the contact paper and sticking.


I also taped the edges of the windows and added pieces of paper from our recycling bin to cover the wood.  I'm not sure how necessary this was, because I'm not sure what this paint would do to it since it seems to spray on clear, but I didn't want to risk it.

Edges masked, letters stuck on, ready to paint.
I chose to open the door to paint to help with the fumes.  I sprayed it completely, waited a couple minutes, then went over the whole thing again--going for slow steady strokes and even coverage.
The can said it can take 10 minutes for the frosted effect to show.  It's hard to see where you've painted because the color doesn't change right away, so it's good to wait for your second coat until you can see where the first one was heavy or light.

Once it's pretty dry (I only waited about 15 minutes), peel your letters off, take off the tape, and step outside to behold your beautiful handiwork!

Finished product

Nice execution of function and style with frosted glass for a modern look!  
How do you like her first project?

Read more...
Related Posts with Thumbnails
Emealz - Easy Meals for Busy People!
Home & Garden Blogs Home & Garden Blogs - Blog Rankings

Blogging  tips, tutorials and SEO

From Here to Eternity

  © Blogger template On The Road by Ourblogtemplates.com 2009

Back to TOP