We’ve Moved!


If you aren’t redirected here is the link:


Remodelaholic!


THANKS!

Showing posts with label Bathrooms. Show all posts

Repurposing an Old Shutter Into a Bathroom Counter

14 September 2011

Repurposing an Old Shutter Into a Bathroom Counter

Thanks so much to everyone who shares in my excitement about my new (old) counters! I really really love doing this project. It is so fun to see something transform from a worn out piece of wood...to a stylin new vanity top! Here is a little background to get you up to speed...
I recently painted the cabinets...(see this post) and the counters were looking a bit blahhhhh. So I found some really cool shutters for the counter..(see this post)....and I am going to keep the same faucets and just purchase a new drop in sink.
I will continue to post about this project for the next few weeks...I will show you how I changed out the plumbing...took off the old vanity top...cleaned up the faucets....and put it all back together! But for now...lets just look at all the pretty pictures :) That's what we all love the best right?!?!

Read more...

Amazing Teenage Boy's Room Reveal

13 September 2011

Amazing Teenage Boy's Room Reveal 

Mary Ann of Classic * Casual * Home, really has some STUNNING spaces in her home.  I wish that I lived there myself!  This room of her sons could EASILY be inspiration for a master bedroom too!  I hope you enjoy it!


This is our son, Tommy's remodeled room.  
When we bought the house, the room looked like this below.
The ceiling was pitched to the right.  We gave it a center pitch and added insulation.  
We removed the middle window and added two on the sides and new oak flooring 

Read more...

Cute Striped Wall Update for Half Bath

05 September 2011

Cute Striped Wall Update for Half Bath


Last time I used the words "half bath" in a post, it was the 21st of May and I was wrapping myself in painters tape in an attempt to make stripes on the walls. (I considered doing that again in red, white, and blue tape as a "GO AMERICA" salute to the upcoming holiday, but I decided that wouldn't be all that cute. Sorta like a Lady Gaga ensemble, but with less need for controversial refrigeration.)


Anyway, we still have some more things to do (ceiling light fixture, finish painting the trim, cover up the washer and dryer that currently share this space, update the sockets and switches so they aren't beige with all of our white...) but a month and several weeks of Rick singing Kumbaya tocoaxing under-sink pipes to stop leaking, we finally have some more updates on our half bath!

Read more...

Master Bathroom Remodel with Double Shower

26 August 2011

Master Bathroom Remodel with Double Shower


After:


One of the biggest projects we tackled in this house was our master bath.  When we moved in, the master bathroom still boasted its 1984 decor: shiny peach floor tiles, three competing patterns of mauve/gray/peach/green/maroon wallpaper, popcorn ceilings, fluorescent lighting, an art-deco-style frosted glass window, two-toned faucets, cultured marble countertops, gray and teal painted cabinets, and a cave-like shower stall.  Aside from the bathroom's overall spaciousness, it was a disaster, and these "before" pictures don't do the horrors justice:

Read more...

Black and Blue (and BEAUTIFUL!) Bathroom Remodel

25 August 2011

Black and Blue (and BEAUTIFUL!) Bathroom Remodel

It’s done!!!!  If you’re new here, then take a look at this post, which did a pretty good job of rounding up all of the dirty details that we’ve been doing over the past 6 months!  There’s also a chapter run down at the END of this post if you need more information.  I am SOOO excited to show you this makeover and thank you generously for your patience during this renovation!  This is by far the most amazing makeover we’ve done to this house – and we’ve done a LOT.  I’ll keep the commentary to a minimum and let the photos speak for themselves…
The Vanity
Before
As you walked in the door, the first thing you saw was the vanity to the left.  Before it was a pretty builder’s basic set up with stock cabinetry, off-centered plumbing and lighting, a wall-to-wall mirror and damaged marble countertops.  The finishes were also mismatched (Oil-Rubbed Bronze lighting and door hardware + brushed nickel faucets = ick!).  I could go on, but you get the point.
After
We replaced EVERYTHING!  Nothing here is original.  New cabinets, lighting, counters – slam-damn EVERYTHING!  There’s so much going on here that I’ll just let you look at the pictures to take it all in.

Read more...

Fabulous Basement Remodel Tour

08 August 2011


Basement Tour By Amanda!


Hey y'all!  I'm Amanda from Dixie Delights and I'm just *delighted* to do my very first guest post over here at Remodelaholic!  Honey (as my mister is affectionately called) and I just wrapped up an extensive renovation on our basement. 
Here's the story that's a year in the making...


Two years ago when we purchased our forty year old home that boasted a "finished basement" clearly they were using the term "finished" lightly.  The space was loaded with navy blue carpeting, dark painted paneling, water stained ceilings, various mirrored walls and various other unmentionables.  I refused to step foot in it, much less take a picture of it.  Hence, I have only a couple of pictures to document the before.  

Read more...

Gorgeous Complete Bathroom Transformation; Gut & Rebuild!

21 July 2011

Complete Bathroom Gut and Remodel 
Submitted by Dream it...Build it...Style it!
After:


We, Nancy and Tony, spent almost 5 months DIY renovating our mainfloor bathroom.  Let me first show you what the bathroom looked like:


Read more...

No More Pink Tile: Bathroom Remodel

12 July 2011

No More Pink Tile: Bathroom Remodel
submitted by Spacey Lacy

So I have been talking about our bathroom remodel for months and although there are still a few things to complete it's pretty much done.  It felt like it took forever at times.  I think that's probably because my husband and I did it all (with the exception of plumbing and major drywall work).

Read more...

Master Bathroom Before - After (and everything in between!)

15 June 2011


Master Bathroom Before - After (and in between!) by Alyssa


Hi, I’m Alyssa from Sweet Sewn Stitches! I have been blogging for a few years, but just recently have been inspired to kick it up a notch and dedicate more time to my story.
I hope to share what is real in my life - as a wife of an amazing hubby, a momma of two under three, who still loves ME time, someone who thirsts for unique tutorials and artsy projects, as a planner, and as a momma who is always looking for more inspiration! 

I am absolutely thrilled to have the opportunity to share on Remodelaholic! Giving our master bath a facelift was on the ‘to do’ list for a LONG time. I despised the ‘dressing room’ lightbulbs, the 6 feet long, wall sized mirror, and the grubby acrylic shower with etched and corroded glass enclosure. It was finally the pregnancy hormones and nesting instincts that sparked motivation to remodel the space. Here is a peek at the transformation!

BEFORE
AFTER

Read more...

Powder Room Transformation!

09 June 2011

Powder Room Transformation! by Carrie

Hello fellow Remodelaholics!
This is Carrie from Hazardous Design. Don't let the name of my blog scare you! The house my husband and I moved into about nine months ago is located on Hazard Ave. It was built in the late 1800's and needed a bit of TLC. Hazardous Design is a documentation of our renovation.

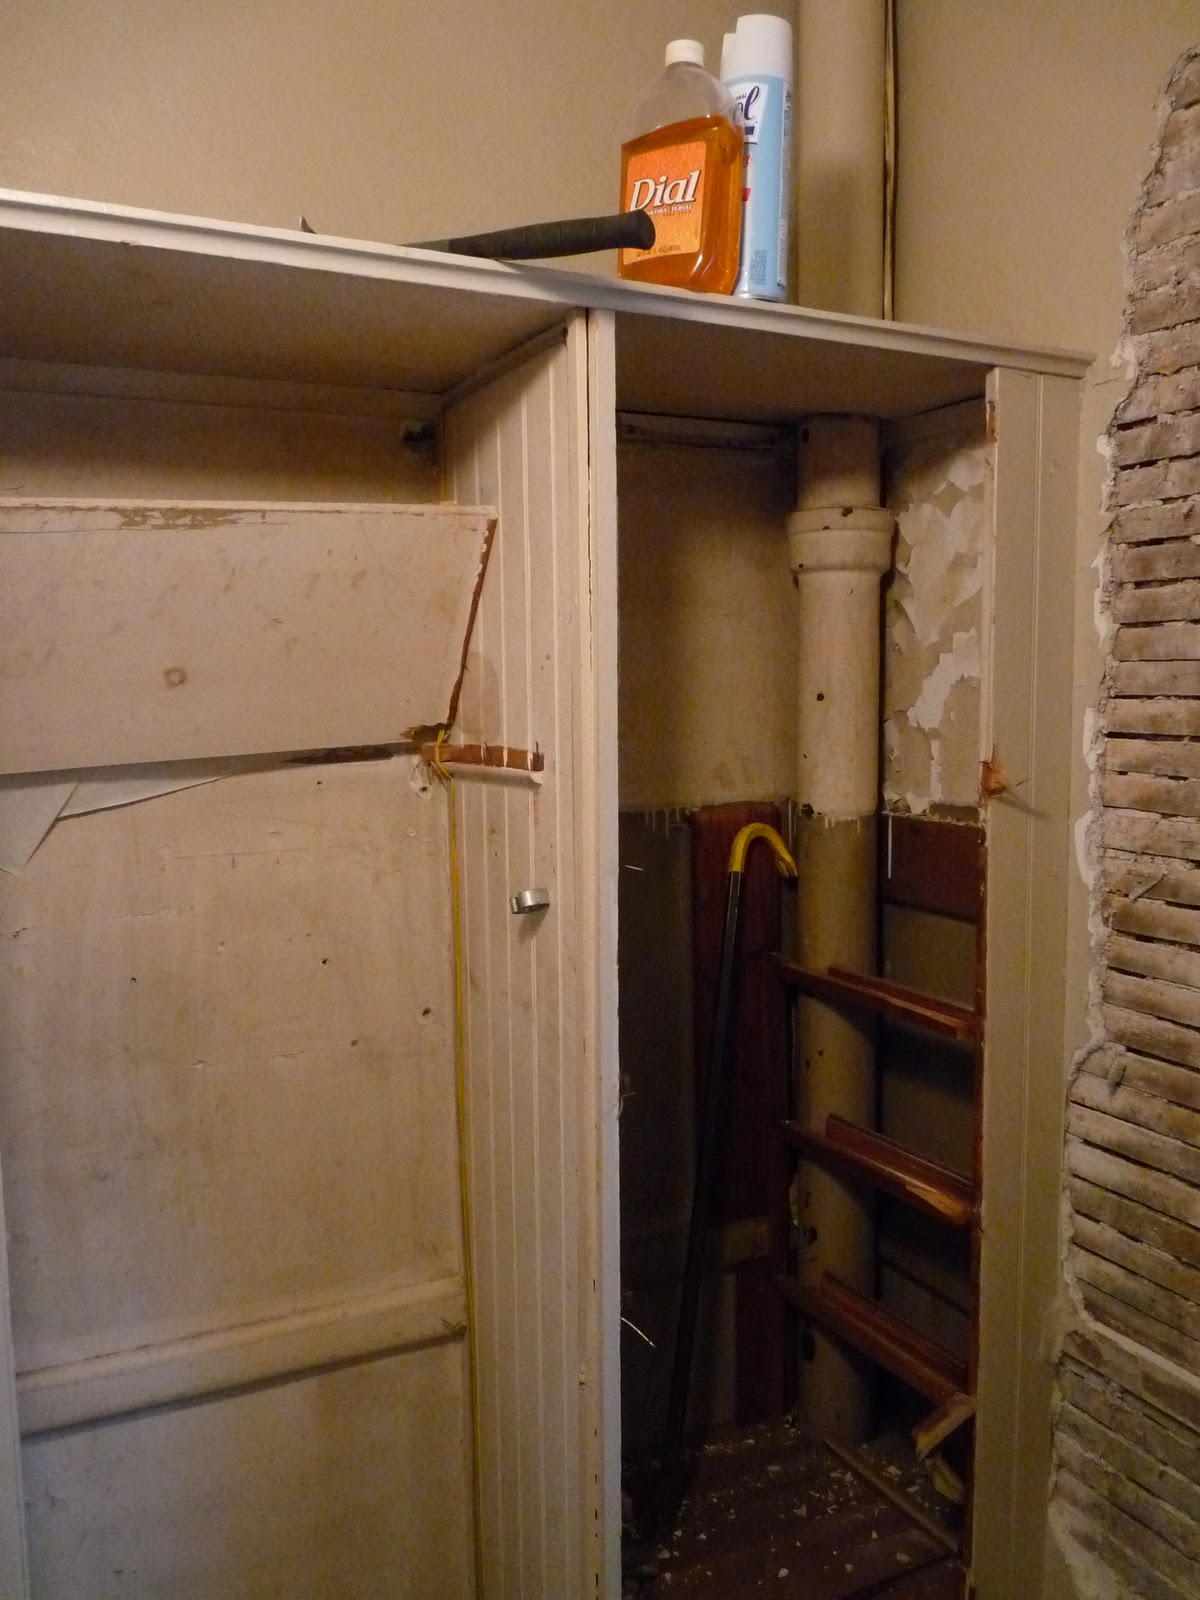
I was very excited when Cassity invited me to share the highlights of our recent powder room remodel and how it went from looking like this:

to this!
It is a bit of an improvement, no?

It all started back in December when my husband, Chris, began tearing apart the old bathroom,
and framed up a new wall to hide the plumbing stack in the corner.
Since we were going through all this trouble, we decided to reorient the bathroom sink and move it against the new wall instead of where it had been under the window. This meant we could have a bigger sink and wire for sconces. So next, we called in our electrician to do the rough wiring.
And then the plumber to install the pipes for the new sink location.
With that done, we could finally hang the wallboard.
Finally we got to the exciting stage of the project (at least for me!), where all of the decorative elements started to come together. We opted for wide plank vinyl beadboard hung 4ft high,
and to use several different sizes of white carrera marble tile.  Chris laid them in a mosaic pattern.
After painting the ceiling blue to match the wallpaper, he installed crown molding. It makes the tiny room look so elegant!
We called plumber back to install the toilet, sink, and radiator, and then asked the wallpaper hanger to come and work his magic.
You can imagine how excited we were at this point. The only thing left to do was install the sconces and overhead lighting!
So finally, after about six months of living with construction debris, dust, materials and tools in my kitchen, we have a completed powder room that looks like this:
 The mirror was an antique mall find. It was originally gold, so I spray painted it black.


If you are curious about what else we might be working on on Hazard Ave, please stop by and visit us at Hazardous Design!


Read more...

Updating A Bathroom Vanity

12 May 2011

Updating A Bathroom Vanity by Becky

Hi, I’m Becky from Goodbye Faux Wood Paneling. My husband and I just recently started our blog in January and I was pretty sure our only reader was my mother so I was shocked when Cassity asked me to share our bathroom vanity project with all the fellow Remodelaholics and I’m really excited to share this guest post today! I’m a full-time working mother and have somewhat of an addiction to DIY design blogs. Since the handy hubby and I are always tackling projects in our own home on the cheap I figured it was finally time to start sharing some of them for others to draw some knowledge and inspiration from. Besides, I figured, even if we never have any blog followers at least we’ll have a chronicle of our home before and afters for our own sake.

The bathroom updating started pretty innocently, in fact it started with cleaning the tile floor. The cleaning went wrong when some grout got scrubbed out of the tile joints and then things snow balled from there. Once the grout project was complete the vanity seemed somewhat tired (read really really dated, and more suitable for cabin/RV use, than a "modern" bathroom"). Brace yourselves because here’s the horrendous before picture.


We decided to redo the bathroom vanity for three reasons; 1) it was tired 2)it would be good practice making cabinet doors for the project that never ends and 3) the floor tile doesn’t extend under the vanity so replacing it would have been difficult.

We used MDF for the panels and paint grade wood (poplar) for the door frames because it’s cheap, easy to handle in our makeshift wood shop (aka garage), and accepts heavy black paint just fine. For the doors, we really liked to the look of a beaded inset door and picked up a rail and stile bit set for our router table that we can use on other projects.

These bits are not cheap but we have a lot of cabinet doors to update throughout the house, so we bought one we liked and will save a ton going the DIY route versus buying new cabinets or having the doors custom made by someone else. After few practice runs and lots of fine tuning of the bit depth to get the doors to look just right we were pretty pleased with the results.


We put an applied bead on the face frames of the cabinet to dress up the existing face frame a bit as well as a piece of modified base board trim to add a “furniture-like” detail to the toe kick on our otherwise pretty basic cabinet. The whole cabinet received multiple coats of grey primer and glossy black latex paint as well as some classy brushed nickel hardware to top it off. Here it is all shiny and new looking.


As far lessons learned, the old standby "take your time" really reared its ugly head on this one, we got impatient to get it completed and that caused some naggling little problems such as brush marks, inconsistent reveals between the doors and door frame and slightly off kilter knobs. Thankfully, those things are really only noticed by us, and all in, we are really proud of our final results. If you’d like more a more detailed play-by-play how-to please click on over to our blog post.

Read more...

Complete DIY Master Bathroom Remodel!!!

12 April 2011

Complete DIY Master Bathroom Remodel 


Hi, I'm Ronda from Batchelors Way.  
I'm so honored to be guest posting on Remodelacholic.  

I'm a stay at home mom to six talented and cute kids.  
They range from 6 to 16.  
They keep me busy.  But I still find time to do what I love and that's design and decorate.  
I have always seem to have a limited budget. 
(Don't we all?)  
So I love to use my creative juices and find ways to do things for less, way less! 

 My most recent project was our master bathroom for around $1200.  
Here is the 
Before

And the 
After


Read more...

Updated Powder Room With Fancy Mirrored Vanity

15 March 2011

No More Brass Hardware: 
Updated Powder Room With 
Fancy Mirrored Vanity
contributed by View Along The Way


Finally! We have some "after" shots of the house. I'm going to post these one room at a time, starting today with our powder room!

Let's take a little journey back in time... to a time when you had to use THIS if you wanted to powder your nose downstairs:


The brass fixtures were a little less gleaming now than I imagine they were back in their heyday. The cabinet door was broken. There was a mysterious paper towel holder next to the vanity. (That's a new one for me. I guess the paper towels were there in case things got a little messier than usual?)

The grunge build-up on the laminate floors was enough to make you bulimic. And if you used the toilet (which we avoided), you quickly learned that it wasn't really screwed in to the floor, and rocked back and forth so you felt like you were on a fantastic roller coaster ride while taking care of your business. Not ideal.

You can't really tell in the picture above, but inside the old cabinet was a massive pile of hair. Er, weave. NASTY! And the walls were a much grosser color than they look here. I'd name it Green Baby Poo.

And then I'd throw it away.

Read more...

Faux Board And Batten For $50

10 March 2011

Faux Board And Batten For $50
contributed by Little Blue Chairs


I am calling this collateral damage.


After spending weeks working on the storage space across from the bathroom I got it in my head that our bathroom was all wrong and needed a bright, clean new look.  So I decided to say Bye-Bye to my little birdies and their trees.


 Now, Don't get me wrong.  I loved my little trees, especially since they were a labor of love (check out Making Mistakes Work).  But, we have been living with them for almost 2 years, and I just felt the bathroom was just screaming out -white, I want to be white. 

I have been having this back and forth struggle with trying to go very pale or adding color to my space.  Latley, I am being seduced more by the very pale look of the Scandinavian country styles that I so love.  So it was an easy choice when it came to changing our bathroom.

Since it is such a small space I felt I could try it out.


I also, wanted to try my had at the faux board and batten.


I think I love it!.

It took me a weeks worth of time to do the work, and around $50 in materials.


I pretty much stripped it down and let the natural elements do their jobs.  The shelf I ended up using was re-purposed from the basement.  I still have 3 of them down there. I love the way it looks so much that the remaining shelves may show up in other places.


And the best response I got was from my daughter who told me it was so beautiful, it brought tears to her eyes. 


Read more...

Farmhouse Bathroom 180 Degree Renovation

07 March 2011

Farmhouse Bathroom Renovation
contributed by HollerDesign


This much needed renovation transformed a dark, outdated bathroom into a space more appropriate to this cute farmhouse. The design combines humble, traditional elements (a cast iron tub, white subway tile, wide plank flooring) with cleaner, more modern features (a wall mounted toilet, recessed lighting, and a vanity with clean overlay drawers.) 


Read more...

Double Bathroom Sinks And Tile For Multiple Kids

28 February 2011


Double Bathroom Sinks And Tile 
For Multiple Kids 
contributed by The Boys & Ruby

When we bought our new house 3 years ago, it was a beautiful Cape Cod style house and only needed updating.  The carpet was burgundy and there was burgundy paint throughout along with all types of wallpaper and brass accents everywhere.  We re-did this bathroom while I was pregnant with Ruby (before I was layed off!). It only had 1 sink and a door that separated the bath area from the sink area.  This would have been a nightmare getting 4 kids through here in the mornings, so we decided to do a super kid friendly remodel, durable clean and more open.  We tiled 3/4 of the way up the walls and I think we put 3 sub floor sealers for water in case they ever flooded it!  I think it turned out really great.  Sorry  about the quality of the photos, the before shot was how it looked before we moved in when the old owners were still here.

Read more...
Related Posts with Thumbnails
Emealz - Easy Meals for Busy People!
Home & Garden Blogs Home & Garden Blogs - Blog Rankings

Blogging  tips, tutorials and SEO

From Here to Eternity

  © Blogger template On The Road by Ourblogtemplates.com 2009

Back to TOP