We’ve Moved!


If you aren’t redirected here is the link:


Remodelaholic!


THANKS!

Showing posts with label Repurpose. Show all posts

Make Your Own Blue Glass Jars Tutorial

25 October 2011

Make Your Own Blue Glass Jars Tutorial


No, I'm not having crazy preggo cravings (cuz I'm not preggo)...and no, I haven't lost my mind either!  I just happened to make some candles out of some saved up jars that used to be in the fridge...holding food.
Honestly, most of these jars would typically wind up in the recycling...but I finally got smart.  You see, there have been times when I've said to myself, "self, that's a cute project that involves a glass jar!" But then I realize that I don't have any glass jars.
On one occassion (cough, cough, hint, bridal shower) I even bought some mason jars because I didn't have any on hand.  Boy was that silly!  After seeing the stash I'd collected in just a few weeks, I'm hoping that I've learned to go green and put those containers to new use, through one craft or another.
This project was something that I've been dye-ing to try!  LOL!  I crack myself up!
I'd heard it was possible to dye glass different colors using glue and food coloring, but I wanted to give it a test run.
Honestly, the most difficult part of this project was getting the stinkin' labels off of the jars.  I couldn't find my trusty Goo Gone, but I found soaking the jars in warm water to be helpful.
Once they were soaked, I peeled off what I could, and scrubbed with soap and water to remove the rest of the sticky gunk from the jars.
Then I went all out and spent a whopping $.50 on some school glue.
To get some color, I used a few drops of blue food coloring and a hint of green food coloring.  This created an aqua color, and in case you haven't noticed, I happen to be in love with aqua!
After one coat, the glass had a nice soft tint, but I wanted to go for something with a bit more pop.
The second coat was just what I was looking for.  I loved the color and the level of transparency!  These photos were taken when the glue was still wet...
...and these were taken once the glue had dried.... 
One word...L.O.V.E!
This project was so easy, so cheap, and the results are so fun!  I can think of so many fun things to do with this, but for this photo shoot, I just threw some candles in.
I tried to get some shots from different times of the day so that you could see the color in different lighting.  I loved how the color appeared soft in strong light, but more vibrant in darker light.  They looked pretty natural to me, but what do you think?
Granted, there were a few spots where I didn't catch the air-bubbles or the drips, but I never sweat the small stuff when I try a project out for the first time.  
I learned that I need to wait a bit longer in between coats so that the glue can dry completely first, but you might remember from this project that waiting patiently has never been one of my strong suits.
Grand total on this project...$.50, and a few hours.  A great project for some weekend craftiness on a tight budget!
So here's what I learned:
  1. Keep food jars! It's green and fun! This is just one of many crafts you can do with them.
  2. Patience is a virtue.  Wait longer in between coats.
  3. Don't sweat the small stuff.  Projects don't have to be perfect all of the time.  In fact, in many cases, imperfection creates an aged or weathered look.
  4. It is possible to craft for less than $1.00.  You don't have to spend a lot of money.  Use what you have around the house.
  5. This idea could be used to make cute gifts.  Fill the jars with bath salts, or even snacks.  The glue is on the outside of the jar, so it won't contaminate any food items!
So tell me, what would you do with these jars?  What color would you paint them?  I think I might try some red and orange ones next considering fall is just around the corner.  I'm so glad I tried this!

                                                                           
This project was contributed by one of our fabulous readers! We love to share your projects with this great blogging community. So, if you have projects from kitchen renovation ideas to small bathroom remodels, overhauled and repurposed furniture, spray paint updates you name it please send it in! Thanks for reading Remodelaholic!


Other fun DIY projects HERE:

Read more...

Repurposed Faux Fire Place Mantel

24 October 2011

Repurposed Faux Fire Place Mantel

It’s been about two weeks since we shared our faux fireplace redo, and gosh darn it, I think it’s nifty. There are two problems with it, one of which I think we finally solved. The plants in the apple box just didn’t quite go with it, and it is a little big in scale for the living room. While we are considering moving this beauty to another part of the house sometime down the road, we finally got to the project of redoing the inside.
Photobucket

Read more...

$9.00 DIY Deer Head Decor Idea

30 September 2011

$9.00 DIY Deer Head Decor Idea

i spotted these deer on clearance at michaels this afternoon.
$8.99 each.
my mind starting spinning.
i purchased them and headed to home depot (aka butcher)


the guy at the tool rental thought i was a little weird, walking around with a deer in my cart and taking pictures of it.
he was convinced that i was crazy when i asked him to cut off their heads.

luckily he obliged.

are you confused?
i think this might end up being my best diy project to date.

i think they turned out fantastic.


what do you think?    

                                                               
This project was contributed by one of our fabulous readers! We love to share your projects with this great blogging community. So, if you have projects from kitchen renovation ideas to small bathroom remodels, overhauled and repurposed furniture, spray paint updates you name it please send it in! Thanks for reading Remodelaholic!


More fun wall art! Check 'em out:
Read more...

Crib Turned Magnet Board Re-purpose Project

22 September 2011

Crib Turned Magnet Board Re-purpose Project

BeforeMy good friend Allison had a very clever idea to take the two ends of an old crib she had and repurpose them into magnet boards. And this is what Mike came up with.

Read more...

Repurposing an Old Shutter Into a Bathroom Counter

14 September 2011

Repurposing an Old Shutter Into a Bathroom Counter

Thanks so much to everyone who shares in my excitement about my new (old) counters! I really really love doing this project. It is so fun to see something transform from a worn out piece of wood...to a stylin new vanity top! Here is a little background to get you up to speed...
I recently painted the cabinets...(see this post) and the counters were looking a bit blahhhhh. So I found some really cool shutters for the counter..(see this post)....and I am going to keep the same faucets and just purchase a new drop in sink.
I will continue to post about this project for the next few weeks...I will show you how I changed out the plumbing...took off the old vanity top...cleaned up the faucets....and put it all back together! But for now...lets just look at all the pretty pictures :) That's what we all love the best right?!?!

Read more...

70's Coffee Table Refinished To Buffet Table

29 March 2011

70's Coffee Table 
Refinished For Kitchen Nook as a Buffet
contributed by Under A Copper Sky


Here's the little 70's coffee table
that I turned into a table for our kitchen nook.  
Can I say,
love,
love,
love!!
From this

To this


To in my beautiful kitchen


Read more...

Old Barn Door Recycled into Kitchen Table

11 January 2011

Old Barn Door Recycled into Kitchen Table
contributed by Mason Bay


Hinges, and latches adorn my kitchen table. An old barn door, attached to some legs, and perfection. 

The door became a beautiful kitchen table. 

The plain wood legs, and base needed something, so a white wash, and paint stained clothes was a must.


Read more...

Card Catalog Remake into Buffet

20 October 2010

This amazing redo-rework of an old card catalog totally caught my eye!  Now I want one!  Although I might have to ask Adrianne from Dream Book Designn to do all the hard work like they did for this one!  AMAZING!  Here is her explanation of what she did!


should just start off by saying that in this post I tend to toot my own horn, a lot. However it's not because of me doing anything amazing myself, but for the fact that I am married the most AMAZING man ever! Go me!

A couple of months ago J bought this massive card catalog from Craigslist. It is from a closed down old Phoenix Public Library. It was so incredible, but yet we had no idea what the heck to do with it. It sat in the garage for a good four months until one day my hubby had a "light bulb" moment and decided he would take it apart and transform it into the most beautiful buffet ever...really, ever!

This is what we started with:


Here is the process:


  • Removed the 72 drawers, numbering each with tape as we went so we could place it back in the correct spot
  • Removed the outside plywood casing of the original cabinet
  • Separated the four sections of 18 slots that were stacked 4x1 and reacquainted the with each other in a 2x2 buffet setting. Screwed the sections back together


  • Purchased two 4'x8' sections of oak plywood and had Lowe's cut them to size for free. These would be the new top and base, but we used the original casings for the sides to preserve the character of the piece since they have great splits and dents already.


  • Secured 8 legs purchased from Lowe's for $8 each to base sheet of plywood in a diamond pattern {the card catalog is probably 350 lobs. so we were really, really, relieved when the base withstood all of the weight.
  • Added 3/4" trim purchased from Lowe's and cut at home with our Miter saw, then pathched the nail holes with wood putty.


  • Sanded, re-sanded, and sanded some more to really smooth things out
  • Painted all {freaking} 72 drawers {with a smile of course}and whole thing with Behr Premium Plus Ultra paint and primer in one from Home Depot {color:Rhino}- random fact: we will ONLY ever use Behr PPU for all projects, it is in our minds thebest
  • Rubbed some stain {Minwax Dark Walnut 2716} all over with a small brush and a few rags to give the antique look, followed by a little more sanding and then some Minwax Wipe on Poly to seal it


  • Lastly, we placed all the original hardware back on each drawer {minus the 4 that are missing the little circle do-dads, we are very technical over here, do-dads} 


So far we have figured out that we can stick wine bottles, cloth napkins, serving utensils, and other small things..but lets be honest- 72 drawers is a little much! We shall see what junk I can find to fill it up...
Finally, how rad is my J. What hubby thinks of this, and then is even excited to do it over his three-day weekend. I kinda love him.


They had SUCH incredible vision!

That piece is stunning and I am in love with it too!
What are your thoughts?

Read more...

Feeling Spindle-y, Re-purpose, Guest

04 August 2010

Gail from My Repurposed Life sent over this little project and I love it.  I think they are beautiful.  And after reading her post I am wanting to move to a place where you find such great junk on the side of the road.


100_5869


Jamie told me that I needed some height on my mantel. I was thinking candlesticks. I looked at the store (Meijer) and I saw that they are VERY expensive. I braved the cold in the garage and rummaged around to see what I could find.
100_5760

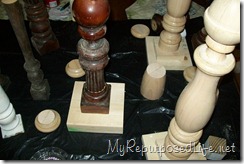
This is a bedpost from a full sized bed that Cathy and I found on the curb. It wasn’t really bench worthy, so I parted it out. I cut off the posts and legs, and threw the headboard away.

100_5762

This is another bed post, not sure where the rest of this bed ended up. :)

100_5764

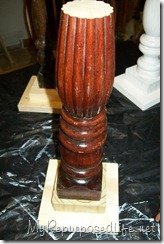
While in the garage, I also cut some 1x’s and some 4x4’s into squares for bases.

100_5767

Then I sort of just started playing around with the configurations. A lot like I do when I make totems.

100_5769
This is a 1x5, and part of a bed post/leg.
100_5771
Here I added the top of another bed post.
100_5774
I sanded the rough edges, and cleaned up all the saw dust.
100_5778
This is the bottom part of the bed post pictured above.
100_5777
This is a 1x5, and a 1x4, a part of a staircase spindle, and the top (finial) of an old chair.
100_5783
This little cutie is a 1x5, 4x4 and a chair leg!
100_5784
This is the other part of the stair case spindle, with another chair finial on top.
I used gorilla glue to hold all the pieces together. I could not decide what color I wanted, so I chose 3 different colors.  Here I have one of those cute little glass ashtray pieces I picked up at the peddler’s mall.
 100_5787  100_5788

This is the same turquoise I used on my last window cabinet I made. I watered it down so it was more like a glaze. I used Kilz on all of these before I painted their new colors on them.  This white one is the free Glidden “Crisp Linen” with a wash/glaze of raw umber over it. The browns are a glaze of raw umber. The candle I got on clearance this week at Walmart for .25 cents.

100_5797 100_5800
100_5868

I put them in my gynormous firebox and lit the candles.
100_5861
100_5863

I am not sure what configuration I will use. I don’t know whether I will keep them in the firebox, put them on the mantel, or on the hearth. I may change up the colors. I tend to change my mind a lot. Ideas? Suggestions? I’m sure you true junkers have lots of items in your stash that you can make these from. They sort of remind me of chess pieces.

I am still enjoying my fireplace and can hardly believe I actually made it!

Love it!
Does anyone else have any clever re-purpose ideas?  


Read more...
Related Posts with Thumbnails
Emealz - Easy Meals for Busy People!
Home & Garden Blogs Home & Garden Blogs - Blog Rankings

Blogging  tips, tutorials and SEO

From Here to Eternity

  © Blogger template On The Road by Ourblogtemplates.com 2009

Back to TOP