We’ve Moved!


If you aren’t redirected here is the link:


Remodelaholic!


THANKS!

Showing posts with label Our Furniture Projects. Show all posts

One Hot Bottom, uh I mean Hutch!

28 July 2011

I know, I know, a very naughty title.  Forgive me, but I really am talking about the base of this hutch.

Check out the 1st and 2nd post about this piece if you have the chance!

Originally the hutch base had three doors.  The thing that bothered me the most about the original look is that the spacing didn't match the top doors.  Function wise, the middle section didn't move, it was nailed in place and only the two outside doors worked.  AND the doors were literally 2 inches thick, so the space inside was limited and I hate wasted space, I want this hutch to store stuff so I needed more space.

When coming to a look we liked design wise, we tried to copy as many details from the top that we could.  That doesn't mean that all the details were the best, but that the two pieces needed to work together so we took our cues from above (ha ha).


We started by adding a face frame to the sides.  Because the original doors were the front face frame and we wanted to make the new piece a little deeper, so technically the original frame sits back a few inches.  One detail we added to make it look a little more classy are the side panels. We made the sides to match the existing upper doors, and the new base doors. 


For the bead detail, we found a molding that worked and ripped it down on the table saw to the proper width, and applied it on instead of using the router.  At this point we also made the feet an inch or two longer than the original base cuz I mentioned earlier that we wanted it a little taller.


Justin then made a basic face frame and nailed it in place to the front.  It overlapped the side panel about an 1/8 of an inch, similar to the existing top.


I wanted the doors to match the glass doors, so he made those to look as close as he could.   But, one thing we did have to change a bit were the door dimentions.  Because we added the face frame it would have made the two side doors really small, so we had to tweek it a bit (along with the drawer section) but we think it turned out okay, see if you notice)


Lastly, when I was looking for inspiration on how I wanted my hutch to look once updated, I saw a lot of molding wrapped bases.  So, we went for that look, and it has teh added benefit of keeping little baby things, cat toys and junk from falling under the furniture.

Before paint this is what the piece looked like.  (so much better than before... you should really scroll up there and check it out)


Now on to putting humpty-dumpty back together again...  Here are all the pieces coming together.  You can see in this picture that the stencil is really subtle.  I am liking this....


I decided that I didn't want to have to spray paint the inside shelves outside and I was going to ignore them completely, but it took a while to finish and install the doors, so one day I just sat down and painted the interior.  I am glad I did.

Trying on the doors for size...


Then off again to paint... now for the fun stuff dishes.  I realize for some people's taste I may have too much stuff in there, but I am really happy with it, and it changes occasionally, but not too often, and not too much.  This really is about function for me cuz I totally have a dish fetish so I need storage.


Quick reminder of the old:


And FINALLY with the doors back in place and painted!  Now all we need to finish are the drawers.


Hey everyone!  Hope you can't see the dirty dishes I am neglecting in the reflection of this bowl!


Here just so you feel satisfied, I photoshopped (not so expertly) some drawer fronts on there. 


What do you think about our project?
It only took me about 10 months to blog about it...

Remodelaholic is written by Cassity and Justin. Cassity has a degree in interior design and Justin is a landscape architect, so we adore everything that makes up a HOME! We love to share home remodeling ideas and projects we’re working on. From huge kitchen renovation ideas to small bathroom remodels, there isn’t anything we won’t try to tackle (at least once!). We are in the midst of our third whole home renovation, (check out house 1 and house 2 as well, so there should be a lot more inspiration coming your way. We hope that you will stop by often for home design inspiration, tutorials, interior design tips, delicious recipes and what going on in our family life.


Read more...

How To Update A Hutch; Part 2

Finally- I am back to show you what we did on this hutch.  In all honesty, I have had this scheduled to post for the past 3 mornings but haven't been able to finish it to actually post, so I have been scrambling to get things posted every night... actually I am almost always scrambling nowadays, moving on.

Read more...

Hutch Makeover Part 1

20 July 2011

A while back, when contemplating how to possibly earn an extra buck to pay off pesky student loans (urgh)... I thought well maybe we should refinish furniture(there are a lot of people doing a great job with this).  So, I went to consult my buddy Craig S. List.  I had just had some great luck selling an entertainment center so I bought another for cheap to redo, while picking it up I noticed that they also had a hutch.  I have wanted one for a while, so for two Andrew Jacksons I secured that deal, not a fabulous steal but not bad (that's 40 buck in case you are wondering...).

I was thinking I would refinish this too and sell it, but then I put it into my house and realized, I have a dish addiction, and you thought I was only a Remodelaholic.  But you guessed it, soon the hutch was mine, it was darn ugly a little stinky but all mine!

Besides, I realized, I am not fast when it comes to furniture makeovers, and it is not worth it for me to part with a piece that has taken so many consecutive naps times to finish!  I would be charging a thousand smackaroos for an end table...

Back to the point of this post.  Here is the hutch before:

Tt totally reeked inside so I had dryer sheets in there and bowls of baking soda, it didn't work, we also got away with out the shelves, so I was trying to visualize stuff in there by using my dinner plates between the supports!


(no quite finished) After:


You may have noticed there is an extreme difference between the top and the bottom image.  Mainly the base is completely different.  I will show you what, and how we did this soon!

p.s. It isn't quite done, we still plan on adding 3 drawers... but we will see when we get there!  
For now it is a perfect place for a nap... a cat nap that is.


 My sweet dorky furball children!

TO BE CONTINUED!
Getting the hutch painted and the final reveal!

Remodelaholic is written by Cassity and Justin. Cassity has a degree in interior design and Justin is a landscape architect, so we adore everything that makes up a HOME! We love to share home remodeling ideas and projects we’re working on. From huge kitchen renovation ideas to small bathroom remodels, there isn’t anything we won’t try to tackle (at least once!). We are in the midst of our third whole home renovation, (check out house 1 and house 2 as well, so there should be a lot more inspiration coming your way. We hope that you will stop by often for home design inspiration, tutorials, interior design tips, delicious recipes and what going on in our family life.

Read more...

Living Room Update 4; Installing Wainscoting and Column Moldings

09 February 2011

Living Room Update 4: 
Wainscoting and Columns...
By Remodelaholic


If you wanna read about our current project click here Part 1Part 2, Part 3 Rugs, and Sofas.


Teaser pic...

I am sure you all are ready for the living room to get exciting... and guess what I am about to heat it up!  This post is where our living room gets "it's HOT on"!

I know... I am a nerd.  A living room loving nerd.  I can't help it... I have been waiting for this moment for a while now, and you wanna know the funny part?  (we still aren't quite done) but I look back at the before pictures and I am like "Oh my gosh- who would ever do that much work..." I do it every time we have a major change, I live through it, then thank my lucky stars I never have to do that project again! (and move on to the next, what can I say, I am a glutton for punishment!)

SO- DO YOU WANNA KNOW WHAT WE DID?

I really want to tell you, so let's go.

Read more...

Opinions Needed! Please Help!

11 October 2010


Needed: some constructive opinions 
and help, please read!!

Hey Everyone-

Guess what!- this is the actual author of this blog.  Cassity, AKA Remodelaholic, AKA the missing blogger... I know amazing right?  You haven't heard from me, besides intros to posts for about 20 weeks.  I apologize for this, my morning sickness is extraordinarily LONG!  - But I can see the light, and something besides the porcelain throne in my bathroom, so things are looking up for me.   (BTW we are having another girl- yea for sisters!!)


As I am finally getting back to normal - we have been working S.L.O.W.L.Y. on some projects and I would like to share them with you, BUT I am extremely short on time.  So, I have been doing some thinking about ways to save time, and I would like your opinions:

1. First, instead of typing out intros to featured posts, I am considering simply writing the title of the project and who the blog post is by with a link (like I have been doing on my craft blog seen here or in the example below).  This has saved me a huge amount of time on my other blog and allowed me to show off more projects and I think that is what I am going to start doing here.  What do you think? 


Example:
Brand New Living Room Design


Hopefully, and I have to say that tentatively because I have a 14 month old that needs a lot of love and attention this means that I can take some of the time that was writing intros (21 times a week mind you!) and write a post about what we are up to.

2. Weekends-  I have played with this idea off and on and just haven't been able to give them up and still don't want to make promises as to yea or nay.  So here is my compromise:   When it comes to weekend posts, we will continue to have the weekend link parties for you to glean inspiration an share what you have been working on the basic schedule :
  • Friday morning 7:00 AM CST- Remodelaholic's Anonymous  (still planning on 2 other feature posts this day, fyi)
  • Saturday morning 7:00 AM CST - For Sale by Owner, your chance to show off what you are selling on your blog, or Etsy shop, furniture you've refinished.  This is for HOME BASED businesses that are family friendly.
  • Sunday morning 7:00 AM CST: Recipe link Party; I will share a recipe and you can show me what you've been cooking up.
As far as other features (on Saturday or Sunday), I am not going to promise that there are any.  If I have the time, great, if not, please feel free to look through archives and or click around on all the lovely links from the parties.  These two days will be interactive for you and a rest for me.  Would that work?


3.  I have received a few emails recently about the blog page loading slowly.  I don't seem to have a problem at my house or at my husbands work, so I didn't know.  But this means we need to do some blog design cleanup, which I can tell you for this semi html-illiterate blogger takes some time.  But I want to you know that we are going to be addressing this as soon as we can.  ...please bear with us.


4.  Truth be told, lately for obvious (illness) reasons I have been less of a Remodelaholic and more of a momaholic, just doing what I have to to survive a toddler and morning sickness.  I am BARELY getting the hang of getting the dishes done with a fully mobile child standing in the dishwasher "helping"...really how do mothers with several children do it all???

...but this hasn't kept me from dreaming up great plans for our house.  The fact is, a lot of these awesome plans stay just that plans - in quick sketch form on my graph paper.  BUT the plans are interesting.  I do sketches, sometimes several versions and they look kinda cool and I was wondering if that would be interesting for you guys to see?   With the caveat that most of these plans will never see the lumber store.

I thought that maybe I  can explain the process a bit and the goals for the project and that would be that.  If it comes to life and we actually follow through with one, then I will go into more detail of course.  So the question is
Would you like these kinds of posts?


5. Also, I have a passion for space planning, hence the unused plans and sketches I am always drawing... But I would love to show off some of the ideas we have come up with while shopping for houses or helping family out with floor plan options and quick changes.  Unfortunately- I can't do yours.  But you might get some inspiration for what could possibly happen.   Would you like to see some Space Planning Posts?


Okay, that is all I really have on my mind at the moment.  Please consider giving me some constructive feedback to some or all of the questions I have asked.  And hopefully I can get going on them asap, although I still think it may only get to be one post per week by moi... but at least I might be  little more involved right?


OH YEA! wait...


So, it seems that we have moved into the crafting season.  People are settling into home and feathering their nests not so much remodeling them which means:


I REALLY need some Projects Submissions  

In the subjects of:
Before and After
Remodeling
Decorating (the whole room type)
Building Tutorials
Furniture Remakes or Redos
Up-cycle building projects
etc.

Please try to keep the subject as Remodelaholic friendly, if I feel it is more craft blog friendly and would like to feature it there I will let you know.   Also I need more than just one before and after picture, they need to be clear and hopefully explanatory.  So, email me links please, the more projects you link the more likely I will be able to share one.  (remove spaces but here is the email)

remodelaholic @ gmail . com

Read more...

Wardrobe no more, Part 2 of 3; Transformation Idea

08 June 2010

Hey it is me... the person that runs this blog... and guess what I actually have another post this week.  I know it boggles the mind...  Last week I explained how we transformed the outer shell of our old cedar wardrobe/armoire.  Here is the before and after to refresh your memory.


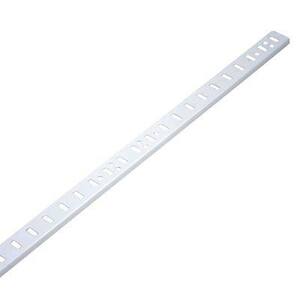
When we finished with the outside, the inside was completely empty except for a clothing bar, so we had to retrofit it with shelving.  We went for an easy option, that is pre-made in the shelving section at the hardware store. 

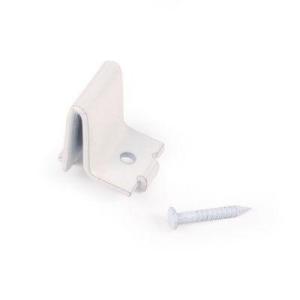
I can't find the exact name but they are shelf support strips with horizontal slots that you use a shelf bracket with, then the shelving sits right on top of that.  On the Home Depot site they are here, and they look like this (image courtesy Home Depot) technically we have metal.  The shelf supports are pictured next to it.
  

The shelf clip allow you to adjust the shelving whenever you needed, so we chose to go with that rather than fixing the shelves in place which could also be an option.  The tricky part with these systems is that you need one for every corner and they must be lined up exactly in order for the shelving to be stable so don't rush through this installation step.  Do it carefully. And when you paint don't be as sloppy as me! (in fact I painted these in place a year after we changed it.... next time.....)


If you are good at wood working you could do something like this:  
It would be more work but nicer craftsmanship!

The next thing that we did was have wood cut for the shelving.  At the time we used 1/2" MDF.  Today if I were to do it again, (which we might... someday)  I would use plywood and attach a solid wood front to each piece.  The solid wood banding or edging will help to support the center of the shelf so that it doesn't sag as easily, it also will cover the ugly plywood layers.  We would have done this band on the front and back for the best support, you could just buy a 1 x 2 and attach that with the excess hanging down in front and that would make the shelves look more substantial. 

or sorta like the image below only not as thick

An Unfinished Plywood Table 

Okay, at this point, if you have the proper dimensions of the wardrobe, you can have the plywood sheet cut down to size at Lowes or Home Depot when you purchase it.

So, now you just need to:

Attach the banding with finishing nails, and a little wood glue in the joint
putty the holes.
Lightly sand
paint or finish your shelves.

Put in your shelf supports and the little brackets and you have a very functional adjustable piece of furniture.

At first, we left off at this point and put our TV, DVD player, music player, speakers and DVD's in here for 2 years.  It was perfect, when we wanted to see the t.v. it could be opened, when we didn't it looked like a nice piece of furniture but not a HUGE focal point.

Fast forward two years, and a move across the country.

This piece is no longer needed as an entertainment center.  But what could it be?...  We needed a localized place to put our computer, but I hate to see the mess... so we fixed it again!   We decided this time to make it into a small home office in a wardrobe. (just beyond the fur coats and by the lamp post Mr Tumnus can be your personal assistant)

The shelves were already adjustable, so we figured out where we wanted the shelf for the monitor (whic also happens to be our TV for movies which is why it is GI-NORMOUS, and how much space we needed for the HUGE tower that is a bit archaic but luckily for our budget is still working like a champ!

One consideration is the keyboard and this was the major change that we made this time. It is most ergonomic to be bale to type over your lap and not leaning forward so we needed a drawer of sorts for the keyboard to be able to pull out and be used.

The drawer slides had to be really strong so they could support the use and abuse and weight of your hands resting, and sometimes leaning on my elbows drooling over awesome projects on people's blogs...

This is the type of hardware we bought
It is a ball bearing fully extendable slide.  You can see what it looks like here:


(this picture especially shows how much better it would have looked with the solid edging band, 
and it also shows my crappy paint job...)

And this is how we basically built it:


Okay so here it is in it's semi messy glory.  * I really want to buy some nice storage organizers, but don't want to spend the money, so in the mean time, I wrapped two boxes with matching wrapping paper, but someday...


All in all it is a great space, and when it is a mess, 
which is usual since I am working on this blog so much... I can just shut the doors and no one knows but me!


Next week I will be back to explain how you could possibly do this:


Any questions?  If you have them leave a comment and I will respond in the comment section so everyone can see the answers!

Read more...
Related Posts with Thumbnails
Emealz - Easy Meals for Busy People!
Home & Garden Blogs Home & Garden Blogs - Blog Rankings

Blogging  tips, tutorials and SEO

From Here to Eternity

  © Blogger template On The Road by Ourblogtemplates.com 2009

Back to TOP