We’ve Moved!


If you aren’t redirected here is the link:


Remodelaholic!


THANKS!

Showing posts with label Sewing Projects. Show all posts

Fun Fall Sewing Project! Owl Pillow

08 September 2011

Fun Fall Project! 
Owl Pillow


I had my adorable niece in town the last week of August!  She is going to college this fall!  It is so crazy to think that she is already graduated from high school.  And I have to laugh at myself because I so have those moments... you know the " I remember when you were 2 and you got into my makeup and crushed all my eye shadows all over the floor..."  Which she did!!

But it kinda cracks me up.  Because as a kid you roll your eyes at the reminiscing of old people... and now I am that old reminiscing person, and it is amazing how fast time flies, and how our concept of OLD changes... (I am so not old!)  Here are some pics from her visit!


Anyway since she is going off to college, we went shopping at the mall a lot (and my favorite thrift store! it was 75 cent day!  We both scored big time!) but when funds were running low we decided that it might be fun to make something and that something was an owl pillow.  

I miss doing little simple crafts- we are in big project mode for our house.  I had a lot of fun doing it too!

Here is what my owl looks like!

We went through a ton of fabric...in search of the best!  
'Liza (my niece) did a cute round sleeping owl in all sorts of colors.  


I decided to stick to a fall colors theme.  I thought that it might be fun to use with my huge candy corn pillows, I used a lot fo the scraps of fabric that I had left over from my lighted ragamuffin garland (pictured below!)


Here is the owl coming together!

and sewn on...

Etta helped me stuff it, she was in love with it immediately!  (yes the house was a mess, I decided it was time to go through all the girls clothes and purge... We have a LOT of baby clothes!)


Here is Liza and Etta loving on their owls.


Would you be interested in a pattern?  
Let me know.... if I get enough interest I will try to make one!


Remodelaholic is written by Cassity and Justin. Cassity has a degree in interior design and Justin is a landscape architect, so we adore everything that makes up a HOME! We love to share home remodeling ideas and projects we’re working on. From huge kitchen renovation ideas to small bathroom remodels, there isn’t anything we won’t try to tackle (at least once!). We are in the midst of our third whole home renovation, (check out house 1 and house 2 as well, so there should be a lot more inspiration coming your way. We hope that you will stop by often for home design inspiration, tutorials, interior design tips, delicious recipes and what going on in our family life.

Read more...

Wingback Chair Reupholstering Tutorial

27 August 2011


Wingback Chair Reupholstering Tutorial 

 It is done! Done! Done! Done!


I mentioned earlier this week that I started the actual upholstering part of my wingback reupholstering this weekend and finished it in two days!!!!  It was on my "list of things to finish before my parents get here" so I thought once I start I have to get this done.

I started this project over 3 months ago {see first post here} and like many things in design it never turns out exactly the way you think it is going to go.  I first started out {in May}wanting to write a really detailed tutorial about how to reupholster a piece of furniture; even though at that point I had NEVER actually upholstered anything before... I thought if I can do it anyone can.  BUT I was not as detailed as I thought I was going to be at documenting my progress... and in the end {with a great chair but not a great "How To" post} that is the best advice I am going to give you.... BE DETAILED!!!

I started with this:

Read more...

Stenciled Drapery Tutorial

26 May 2011

Stenciled Drapery Tutorial by Heather


Hi Remodelaholic readers!!!  I am so glad to be guest posting today, from one remodelaholic to another!!!  I blog over at {twenty}something where I write about turning a builder beige turn-key into a home through lots of DIY projects and lots of great Pottery Barn and West Elm knock-off tutorials...all done on a teacher's budget!
My husband Rusty and I are both teachers at the same school, so we budget out our weekends and summers to cram in as much home remodeling as possible.  Here are some of my favorite projects:
My White Mantelscape with shutters and a coffee filter wreath.
Pottery Barn Jewelry Holder Knock Off made form a thrift store frame and some jewelery wire.  Cost totaled under $3.00 for me!
Pottery Barn Hundi Lantern Knock Off made from a thrift store light fixture and a glass hurricane from Michael's.  Cost totaled under $30.00!
Oversized Pottery Barn Clock made from plywood and a homemade stencil.  Project cost under $10.00!


Here is the project I am sharing today.  I took my breakfast nook from this:
To this:
Since Christmas, we have been redoing our breakfast nook.  Since curtains are the next most dramatic thing you change in a room besides paint color, I set out to make some curtains inspired by this West Elm photo:
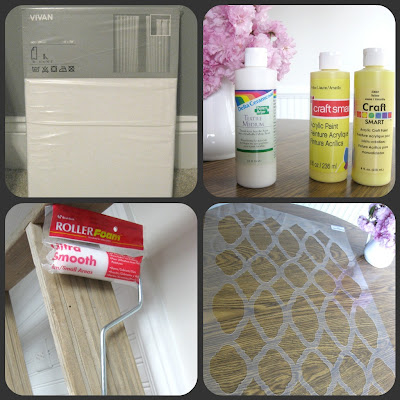
Supplies:
  • Curtain panels (Ikea Vivan in white)
  • Acrylic Paint (Craft Smart, Yellow)
  • Fabric Medium (Delta Ceramcoat)
  • Stencil (Zagora Allover Stencil from Cutting Edge Stencils)
  • Foam Roller
  • Brown Craft/Painter's Paper

Steps:
1.  Cover a large, flat working area with heavy paper to catch all paint that might bleed through.  I used my breakfast nook floor.
2.  Wash and dry curtains.  This will keep the curtains from drawing up later on when you go to wash them.


3.  The directions say to iron the curtains.  Mine were not wrinkled when they came out, so I just skipped this step and smoothed and tugged out the wrinkles.


4.  Mix your paint.  You can use fabric paint, but I found that it was too expensive.  I just bought acrylic paints and a product called Fabric Medium.  You just mix 2 parts paint to 1 part fabric medium, and you will have tons of fabric paint for next to nothing!  Play around with your shades by adding colors together until you get the color your want.  I took my yellow to a more muted yellow by adding some leftover wall paint from when I painted my kitchen.
5.  Place your stencil in the upper left hand corner (if you are right handed like me) and add a few pieces of blue painter's tape to hold it down.
6.  Prepare your brush by rolling into paint and removing excess on a dry paper towel.  You could also roll right on for a faster, thicker coverage.
7.  Stencil your first section. 

8.  Repeat last two steps until your are done!

Now, here are all of the little helpful tips I learned along the way that I hope can help you out:


It is very possible for the fabric to misbehave and ripple under the stencil or behave perfectly.  Both are fine because you can't tell when you are done!
When you are done stenciling a row, pull the whole curtain up and lay it back down to keep the paper from drying to the curtain.  I wouldn't pull your curtain down after each square because it actually helps keep your fabric tight and makes it easier to align.

When stenciling fabric (especially curtains), you will NOT get the stencil to line up perfectly because the fabric will pull all different ways and stretch.  Stop stressing about this since they will hang and flow anyway!  It's just like not shaving your legs in the winter...no one has to know!
Once you have lined it up as much as possible, carefully stencil the pattern beside it without going over the pattern in the overlapped areas.
In tight corners or edges, you can turn your foam roller sideways and use a tapping motion.  This works well in the parts of the stencil beside where you have lined up with the last area you stenciled and you don't want to roll over any parts that are not matched up.
And here they are in all of their glory!!


I really love how they turned out.  If this project really matches your style, come join me over at {twenty}something as I dive head first into my summer off with lots more cheap-o DYI projects and knock-offs!


Read more...

Easiest Pillow Cover Tutorial and Monthly Silhouette Promo

18 May 2011

I decided to make a little pillow sham this month for the Silhouette promo.  Pillow shams are very easy to make because all you have to do is sew a few straight (or straight-ish) lines and you are done.  So, for those of you that think you can't sew this is the project to give you some confidence that you can...


Supplies:
Sewing Machine
Scissors
Pillow form (any size)
Fabric
Thread
Pins
Iron
(Flocked Heat Transfer optional, but way fun!)


The fabric size will depend on your pillow form.  You can do the same fabric for front and back or different fabric, (which I did since this was a "no shopping, use what I have" project!)
2 fat quarters (which are 18" x 22" inches) will work on any pillow form up to about 16x16.


Step 1.  Iron all fabric!!!  Do not skip this step ironing makes every project more professional, and makes sure that things fit properly!  IRON like the life of your pillow depends on it!


 Step 2. The front piece of fabric should be cut to a square 1 inch more than the size of your pillow.  For example if you are using a 16" x 16" inch pillow cut the square to 17" x 17" inches (piece A).


Step 3.  The back piece of fabric needs to measure at minimum 22 inches x 17 (for 16 x 16 pillow!)
Cut it in two pieces at approximately 2/3 so you have a piece about 14.5" inches (Piece B) and the second piece is about 7.5" inches (Piece C)(or this one can be longer... I made mine longer just because I had the fabric!).

Step 4.  You need to finished one 17" long edge of those two pieces.  By folding over 1/2" an inch of fabric and ironing.  Then folding that again over itself to conceal the raw edge, iron again,  (this will make it easier to sew).  Pin if you need to to hold it all in place and sew that fold in place.  In the end you have a piece that looks like this:  See the one finished edge?


Step 5.  Now place your front piece A fabric, good side up on the table.   Place Piece B  Good Side down aligning to one side.  When sewing remember you want good sides together.  You want the folded portion of the edge to be in the center of the pillow.

Step 6.  Overlap Piece C on top of Piece B so that the finished seam is also in the center of the square of fabric.  Like below:

Step 7.  Now pin the corners and edges in place.  You don't need too many pins.  (technically if your fabric isn't slippery and you feel comfortable just holding it you don't need them at all!)


Step 8.  Sew a straight line along each edge.  4 total.


Step 9. Now use the overlapping pocket to flip the pillow right side out.  Be sure to push the corners out completely and press again.

If you want you can be done at this point, just stuff your pillow in through the flap on back.

Since this is my Silhouette project I decided it would be fun to add some words, so I can put it on Etta's bed someday when she moves into her "big girl bed".

Simply type out, cut with your machine and iron on.  This whole project took about an hour.


Now for the Silhouette promo.silhouette america
Do you still need a Silhouette?  If you don't have one, I'd consider it.  
They are pretty darn fun and SO versatile!  Here is the deal this month if you do:

1 Silhouette SD machine
1 package of white flocked heat transfer material
1 package of teal smooth heat transfer material (LOVE THIS COLOR ESPECIALLY!)
1 package of dark pink smooth heat transfer
All for $219!
(this is a savings of 125 dollars!!)

To receive the discount just use the code "Remodel". (offer valid May 17-25)

What fun project would you make with your silhouette machine?

Read more...
Related Posts with Thumbnails
Emealz - Easy Meals for Busy People!
Home & Garden Blogs Home & Garden Blogs - Blog Rankings

Blogging  tips, tutorials and SEO

From Here to Eternity

  © Blogger template On The Road by Ourblogtemplates.com 2009

Back to TOP