We’ve Moved!


If you aren’t redirected here is the link:


Remodelaholic!


THANKS!

Showing posts with label Crafts. Show all posts

Make Your Own Blue Glass Jars Tutorial

25 October 2011

Make Your Own Blue Glass Jars Tutorial


No, I'm not having crazy preggo cravings (cuz I'm not preggo)...and no, I haven't lost my mind either!  I just happened to make some candles out of some saved up jars that used to be in the fridge...holding food.
Honestly, most of these jars would typically wind up in the recycling...but I finally got smart.  You see, there have been times when I've said to myself, "self, that's a cute project that involves a glass jar!" But then I realize that I don't have any glass jars.
On one occassion (cough, cough, hint, bridal shower) I even bought some mason jars because I didn't have any on hand.  Boy was that silly!  After seeing the stash I'd collected in just a few weeks, I'm hoping that I've learned to go green and put those containers to new use, through one craft or another.
This project was something that I've been dye-ing to try!  LOL!  I crack myself up!
I'd heard it was possible to dye glass different colors using glue and food coloring, but I wanted to give it a test run.
Honestly, the most difficult part of this project was getting the stinkin' labels off of the jars.  I couldn't find my trusty Goo Gone, but I found soaking the jars in warm water to be helpful.
Once they were soaked, I peeled off what I could, and scrubbed with soap and water to remove the rest of the sticky gunk from the jars.
Then I went all out and spent a whopping $.50 on some school glue.
To get some color, I used a few drops of blue food coloring and a hint of green food coloring.  This created an aqua color, and in case you haven't noticed, I happen to be in love with aqua!
After one coat, the glass had a nice soft tint, but I wanted to go for something with a bit more pop.
The second coat was just what I was looking for.  I loved the color and the level of transparency!  These photos were taken when the glue was still wet...
...and these were taken once the glue had dried.... 
One word...L.O.V.E!
This project was so easy, so cheap, and the results are so fun!  I can think of so many fun things to do with this, but for this photo shoot, I just threw some candles in.
I tried to get some shots from different times of the day so that you could see the color in different lighting.  I loved how the color appeared soft in strong light, but more vibrant in darker light.  They looked pretty natural to me, but what do you think?
Granted, there were a few spots where I didn't catch the air-bubbles or the drips, but I never sweat the small stuff when I try a project out for the first time.  
I learned that I need to wait a bit longer in between coats so that the glue can dry completely first, but you might remember from this project that waiting patiently has never been one of my strong suits.
Grand total on this project...$.50, and a few hours.  A great project for some weekend craftiness on a tight budget!
So here's what I learned:
  1. Keep food jars! It's green and fun! This is just one of many crafts you can do with them.
  2. Patience is a virtue.  Wait longer in between coats.
  3. Don't sweat the small stuff.  Projects don't have to be perfect all of the time.  In fact, in many cases, imperfection creates an aged or weathered look.
  4. It is possible to craft for less than $1.00.  You don't have to spend a lot of money.  Use what you have around the house.
  5. This idea could be used to make cute gifts.  Fill the jars with bath salts, or even snacks.  The glue is on the outside of the jar, so it won't contaminate any food items!
So tell me, what would you do with these jars?  What color would you paint them?  I think I might try some red and orange ones next considering fall is just around the corner.  I'm so glad I tried this!

                                                                           
This project was contributed by one of our fabulous readers! We love to share your projects with this great blogging community. So, if you have projects from kitchen renovation ideas to small bathroom remodels, overhauled and repurposed furniture, spray paint updates you name it please send it in! Thanks for reading Remodelaholic!


Other fun DIY projects HERE:

Read more...

Paper Plate Skeleton; Kids Craft!

18 October 2011

Well, I am sorta  late with this post... I have been trying to carve out (notice the Halloween pun, huh?- Good one!) the time to make this for weeks, but it just hasn't happened until tonight.  I got the idea from my friend Michelle last year who has made these since she was a kid.  And she was nice enough to email me the instructions, thank you Michelle!


I thought it would be fun to make with Etta... She loved drawing around her feet and hands, but that is about as far as she went... and then she wanted to play outside.. Oh, well I tired!

But I did manage to finish one...

Beware scary pictures ahead 
(and I don't mean the skeleton, I mean the make-up-less grease ball... me!)


Here is my messy work surface.  We were having family night, and Etta got a Chocolate Carrot Cake Cupcake, once the frosting was gone she lost interest and decided to throw it up in the air a few times for good measure.  Just sorta makes me laugh!


Now you can tie the joints together with string or twine, but I decided to go the lazy way and just staple them together, where I wanted joints to work I just linked two staples together, and bent them back on themselves...

And here it is masking taped to the closet door... our lone Halloween decoration so far this year... Oh well at least it is something, I plan on getting te rest out soon.  (I guess I did buy some orange roses for cheap, and they are very festive!)


Here is the pattern:


Let me know if you make it!


Remodelaholic is written by Cassity and Justin. Cassity has a degree in interior design and Justin is a landscape architect, so we adore everything that makes up a HOME! We love to share home remodeling ideas and projects we’re working on. From huge kitchen renovation ideas to small bathroom remodels, there isn’t anything we won’t try to tackle (at least once!). We are in the midst of our third whole home renovation, (check out house 1 and house 2 as well, so there should be a lot more inspiration coming your way. We hope that you will stop by often for home design inspiration, tutorials, interior design tips, delicious recipes and what going on in our family life.

Other Great Halloween Posts:

Read more...

Fall Wall Decor Idea

26 September 2011

Fall Wall Decor Idea
     
I love decorating especially for seasons but in my house I don't have a lot of room to do that. I saw a display at Rodworks the other day and I just had to do it for one of my boring walls. This is obviously my fall decor and all I will have to do when we get to Christmas is change the wreath and the ribbon! I love it! What do you think?


BEFORE


Read more...

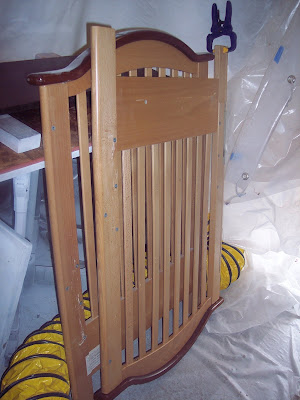
Crib Turned Magnet Board Re-purpose Project

22 September 2011

Crib Turned Magnet Board Re-purpose Project

BeforeMy good friend Allison had a very clever idea to take the two ends of an old crib she had and repurpose them into magnet boards. And this is what Mike came up with.

Read more...

Craft Party Link Up

01 November 2010

This is just a (not so) subtle reminder that our 
is going on today at Polly Want a Crafter so show us what you've been working on!


Also  I am on the lookout for craft submissions to Polly.

Subjects Include:

Thanksgiving
Christmas
Hanukkah
Gift Idea Tutorials
Paper Holiday Decorations
Beaded Holiday Decorations
Misc Crafting!!

Email me your direct story links and I will let you know when I can feature them! (minus spaces!)
remodelaholic @ gmail . com

Read more...

Craft Party Reminder!

11 October 2010

Just wanted to remind you about the
new craft blog's link party today!  
I hope you all will participate!  Thanks!

Here is the link or click on the image below!

Read more...

Don't forget the new link craft blog...

04 October 2010

Just wanted to remind you about the
new craft blog's link party today!  
I hope you all will participate!  Thanks!

Here is the link or click on the image below!

Read more...

NEW CRAFT BLOG!!!

01 October 2010

I totally forgot to have you all check out 
It will be Remodelaholic's sister site to show off more of the crafty side of home making etc. 


We will be having a link party on Monday, 
so please stop by!  AND please submit your crafty projects to be featured there, by sending them to remodelaholic@gmail.com 

Read more...

Anthropologie Inspired Art, DIY Project

29 September 2010

This project is SO FUN!  I love the way it looks, I love the creativity!   It was a party link from Lorilyn from A Crummy Marriage Blog check out how great it looks, here is what she has to say:


So I'm really trying this new "keeping my finances in check" thing because I no longer have as large of an income since I went from full-time to part-time (which is AMAZING by the way - everyday is like the weekend).

Enough bragging though, so I joined the financial band wagon and am doing the Total Money Makeover with Dave Ramsey so I can make sure we use our finances to the best of our ability and because we have several large expenses in the next five years that we need to save for (new kitchen, new bathroom, new babies, new babies from Africa, etc) and that means cutting back on some areas now.

I've been going over what we've spent since getting the house, and I have to accept the fact that I probably (definitely) spend too much of my money on crafts and projects. Probably more then I spend for myself on food. I know that's sick.

So I've started to use my large brain the good Lord gifted me with and things from around the house to create new projects with. As a result, you will see about a 99% increase in projects that cost nothing (for me) to do.

Recommended by my Mom, I was surfing on Anthropologie's website since that's a good place to glean inspiration from, and I came across the Tree of Life.


For $2,000. Why anyone would spend $2,000 on a piece of art is beyond me, but it serves as good inspiration for me.

But then arises the problem that I don't have a large canvas lying around.

But I do have lots of scrap wood.

So I headed down to my fun house mirrors of death room, grabbed some 1 x 8's, and slapped em together to make this.


Now for painting. Since I'm not spending any money, I had to work with the house paints and acrylics I had on hand, which meant lots of mixing and diluting.


The slew of pictures that follow show my various stages of painting and layering colors. All the color layers I did were mixed with water so the colors underneath would show through as well.

I started with a light blue base.

Then taped off some sections where I wanted to do different colors.


Then after many layers of washed colors on top of those colors (and some sanding) I drew branches on the edges.


Then I did more coats and sanding on top of that.


Then I looked at my inspiration picture and drew the tree.

A side note about free-hand drawing. Break the drawing down to one line at a time. This is what I've done since I was like, 7 and I can draw Disney characters like nobodies business.

So I perched up to take a look at it.


Too matchy matchy.

So I took out some dark brown stain, sanded a bit, and rubbed and rubbed, and then rubbed some more.

I don't know if others have this problem, but whenever I try this technique with stain or glaze, I feel like it just looks like someone rubbed dirt all over it (hmmm maybe when I really cut back that's what I will do...)

So I grabbed the sander again and ran it just on the tree where it looked muddiest.

Perfection.

Cost? Nothing.

Hours? None. Okay it took some, probably total.... 2? The thing is, since you do most of it in tiny stages, like the washes, you literally paint on a layer, which takes 30 seconds to minute, then you wait about an hour (or longer if you're busy, doesn't really matter) till it dries and do the next one. The whole thing took me about 6 days, but that includes me not working on it much during the weekend and very sporadically during the week. All in all though, very easy :)


Doesn't that look great?  
I love it!  What are your thoughts?

Read more...
Related Posts with Thumbnails
Emealz - Easy Meals for Busy People!
Home & Garden Blogs Home & Garden Blogs - Blog Rankings

Blogging  tips, tutorials and SEO

From Here to Eternity

  © Blogger template On The Road by Ourblogtemplates.com 2009

Back to TOP