We’ve Moved!


If you aren’t redirected here is the link:


Remodelaholic!


THANKS!

Showing posts with label Guest Projects. Show all posts

New and Improved Master Bathroom

25 August 2011


New and Improved Master Bathroom

Our bathroom is teeny tiny. Like 5'x7'. No joke.  There's nothing "master-ish" about it all. But, we've worked with what we have and actually really love how the space has turned out. 

Before:


And the AFTER:


Such a big (and better) difference, in my opinion!

Read more...

Suitcase Refinished with Chalkboard Paint

24 August 2011

Suitcase Refinished with Chalkboard Paint


I'm very excited about this post! It features one of my favorite makeovers to date and trashy treasure. Seriously. Found him/her (I'm not sure yet) next to the trash cans outside my apartment building. Score.

First up- this vintage suitcase I found at the local antique shop.

DSC_4829

DSC_4830

It was nice as is and I did like the color but there were some imperfections that bothered me.  I bought some chalkboard paint a while ago with nothing particular in mind. This seemed like the perfect first project.
I primed it first with some gray spray primer.

DSC_4831

Read more...

Living Room Makeover From Better To Best

23 August 2011


Living Room Makeover From Better To Best

Immediately I connected with this house because of the open floor plan and good placement of the formal and informal areas, large bedrooms and beautiful neighborhood. This home had loads of character but needed much love and with at least 2700 square feet of shiny white ceramic tile (the house has a total of 4000 sq feet) that had to be removed, it is obvious why few were up to the task. We lived in this house with white tile, bad fixtures and ten, yes ten, tacky metal floor to ceiling pillars in our living room for six years before we hit the ground running with a six month remodel that made this house our home.

 I have been trying to post a group of before and after photos of our home each week featuring a different room or area. This week i feel that I need explain my way through the living room because at first glance it can be difficult to spot the changes that I found absolutely necessary. Of course we took out the white tile surround below the mantle, took away the white ceiling fan, removed the carpet and removed the mirror above the mantle (that was set into the wood), I got rid of the dark red paint and of course updated the furniture.

Before

We painted the walls and ceiling a warm gray and added black honed granite to the fireplace surround. The entire house, except for the bathrooms and laundry and mud room have these fabulous 5" solid hickory plank flooring accented with area rugs.  

Read more...

Little Boys Room Makeover

22 August 2011

Little Boys Room Makeover
submitted by Balancing Home


The much anticipated reveal of Quinn's room. The project took on a life of its own and took us longer to finish then expected, but it was totally worth it. Without Further Ado...


Before and Afters

Read more...

Painted Formica Countertop

16 August 2011


Painted Formica Countertop

My UGLY formica countertops were just SCREAMING for an Ambush Makeover!  But since I could not take them on a plane to the Today Show so Kathie Lee and Hoda could work their magic, ultimately, the responsibility fell to me!  Yikes!  I removed the purple, green and plaid wallpaper - actually it wasn't as bad as you might think.  The border was blue and purple and green hydrangeas so it really was quite lovely.  I was on a green and black and white damask kick so I figured - why not?  Once I got the walls and ceiling painted, the countertops stuck out like a sore thumb.   I didn't want to get new formica and I certainly could not afford granite - what is a girl to do when faced with a conundrum of epic proportions?  GOOGLE! 

 Here is what I was faced with:  Not completely horrible I am totally thinking Nate Berkus would just be brought to tears.


BEFORE! YUCKY!

Read more...

Gutted Kitchen Remodel With Lots of New Lighting

19 July 2011

Gutted Kitchen Remodel With Lots of New Lighting
submitted by Balancing Home

Well clearly the biggest change from when we bought our house until now was the kitchen. We started with something that looked like this:


Yikes! Right? Well we did almost all the work on our own (with the help of family). We gutted the kitchen and even knocked down the wall all on our own. For some time we lived like this:

Read more...

Compact Kitchen Remodel: Taking Advantage Of All Available Space

13 July 2011

Compact Kitchen Remodel: 
Taking Advantage Of All Available Space
submitted by A Sense of Design


OK...now this kitchen was seriously ugly when we first moved in, needless to say it was one of the first things I did...and in a hurry. Luckily I was fairly organised and the day we moved in I had the removalist in the morning and about 4 trades turn up in the afternoon to start quoting!!!

I was determined that I would plan this kitchen carefully, it is compact and important to get right. So although I was pushing to get my new kitchen installed quickly I took the time to make sure that the storage worked and the layout was as ergonomic as possible.

It needed to be fully custom built as I wanted to take advantage of all the available space. A more cost effective kitchen would have been to use standard size cabinets. Because I am tall I also wanted the bench height to be a little higher than normal (this is the opportunity to get what you want for once, when you are having a kitchen designed for especially for you).

The original kitchen was a galley kitchen with an opening each end. I decided to close off the far end (to create a space for the large freestanding stove) and enlarge the opening leading into the living room. The window in the kitchen was too high and impractical, so it was replaced with a larger window in keeping with the rest of the house.

Some things to consider when you are planning your new kitchen...

  • Make sure that you have a cupboard close to the dishwasher to unstack the dishes so you are not trekking across the kitchen.
  • Plenty of bench space can never be over-rated.
  • Consider how you and your family use your kitchen, you may want a bench for the kids to sit up at if room allows or you may chose to have an extra small sink for the prep area. Every family has their own way of operating.
  • A microwave should always be considered as a built in, we all have one so plan for it to be either built in like an oven or in a cupboard....never on a bench top.
  • Good lighting is important, especially in the prep area and stove area, make sure that it is considered at the planning stage.
  • Have an appliance cupboard (or 2), toasters, kettles etc are used regularly so have them in an easily accessible cupboard where they are plugged in always ready for use and not on show! I have two, one side has kettle and coffee maker with jars of teas, coffee and sugar on the shelf above and cups on the next shelf. The other cupboard has a toaster and blender with bread box above and then glasses above that.
  • A good exhaust fan over the stove is a must...make sure that you choose one that is not too noisy and if possible can be ducted outside.
  • Bench tops - mine is marble on one side and timber on the other, both fairly high maintenance, which I am prepared to do but you might prefer to use a quartz stone top (man made stone). The many different brands available now are all more or less the same but they are a great practical surface.
Well on with the photos...I hope there aren't too many!!!


YES...it had to go

Read more...

Red Dresser Makeover With Sheet Music Drawer Fronts

08 July 2011


Red Dresser Makeover With 
Sheet Music Drawer Fronts
submitted by Polka Dots and Pizza


Wow! I am excited. My dresser turned out SO much better than I thought it would! Here is the before pic again. 


The top of the dresser was warped, and that's why the lady I got it from said she was about to throw it in the trash! AH! My hand husband was able to clamp the top down and re-nail it back down. There is a little crack at the top from doing this, bu nothing that you can notice or that hurts it!

Read more...

Carver Chair Before and After Upgrade

06 July 2011


Carver Chair 
Before and After Upgrade
Submitted by Raine and Sage

Here is a lovely Carver Chair. It needed a bit of TLC as you will see, but I am pleased with the results.

Read more...

Installing An In-Cupboard Pot Rack

30 June 2011

Installing An In-Cupboard Pot Rack
submitted by Between 3 Sisters


About a month ago I wrote a post about organizing my kitchen and adding a pan rack was one of my ideas.We really wanted to have a normal pan rack displayed in our kitchen, but the problem was the only spot available would be above the sink and that would block the view of our backyard. Browsing around on the internet I came across this in-cupboard hanging pan rack. I LOVED IT! We have a cupboard just left to the cook-top that really doesn't get used much, so I thought this would be a perfect addition to the kitchen and really aid us in the storage of our pans.
I contacted the company and they told me they just purchased a pan rack (that normally would hang from your ceiling) from amazon and mounted in the cupboard, but they didn't know how the carpenter had mounted it in the cupboard. After about a month of going back and forth I nailed down our plan of attack. Here is my little How To:

Read more...

Basement Renovation: A Wet Before To A Fantastic After

29 June 2011


Basement Renovation: 
A Wet Before To 
A Fantastic After

Watch as our basement goes from "Meh" to "Holy crap, get me the wet vac" to "I'll never make it out alive" to "Holy crap, it's perfect" in under four minutes:


Is the video a little nerdy? Yes.

Did three months spent underground give me liscence to post a highly dorky video on my blog? You betcha.

In case you can't view the video, here are a few stills to give you an idea of how far we've come.

The fireplace area when we first bought the house:
The fireplace after the basement got wet:
The fireplace area today:

The bar area when we first moved in:


The bar area when things got soggy:

The bar today:

 The stair room when we first bought the house:


The stair room today:

 You like?

We LOVE.

Having poured blood, sweat and tears into this little hideaway, we're pretty pleased with the results. There are a few finishing touches we need to add, but for now - we're happy to kick back by the fire and toast our amazing new basement.


This project was contributed by one of our fabulous readers!  We love to share your projects with this great blogging community.  So, if you have projects from kitchen renovation ideas to small bathroom remodels, overhauled and repurposed furniture, spray paint updates you name it please send it in!  Thanks for reading Remodelaholic!


Read more...

New Enclosed Loft Space At The Top Of The Stairs

23 June 2011

New Enclosed Loft Space 
At The Top Of The Stairs
 Submitted by Classic Casual Home

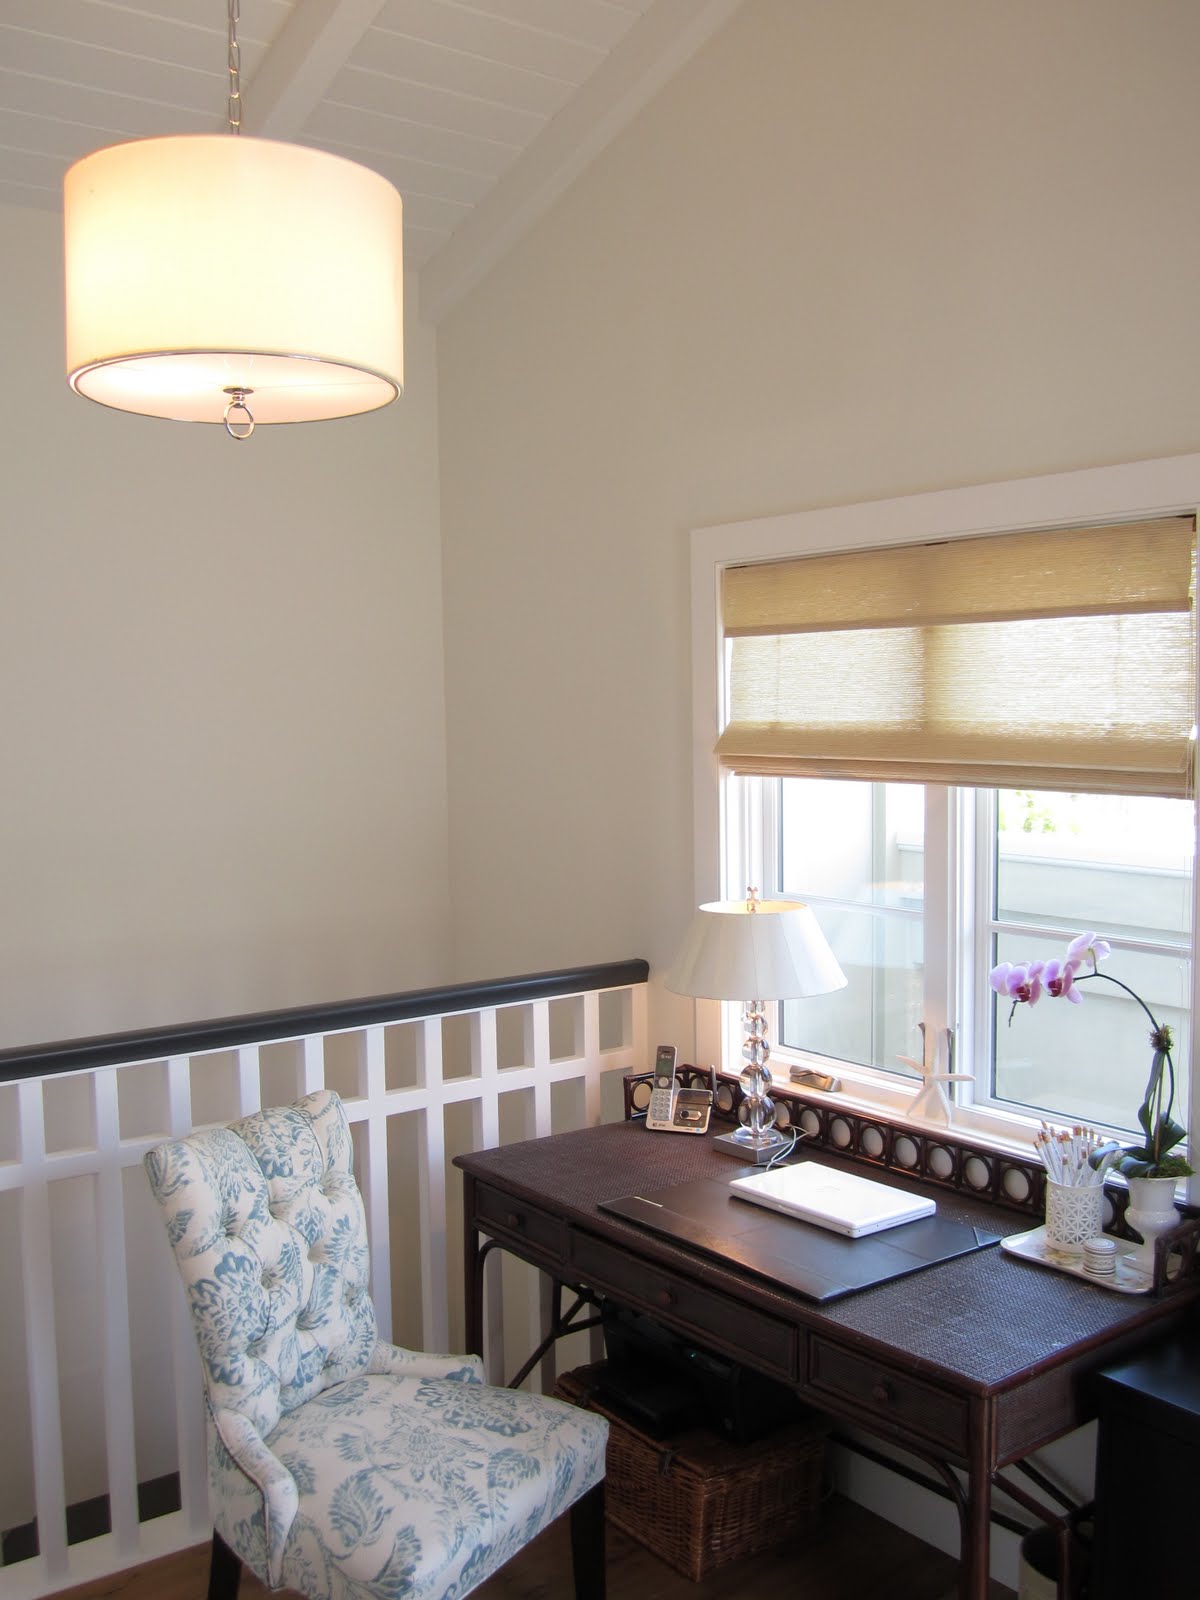
At the top of the stairs, we carved out a small home office/retreat area during 
our recent home renovation.  I LOVE IT!  It's light and a bit feminine.


Before, the upstairs was one big master bedroom (below). 

My friend, Debbie suggested we put up a wall and door 
where the half wall was (she's so brilliant). 


The pendant light was a bargain from Overstock.com.  To the right of this door is a cabinet 
with more office storage...a shambles right now.  Perhaps another post someday.

This is the space before.  


Here it is now...


Desk Accessories
On my desk is a Limoges plate that was my maternal grandmother's.
The personalized pencils also make nice gifts.
They come in lots of colors from Oriental Trading. 


The round box is from a Paris flea market and holds paper clips.
Splurge on interesting file folders (sometimes you can find them at TJ Maxx).
It makes getting organized more fun.


My friend, Claire made this custom clip board for me. 
I order notepads you design yourself


This is the corner where I am now.  "Feet up blogging mode."


Thanks for visiting my new office.  Guess I should get back to work 
(right after I finish my tea and check out some other blogs).

KCE5YPH724XR 


Read more...

Silhouette Wall Art: Tutorial

22 June 2011


Silhouette Wall Art: Tutorial


I started with a regular 4x6 photo that I printed at walgreens of each of my boys doing one of their favorite activities.  I then cut out each child and placed on my overhead projector.  I know its old school, but it works for me.   I used to go into my children's school and use the schools overhead until I found my own at a garage sale for $5! yeah.  Maybe your hubby's office has one you can borrow?  Use your resources and find one to use, or you can always buy one at office max.  I use mine all the time for projects.

Read more...

Designing A Living Room With Tall Walls

Designing A Living Room With Tall Walls
submitted by Live Beautifully


I recently gave you a little sneak peek of this project and am now ready to show you the living portion of it. As you can see in the before image above, the space was basically a blank canvas. My clients didn't know where to start in the space and in turn the space became a resting place for unmatched furniture and no commitments on the walls. Here is the space today after I got my hands on it...

Read more...

Renovated Home Office with Stripes and Lots of Details

22 April 2011


Renovated Home Office 
with Stripes and Lots of Details
 contributed by 

(Yes, I love to use my ellipses...) 

Read more...
Related Posts with Thumbnails
Emealz - Easy Meals for Busy People!
Home & Garden Blogs Home & Garden Blogs - Blog Rankings

Blogging  tips, tutorials and SEO

From Here to Eternity

  © Blogger template On The Road by Ourblogtemplates.com 2009

Back to TOP