We’ve Moved!


If you aren’t redirected here is the link:


Remodelaholic!


THANKS!

Showing posts with label Beach House Style. Show all posts

Amazing Teenage Boy's Room Reveal

13 September 2011

Amazing Teenage Boy's Room Reveal 

Mary Ann of Classic * Casual * Home, really has some STUNNING spaces in her home.  I wish that I lived there myself!  This room of her sons could EASILY be inspiration for a master bedroom too!  I hope you enjoy it!


This is our son, Tommy's remodeled room.  
When we bought the house, the room looked like this below.
The ceiling was pitched to the right.  We gave it a center pitch and added insulation.  
We removed the middle window and added two on the sides and new oak flooring 

Read more...

Beautiful Beach House Kitchen Makeover

06 September 2011


Beautiful Beach House Kitchen Makeover


Before:


Since our beach house was featured in Home Beautiful magazine

Read more...

Budget Friendly Kitchen Remodel

08 June 2011

Budget Friendly Kitchen Remodel by Ritajoy

Thank you, Cassity, for inviting me to do a guest post on your {amazing!} blog.  I feel incredibly honoured…
I’m Ritajoy and my blog home is Harbour Breeze.


I’m a wife and mom, and am so blessed to be living and working at a camp on the West Coast of British Columbia, Canada.  After spending all my growing up years on the prairies of Montana, the waterfront view out my kitchen window still takes my breath away.
One of my passions in life is creating “home” out of a house…and doing so on a very tight budget!:)  That is the subject of most of my blogs…{with a little sprinkling of family,  recipes, and photography, too}.
Our latest  reno venture was our kitchen.  As with any project I start, the changes were prompted for some specific reasons:
1.  I’m short!~ I could only reach the bottom shelf of my (hung too high) upper cupboards. It seemed a shame to have all that “prime real estate” in the cupboards unused most of the time!


2.  The whole look of the kitchen didn’t fit in with the charm of this old, historical house. (And it wasn’t really my style, either…)


I pulled $100 out of the air as my personal budget challenge.  The entire amount was spent on the first trip to Home Depot.  Yikes!…
It turned out to be the best thing ever.  It helped me to “think outside the box” and use things that I already had sitting around…
An old window and repainted dresser turned into our message center:


Curtains made out of painter’s drop cloth became “cupboard doors” for some thrift store cabinets.  (And I love them so much I don’t think I want doors anymore!)


A few coats of paint and  new hardware (given to me by a friend) completely changed the look of the European cupboard doors…


Beadboard wallpaper (doesn’t it look like the real thing??) and “As Is” Ikea shelves turned an unfinished wall into a finished one…


A scrap piece of wood and some craft paint became a “vintage” sign…


And the upper cupboards that started this whole makeover?…We lowered them,  took the doors off, added in extra shelves…and “crowned” them!


Now I can reach up to the third shelf without standing on a chair!!
Here’s the whole thing…
Before…


And after…


In the end, the project totalled $159.00…
I’m so glad I got to chat with you today.  Feel free to come over for a “blog visit” anytime!:)


Read more...

Beach Inspired End Table Redo; and Beach Pictures

22 December 2010

Beach Inspired End Table Redo; and Beach Pictures

Alright, it's been awhile since my last post. I was away last week on vacation in Lake Michigan where I got some major inspiration! Rocks on the seashore, shabby furniture on the beach, and driftwood laying all over! It was paradise. Here are a few inspiration shots I snapped:


Yes, that is a huge log of driftwood you see! I wanted so badly to take it with me, but it would have been impossible to get home. I did pick up some other peices of driftwood though. Here are some incredibly-less-artistic shots of those:


Aren't they amazing?! Haven't decided exactly what to do with them yet, but I'm really excited to use them.

Alright, now on the the main event.

This side table has been sitting in the guest room for awhile now:

I haven't done anything with it, because there wasn't really any room for it in the house, but after coming home from vacation and not having done anything creative for 4 whole days, I just couldn't wait to get my hands on a piece of furniture, so the one above got redone, even though I don't really have room for it. (I will make room :D )

Here is the after:


I'm really pleased with how it came out. I had some troubles along the way, but it all panned out in the end!

Here is a shot of it in-process:


Originally I sanded the top, stained it walnut, and then washed over it with gray paint. It ended up having an almost pinkish finish, which I didn't like, so I stained over the wash with the walnut which made it look LOADS better, but I still wasn't happy with it. I decided that because of the shape of the piece (the bottom has a piece that's the same width as the top) a wood top threw off the balance, so I just sanded it back down and painted over it. After that I decided to wash some white paint over the whole thing, which gave the piece more interest. Then I just distressed away with my electric sander and a 320 grade sandpaper.


Don't you love this knob? I took it off a beat up, old dresser we had sitting in our basement. I think it has a very anthropologie feel to it.


The color is a bit hard to decipher from these pictures. For some reason my camera kept capturing it all different ways. It's actually a light robin's egg blue which I mixed myself using a variety of old paints.


The above is probably the most accurate to the actual color.

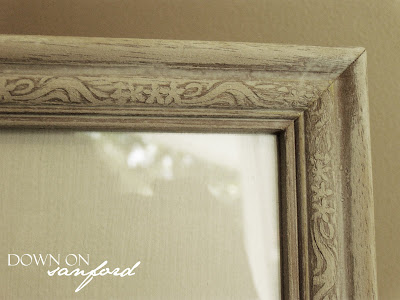
Also, I thought I'd show off the picture frame I recently re-did which is sitting on the end table in the above pictures. Here are some close ups:


I'm really thrilled with how this frame came out. I forgot to take a before picture (doh!) but it did have a nasty gold finish, pink matting and a grandma-ish flower picture. I sanded it down, and then washed it with white paint. I think all the little details are awesome, and the washing really made them stand out.

Alright, I'm finally at the end now, even though I have several other projects I could share with you. :P To quote Father Christmas from The Lion the Witch and the Wardrobe "Things do pile up, when you've been gone a hundred years" (or one week, in my case) Thank you all so much for reading!

Read more...

Beach House Transformation With White Paint

27 October 2010


Beach House Transformation With White Paint
contributed by Chania @ RAZMATAZ


When we bought the cottage a few years ago, it had just had an addition added onto the original 550 sq ft 1930's cottage.  When they renovated the place they put up new yellowy pine and oak panelling and trim, and made the place look like a lodge.  
This is the view from the front room.  We are right overlooking the harbour on Georgian Bay...
View from the cliffs.  The harbour is to the left.
The bay is blue and turquoise.  The yellow and oak theme had to go.
This is the living room from the real estate lisitng. I had to get rid of that fake pine wall panelling and oak trim.
This is the after...
This is the same view as that awful real estate listing....
I white washed all of the ceiling beams, the walls in the great room, the panelling, ceiling  and baseboards.  I painted everything  in Farrow and Ball Strong White.  Even with the addition, the cottage is less than 950 sq ft, but painting it has made it seem much larger and more open.
I white washed this coffee table that was yellow pine with pink and peach flowers and vies painted all over it....a throwback to my taste in the 80's. 
At least it had a nice shape and could be transformed with paint.
You can see the oak panelling before in the dining room here. Have I told you I hate yellow! The light fixture is from West Elm and in future posts, I will show you what I have done with it since.
Out of that window straight ahead is the harbour with all of the blues and greens and whites of the sailboats.  I painted the dining room panelling Strong White and above Farrow and Ball's Light Blue to bring a bit of that blue inside.  Given that I am a" White Paint" kinda gal, that is a lot of color for me.  For now, it works well with the flooring, which is linoleum, but I am hoping to change that for white cedar planks .
This is my "BlogSpot"...
..........and some of my white washed mirrors....


I added lots of bits in blues and greens to bring those colors from the outdoors in....
I love the way the light shines through the vintage glass...
.....One of my favourite little pieces... a wall cabinet with the original rolled glass mirror and original peeling paint....
I have a collection of Vintage Globes.  I bought the marbles in England years ago while shopping with my Grandad, so they are really special to me.  I love the way they reflect the light...
The Turquoise Glass and Zinc lids on these old jars capture the colors of outside, with the bluey greens and the greys....ready for new collections.....

Last year my friends bought me this painted wooden sign.........
Welcome to the Beach House......

Read more...
Related Posts with Thumbnails
Emealz - Easy Meals for Busy People!
Home & Garden Blogs Home & Garden Blogs - Blog Rankings

Blogging  tips, tutorials and SEO

From Here to Eternity

  © Blogger template On The Road by Ourblogtemplates.com 2009

Back to TOP