We’ve Moved!


If you aren’t redirected here is the link:


Remodelaholic!


THANKS!

Showing posts with label Vanities. Show all posts

From Bathroom Vanity And Book Shelves To Entertainment Center

15 August 2011

From Bathroom Vanity And Book Shelves To Entertainment Center


Our last house had a built-in entertainment center, which was great!  We loved the fact that we never had to buy a unit to hold our electronic equipment.  However, it wasn't such a great thing when we moved!  We had a 52 inch TV that sat on our coffee table for months until we came up with an inexpensive solution for holding our TV.

We wanted more than just a console to hold our TV.  We wanted something that was aesthetically pleasing and that would hide a lot of our kids' toys and games.  One night, I found inspiration as I was looking through Craigslist ads, and came up with a solution that would meet all of our requirements.

First, we found these hideous bookcases on Craigslist for $60 for three!


Okay, so they're not THAT hideous...and please don't be mad at me if you have these same bookcases in your house!  The plan was to use two of these on each end of the TV compartment.

To hold the TV, we ended up purchasing an unfinished 60 inch bathroom sink base at a home improvement store.  Here it is while my husband was modifying it:


Read more...

Updating A Bathroom Vanity

12 May 2011

Updating A Bathroom Vanity by Becky

Hi, I’m Becky from Goodbye Faux Wood Paneling. My husband and I just recently started our blog in January and I was pretty sure our only reader was my mother so I was shocked when Cassity asked me to share our bathroom vanity project with all the fellow Remodelaholics and I’m really excited to share this guest post today! I’m a full-time working mother and have somewhat of an addiction to DIY design blogs. Since the handy hubby and I are always tackling projects in our own home on the cheap I figured it was finally time to start sharing some of them for others to draw some knowledge and inspiration from. Besides, I figured, even if we never have any blog followers at least we’ll have a chronicle of our home before and afters for our own sake.

The bathroom updating started pretty innocently, in fact it started with cleaning the tile floor. The cleaning went wrong when some grout got scrubbed out of the tile joints and then things snow balled from there. Once the grout project was complete the vanity seemed somewhat tired (read really really dated, and more suitable for cabin/RV use, than a "modern" bathroom"). Brace yourselves because here’s the horrendous before picture.


We decided to redo the bathroom vanity for three reasons; 1) it was tired 2)it would be good practice making cabinet doors for the project that never ends and 3) the floor tile doesn’t extend under the vanity so replacing it would have been difficult.

We used MDF for the panels and paint grade wood (poplar) for the door frames because it’s cheap, easy to handle in our makeshift wood shop (aka garage), and accepts heavy black paint just fine. For the doors, we really liked to the look of a beaded inset door and picked up a rail and stile bit set for our router table that we can use on other projects.

These bits are not cheap but we have a lot of cabinet doors to update throughout the house, so we bought one we liked and will save a ton going the DIY route versus buying new cabinets or having the doors custom made by someone else. After few practice runs and lots of fine tuning of the bit depth to get the doors to look just right we were pretty pleased with the results.


We put an applied bead on the face frames of the cabinet to dress up the existing face frame a bit as well as a piece of modified base board trim to add a “furniture-like” detail to the toe kick on our otherwise pretty basic cabinet. The whole cabinet received multiple coats of grey primer and glossy black latex paint as well as some classy brushed nickel hardware to top it off. Here it is all shiny and new looking.


As far lessons learned, the old standby "take your time" really reared its ugly head on this one, we got impatient to get it completed and that caused some naggling little problems such as brush marks, inconsistent reveals between the doors and door frame and slightly off kilter knobs. Thankfully, those things are really only noticed by us, and all in, we are really proud of our final results. If you’d like more a more detailed play-by-play how-to please click on over to our blog post.

Read more...

Updated Powder Room With Fancy Mirrored Vanity

15 March 2011

No More Brass Hardware: 
Updated Powder Room With 
Fancy Mirrored Vanity
contributed by View Along The Way


Finally! We have some "after" shots of the house. I'm going to post these one room at a time, starting today with our powder room!

Let's take a little journey back in time... to a time when you had to use THIS if you wanted to powder your nose downstairs:


The brass fixtures were a little less gleaming now than I imagine they were back in their heyday. The cabinet door was broken. There was a mysterious paper towel holder next to the vanity. (That's a new one for me. I guess the paper towels were there in case things got a little messier than usual?)

The grunge build-up on the laminate floors was enough to make you bulimic. And if you used the toilet (which we avoided), you quickly learned that it wasn't really screwed in to the floor, and rocked back and forth so you felt like you were on a fantastic roller coaster ride while taking care of your business. Not ideal.

You can't really tell in the picture above, but inside the old cabinet was a massive pile of hair. Er, weave. NASTY! And the walls were a much grosser color than they look here. I'd name it Green Baby Poo.

And then I'd throw it away.

Read more...

Farmhouse Bathroom 180 Degree Renovation

07 March 2011

Farmhouse Bathroom Renovation
contributed by HollerDesign


This much needed renovation transformed a dark, outdated bathroom into a space more appropriate to this cute farmhouse. The design combines humble, traditional elements (a cast iron tub, white subway tile, wide plank flooring) with cleaner, more modern features (a wall mounted toilet, recessed lighting, and a vanity with clean overlay drawers.) 


Read more...

Double Bathroom Sinks And Tile For Multiple Kids

28 February 2011


Double Bathroom Sinks And Tile 
For Multiple Kids 
contributed by The Boys & Ruby

When we bought our new house 3 years ago, it was a beautiful Cape Cod style house and only needed updating.  The carpet was burgundy and there was burgundy paint throughout along with all types of wallpaper and brass accents everywhere.  We re-did this bathroom while I was pregnant with Ruby (before I was layed off!). It only had 1 sink and a door that separated the bath area from the sink area.  This would have been a nightmare getting 4 kids through here in the mornings, so we decided to do a super kid friendly remodel, durable clean and more open.  We tiled 3/4 of the way up the walls and I think we put 3 sub floor sealers for water in case they ever flooded it!  I think it turned out really great.  Sorry  about the quality of the photos, the before shot was how it looked before we moved in when the old owners were still here.

Read more...

Master Bathroom Remodel With New Tub, Floors, & Vanities

01 November 2010

Master Bathroom Remodel With 
New Tub, Floors, & Vanities
contributed by Penny @ The Comforts of Home


The master bath is finished. Well, except for installing my vintage chandelier over the tub and that will happen after the first of the year. So I wanted to share with you how beautiful it turned out! You can see my inspiration pictures in this post, here.


Fair warning - there are A LOT of pictures to follow. The first FOUR pictures are BEFORE AND DURING. I wanted to remind you what it looked like when we purchased it. Remember we had to gut it because there was a major water leak in the shower and the entire bath floor needed to be replace.


And now for the AFTER pictures.


As you can see, I decided to use simple white drapes on the leaded glass window. I didn't want to loose any of the beauty of the window with blinds. The space on either side of the window was too small to stack shutters.


The matching vanities below have Carrera marble counter tops. I purchased some marble knobs and replaced the standard metal ones the vanities came with. Originally I wanted to place a taller cabinet between the two sinks, but there wasn't enough room. I like the simplicity of this, though and am glad there was not enough room.

The vintage smoking stand next to the tub, I have had for years. It was the inspiration for the dark stained cabinets and marble tops.


We made the stock (from Lowe's) cabinets look more custom, with the marble tops, knobs and by attaching the towel bars to the sides of the vanities instead of the wall.


Some Close Up Shots of the Details


Edited: Someone asked what the container was in the picture above on the right. It is a toothbrush and tooth paste holder. I love it because it keeps the toothbrushes clean and away from dust and germs that float in the air in the bathroom. Plus it keeps them out of site. Let's face it...used toothbrushes can be pretty ugly :-). I purchased it from Lowe's and it comes in several colors.

Once the vintage chandelier gets hung up, I will post a picture of it. I love the way this bath turned out. Tonight I am going to break in that tub!

Read more...

Vain Looks! Table Vanity Redo; Guest

07 July 2010

Jerri Ann of Salty Sister from Salt Creek Ranch sent this great bathroom remodel over, and I just couldn't wait to show it to you'all so without further adieu.


Ooh she's so pretty now. This is a small bath in our guest bedroom, it features a tiled shower and a built in cabinet for towels and bathroom necessities. I have been working on the bedroom too. I featured some of the work in thispost if you want to see more.
Before.
The picture is a little dark and does not do justice to just how ugly it was. This was an example of a good idea gone horribly wrong. From the picture I had in my mind - to what the paint contractor heard - to this. And whatever they used to seal the top yellowed, so it really was pretty bad.


So I stripped it,
sanded it back past the stain.

At this point I wasn't sure what I was going to do with it. I contemplated trying to achieve what I had in mind the first time around but as I worked with this piece and pondered what to do, I began to realize how simple the design is. It seemed to speak to me and what I heard was, "kiss it", also know as keep it simple sweetheart.

So, I used these tools to distress the wood and that seemed to give it a more rustic, western look.

Put on a lovely and beautiful stain color.


I used polyurethane satin finish and bee's wax to seal it.

It looks so good - much, much better.
Next, I need to find something to go on the wall above the commode and a white rug for the floor. Two very easy things to do.

I don't really need storage but maybe a cute shelf for display or a nice picture.


So, what do yo think? Kind of a quiet, almost spa look.

I'm linking up again, woo I'm on a roll twice in one day. Now if I can just figure out how to link to more than one party.

I absolutely love table vanities (we've made two in the past 1 & 2)  I think this turned out simply lovely?  What are your thoughts?

Read more...

Dresser to Vanity How to; Guest Post

06 May 2010

I saw this on An Oregon Cottage and I had to ask Jami if I could show it off to you all, it is simply wonderful.  And Jami explains how she did it, so that you can do it too!  Enjoy!


I've always admired dressers converted into vanities. In our city bungalow there just wasn't enough room in either bathrooms for a dresser-vanity, so when it came time to remodel the bathrooms in our current house I was happy to see there would be enough room in the master bath, but just barely.

Although I do confess I did look longingly at some of the wonderful vanities that are available now. Especially the ones that look like...what do you know, dressers. Seems like others have admired the look, too.

Except that the price tags on these started around $300 and climbed up from there.

Back to the original idea.

Believe it or not, this was the "temporary" vanity we lived with for 1-1/2 years.

It started out simple enough- we were exhausted after spending all our free time in the summer working on both baths, I had to go back to teaching in September, and we were trying to get our new garage weather-proofed before the winter set in. We thought we'd get to it in the winter when we'd have a covered garage to work in.


With the rest of the bathroom completely finished, a curious thing that can happen to do-it-yourselfers at one time or another happened:

We stopped seeing it. It just sorta became part of the room.

Hard to believe with that lovely pieced together top and golden sink.

I think, too, it was because we were going to have to make the vanity and we weren't sure how long it would take or how hard it would be.

When we finally got around to it a few months ago, we found it wasn't that hard at all and didn't take too much time.


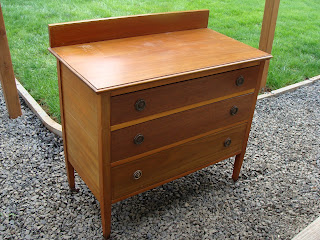
This is what we started with: a $79 dresser from the Salvation Army that I had originally bought to be my nightstand. I thought I needed the storage, but really didn't, so they sat empty. I sure hope you can score something cheaper, but I was looking for specific measurements, and you know how that goes. Plus, have I mentioned how expensive the thrift stores are here? OK, I'll be quiet about it...

It wasn't a fine antique, though, and needed to be painted and the top refinished. The slats separating the drawers had been replaced with a lighter color wood and both of the side panels had big cracks in them that needed to be filled.


The top had a major scratch (top left in this picture) that went all the way to the wood.

So it was a perfect candidate, plus it was the exact size we had between the tub and wall.

Here are the steps we took to convert this dresser into a bathroom vanity:

1. Purchase the sink first to fit the top's measurements. Make sure to measure the true cabinet and not just the top- this dresser had an overhang of more than 1 inch, so I measured inside of this to get a small enough sink.


We just got a basic 16-inch model sink for this dresser. All the others were too big. We seriously considered a vessel sink, but with the new faucet would've cost about $250 instead of $100 (we'd already been using a new faucet).

2. Remove the top drawer, lay the template (comes with the sink) on the dresser top and trace around it with a Sharpie-like marker.

3. Take a deep breath and cut it out with a jigsaw. It's OK, you can do it...


4. Lay the sink in the opening and breath a sigh of relief when the sink fits in the hole.


No photos for these steps (poor planning...):

5. Remove the sink and sand and refinish the top (if needed- alternately, the top can be painted). Paint dresser body and drawers, if needed too.

6. Using a water-based polyurethane (I like satin finish), apply 4 to 5 coats. Since this top had a short back piece, I made sure the joint between them was covered well so that no water from the sink would get between them.

7. When dry, run a bead of clear caulk (works much better with wood counters than white) around the rim of the opening and carefully place the sink right on top, pressing down lightly (you do not need to add caulk around the rim of the bowl after it's in place- that's a sure sign of a do-it-yourself job).

8. Attach the faucet and place the vanity, hooking up all the plumbing with no drawers in place.


Each drawer will be treated differently:

9. You have a few options with the top drawer. It can be taken out entirely and made into a false drawer by cutting the front off and gluing it back in place. Or you can get one of those kits that turn sink drawers in kitchen cabinets into a flip-out with a narrow plastic holder attached.

I wanted more storage, so you can see from this picture that we cut out what was needed to fit the sink, and then built new sides to make small "drawers" on each side.

Of course, if you have enough room for a dresser with three drawers on top, you'd lose the center drawer and still have two functional drawers. That would certainly be the easiest.


10. The middle drawer took the most finagling, but basically we (of course you've probably guessed that this part doesn't really involve me...I'm using "we" merely to show my support) made a box to fit around the plumbing. This leaves plenty of space for toiletries.


11. The bottom drawer merely has a square cut out to skim around the drain pipe. This drawer lost no space at all.


And there you have a slightly stripped-down version of how to turn a dresser into a bathroom vanity.

What? You were expecting plumbing how-tos? Sorry, that's way beyond my skills. Brian does that with a little help from his friends (thanks, Dan!) and I stay far, far, away.

Especially because it was my idea.

Isn't that wonderful!  
And is that a claw foot tub I See?  Jealous!
I have loved this idea and always wanted to do it, 
but never have the bath that is big enough!  ...someday!
Thanks Jami!


Read more...
Related Posts with Thumbnails
Emealz - Easy Meals for Busy People!
Home & Garden Blogs Home & Garden Blogs - Blog Rankings

Blogging  tips, tutorials and SEO

From Here to Eternity

  © Blogger template On The Road by Ourblogtemplates.com 2009

Back to TOP