We’ve Moved!


If you aren’t redirected here is the link:


Remodelaholic!


THANKS!

Showing posts with label Play Rooms. Show all posts

Playhouse Makeover with Help from the Kiddos...

25 May 2011

Playhouse Makeover with Help from the Kiddos... by Becky


Hello!  I'm Becky from Organizing Made Fun.


I have a very fun, unique blog that will not only motivate you learn to organize your home but I focus on getting your life organized, scheduled, and in shape - including my own organized weight loss, organizing finances, and I share about being hospitable to others.  I'm also a mom to a 12 year old autistic son, who is amazing!


Today I'm sharing with you about our playhouse. Our playhouse is SO cute!  It is...my hubby decided, a few years back, that he wanted to make our daughter a playhouse.  But, the time and cost was a lot!  Instead, he found one on Ebay and trucked it to our house!  Funny thing is that it cost less to do it that way than he could even buy the supplies for it!


Playhouse: Circa 2007


Well, it's had lots of use over the last three plus years.  Lots...so much so that the inside is just depressing!  So, I told my seven year old daughter that we would be having a make-over for the inside of her playhouse and she got to choose whatever colors she wanted - from the vast array of paint I already had on hand, that is!


If I don't keep up in there, it gets trashed! Not a fun place to be.


So, the kids started by priming the entire inside - it's all plywood!  Yes, I said the kids...I didn't do it!  This was the perfect opportunity to let them paint and learn how to do it on something that I wasn't overly concerned about!  They loved it!
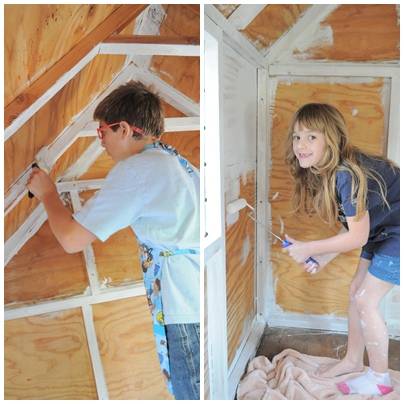

The kids had paint in their hair for weeks, but it was a lot of fun for them!

Once they primed it, it looked like this:


They actually did all this themselves, after a short lesson from mom on how to paint.


Much improved, and then they painted it yellow {semi-gloss}:


The semi-gloss is actually great to keep it clean and wipe up stuff!

Rachel and I scoured thrift stores together.  We found curtains in green {with rubber backing on it} for $2 a panel.  I cut and sewed a hem.


The green curtains have rubber backing on them so they are perfect for outdoors!


We found sheets that matched to use on our bench that we found at a thrift store - to cover some old chair pads we had from my bench in my awkward music room.  I was specifically looking for a bench that was VERY sturdy because lots and lots of kids would be climbing on it.


Rachel's friend/neighbor was a "workhorse" and did a great job painting, too!

I had a $20 limit - and this was $20!  They primed it and then painted it green!  Since we had curtains in there before there were already curtain rods but had gotten a little rusty.  I spray painted them with some silver paint I had leftover.


I used a pizza box to hold all the rings and rods.


There was also a trip to a very fun place...


ReStore has all kinds of building supplies!

I bought three sets of shutters for the windows on the playhouse for $2 each!! 


 The curtains are hung, the bench is painted...


I even brought in a piece of carpet - I got it cheap at Costco.  It's outdoor carpet that is mold/mildew resistant.


Painted more chalkboard paint on the top of the table that was already in there. 


The mirror I found on the side of the road and painted it black.  Not the best mirror, but perfect for a space like this.  


We had to screw it in - as kids who come over and play would yank it right off the wall.


The shutters will help with "privacy" and also help keep the playhouse more weather-proof as the tree drops all kinds of stuff, plus some rain gets in there.


My hubby cut them down to fit on the other two windows.


The curtains just had to be cut down and sewn.  The curtain rods and rings re-vamped a bit with some spray paint.  


We chose to use rope lights to light up inside - as it gets dark in there at night - or when the girls close it up.  We chose it for two reasons: we already had one strand {we just bought one more}, AND mainly because we could staple it down so the kids won't pull it down.


I think the best part of this was my daughter's enjoyment of getting to pick everything herself - from the paint to the bench to the curtains.  She was on a budget...so she didn't get to pick just anything.


She also had to do the work herself {although her brother graciously helped with some of it}.  She loved it even more.


It makes me want to be a little girl again...I would have LOVED this playhouse when I was her age.


Photobucket

Read more...

Pottery Barn Inspired Attic Playroom for Kids

31 August 2010

Shaunna over at Perfectly Imperfect has a new beautiful playroom inspired by Pottery Barn and it is wonderful, check it out:


Alright.  Here's the deal.  I'll fess up to being so completely thrilled with Matt being home that I forgot to take pictures last week of the playroom.  I'll fess up to waiting to hang my wall groupings and light fixture in the "new" guest room....so my big strong guy could do it for me (a.k.a. I hate hanging anything). 

Both rooms were inspired somewhat by Pottery Barn, so when I saw that the CSI challenge was just that, I got really excited.  BUT...when you wait to take pictures the morning of the "deadline," you don't give yourself much wiggle room.

(don't you just love to say that--"wiggle room?")

It's also a good time to tell you I've got no business shooting without my big flash.  I mean really--no business.  I've gotten used to its perfectly balanced bounced light...oh, the light.

Since I'm writing the e-book, it's gotta be done.  I've got to bite the bullet and get a new one.

You'll see why.  Let's just pretend I made the pictures all fuzzy with photoshop.

Okay, just like the writing room bath, I want to show you where this room was in February.


It wasn't even a room.  We did hire out for the bones construction, but we got to do all the fun stuff, beams, flooring, building storage, and all the pretty stuff.

Speaking of pretty...


This can't be good, right???

I showed you all my inspiration photos a while back...these all came from Pottery Barn.  I was going for coastal, clean, cottage, and colorful.  Whew.  That's a lot of c's.


I fell in love with this cameron storage system when I started looking at units to buy.  We then realized how expensive these things are.  I know this one was well over $1500 total. 

For my toddlers.

So, as my sweet husband frequently does, he just said, "I can build that.  And I'll make it better.  That's too short anyway."  I will say I doubted him at first, but then Isaw the unit in person...it was totally particle board....and very short.  I wanted our unit to grow with our kids, so I hesitantly agreed to give Matt one more project to tackle.

It's funny that I'm still learning to trust his abilities...he's amazing!  I'm sorry when I doubt you, honey....you've earned all my respect!

It's one thing to find inspiration in photos, but it's another entirely when you find those first pieces for your space.  I've shown you my inspiration for our room,


and I have shown you the reading nook we added at the last minute...


Here's the whole thing....fuzzy pictures and all:


Now, we might be waiting on a canvas to hang on the wall you see over there.  And we might not have built the middle drawer to the storage and we might be waiting for the beadboard doors to the two outside cabinets.  And...we might still have some lanterns to hang from some rope somewhere in the room, but, other than that...

I LOVE IT!  This space will give our children room to play with each other...it seems to encourage wonderful, quiet play.  They have less distractions than they do downstairs.  We do limit TV and just seeing it is hard for my little guy.  I know he could watch Dinosaur Train all the live long day if I'd let him.

And sometimes I'm tempted.


Didn't he do such a great job on the storage system??  It's all separate pieces, which is great because we can move it around easier and if one day we need a different system altogether, we'll just mix and match.  It's SO sturdy, and I love that he added another 20 inches or so to the cabinets to give us more storage room than if we had bought the PB version.

Plus, it only cost about 200 bucks, including the shelf brackets and $20 in paint (It didn't take a whole gallon).  And it's solid pine with birch overlays.  I've got him busy writing plans for you guys....cuts, angles, type of wood, list of materials, etc.  Would you like some?  I hate to put him through it if you guys have all already done this and I'm just last to jump on the train. :)


There is plenty of opportunity for art up there...I love that.  Lots of painting, puzzles, reading, and pretend play.  We have quite the gourmet kitchen going on up there.  Minus the kitchen....but Christmas is just around the corner.  :)


I mean, you can't tell at all about the pictures, right?  (Insert obnoxious eye roll)  Anyway, other side of the room...I loved creating all the art and accessories for this room.  That's the window from my window turned pic frame tutorial...a very early post.  You can check it out here if you're interested.  I found the oars on ebay for $15 and painted them.  I think now they'll be receiving a bit of crackle and chipped paint treatment.  Maybe by then I'll have a flash and you'll be able to tell.  The sign was just painted on a scrap piece of wood, but I love the grouping and how it fills up the space and pulls the eye upward.


I love the lofted ceilings, the beadboard, and those beams up top.  It feels like such an escape and such a colorful place to foster creativity.


The furniture painter sometimes tries being an artist; it's not the same.  I do love what it reminds us of, though.  :)

The reading nook is where Grayson and I do his reading lessons 3 times a week.  You can see the big book poking out of the bottom of his pile.  I'll let you know how it goes....so far, so good.  It's so rewarding to see him learning!

Speaking of that, we've left room to add to our playroom for that very purpose.  We're about 95 % (or more) positive that we'll be homeschooling, and we would love to add desks and a white board, and I'm sure my nerdy hubby will have us some kind of computer genius up there.  Love you honey, but you are kind of nerdy...and handy.


One my favorite parts of the entire room is these drawers.  Seriously, there are probably 20 puzzles in there...plus other odd-shaped games and activity (have you gotten a latches board for your little ones?  they're great! teaches them how to be a pro at b & e, but hey, all in the name of learning, right?)  ;)


I tried to think ahead of the game and leave these galvanized containers ($1 at Target) for miscellaneous pieces that get left out or misplaced.  You know how you just have to find the system that works for you?  This is saving me tons of time.  Having these containers (and more) and a large basket just for random toys helps me contain the clutter in one place and when it's time to re-organize, I'm able to do it quickly. 


You'll see more about these containers in the video, but I enjoyed making them and using the metallic and natural accents help ground the space for me--not too cartoon-y.


Recognize this?  It's just a standard train table.  I couldn't stand one more pattern in the room, so I just flipped the pieces of the top over and painted them with chalkboard paint.  Functional and a clean slate...literally.


My goal was to spend very little on containers, and this was no exception.  I think maybe $4 at Hobby Lobby, unfinished.  How about I just compile a post on all the storage I painted/created for this room?  That will be much simpler.  It was great to take my time the last 6 months and fill the room with functional, pretty containers that are not breaking the bank.


Love these mod podged books I did for the room...and that the tag on the bottom one says, "grow in grace."


I'm anxious to add maybe one more thing to that wall and I love those oars!  I'm sure they'll receive several makeovers as my mood changes.


What do you think??  If you're not too bored, take a look at the video...it'll give you a much better picture and plus, you get to see the writing room.


Isn't that one of the most beautiful play rooms you have ever seen?  The colors are great, the light is wonderful!  Makes me want to go play, I'm not too old right?

Read more...

Bright Play Room For Kids; Guest

15 July 2010

I saw this lovely playroom for kids on The Perfectly Imperfect Life and had to ask if I could show if off.  I love the colors and storage.  Check it out:


DSC_1706-2
They’re done!  The day bed and the play room are (mostly) done! 
I actually used the comforter from my bed and the pillows from my girls’ beds, so the bedrooms look a bit of a mess, but hey, maybe I’ll decide to keep it this way and get a new comforter for MY room!
Let me give you a tour.  You’ve seen the day bed, but here it is again.  Doesn’t it look nice?
DSC_1724
Mr. Harry sure thinks so…
DSC_1725
I also grabbed the curtains from the girls’ room and the little boxes that used to hang in my kitchen.  Those boxes were definitely a Eureka! moment.  I was driving down the road, chewing on what I could put there when I realized that the boxes were sitting in the garage doing nothing, but if I were to hang them in the play room, I would have a great little place to put all the girls’ 3-dimensional art work and doo-dads!
DSC_1708DSC_1707  
And, speaking of art work!  I finished the art wall.  Generally, Thing 1 produces reams of art work each day, but I actually had to harangue her a bit to actually get the wall filled in (and you can see there are actually still two frames empty).
DSC_1718
DSC_1732
   DSC_1713 

Usually, when I hang frames, I just eyeball it and move them around until I like where they end up.  Which leaves a lot of holes in the wall.  This time, I actually did the responsible, mature thing and created templates and taped them to the wall.  This turned out to be a really smart thing to do because my original plan turned out to require drastic re-working. 
I’ve seen a few bloggers do the template thing, but I might just post on it myself because I ran into a few gotchas that might be good to share.
In addition to the art work, I put up baby pictures of each of us.  Aren’t we cute?
DSC_1729DSC_1730
You may have noticed that you’ve only really seen one side of the room.  The left wall has a white board and a chalk board.  I still have some things I want to do with that, so that’s not going to be shared yet.
The wall opposite the bed holds this:    
DSC_1719
Notice that the door doesn’t shut all the way?  That’s because it looks like this on the inside:

DSC_1720
Actually, it was even worse on the inside.  I had to remove a bunch of stuff to even be able to open the doors.  I think that’s going to be next week’s project.  Should be fun!

But that’s messy.  Let’s finish with something nicer…
DSC_1706-2

Ahhh…ready for my sister’s visit.

I love the day bed, the colors and the art work!  What do you love about this play room?  Do you have any play rooms to show off?

Read more...
Related Posts with Thumbnails
Emealz - Easy Meals for Busy People!
Home & Garden Blogs Home & Garden Blogs - Blog Rankings

Blogging  tips, tutorials and SEO

From Here to Eternity

  © Blogger template On The Road by Ourblogtemplates.com 2009

Back to TOP