We’ve Moved!


If you aren’t redirected here is the link:


Remodelaholic!


THANKS!

Showing posts with label Parties. Show all posts

Off to Paris, Eiffel Tower Model; Guest

11 June 2010

I thought this was such a cool project, I had to share with you all.  It could not only be a a fun decor item, but with the summer break starting might be something the kids could have fun jumping in on!  (or making one of their own...)  This project was a party link, from Autumn at The Fickle Hobbyist here are the links Part 1 and Part 2


One of the main things I HAD to have for Abby’s French Lavender party was, of course, an Eiffel Tower for her dessert table.  I mean, it just wouldn’t feel complete.  I saw one that was the scale I liked at Hobby Lobby but it was somewhere near $60.  I was thinking that just for a centerpiece that was a bit out of my price range.  I googled it and still didn’t find something that was the right size in the right price range.  So, instead I decided to make it.

Originally I wanted to use metal rods but when I saw that each was $2.50 and I’d have to use 16 just for the base, (for the plan I was making up in my head) I figured that would get pretty pricey.  Instead, I headed over to the wooden dowel section of HD and picked up a bunch of the tiniest sized dowels and 4 slightly bigger ones that I would use for the supports.  After all the “end of the year” parties were over today, I sat down with my trusty glue gun and got to work.  (since this project is still in progress, I’m just going to show you what i have done right now.  I will finish up tonight and post the 2nd half tomorrow.)
Ok, so I didn’t have an actual plan, other than to look at an image of the tower and go from there.  Remember, this is what we’re looking for.
Please keep in mind I didn’t measure anything.  I know that probably drives some of you nuts if you’re looking to replicate, but it’s sort of the way I do things.  First I held the medium sized stick up and eyed the size I liked.  I then cut four of them to the same size.  I hot glued two of them together and held them at an angle I thought appropriate until the glue hardened, and then did the same with the other two.  Then I took those two points and glued them together to make a pyramid top.  With the left over medium sticks that were cut off, I glued around the sides for support.
Now that it was secure I added the smaller sized dowels to the inside of the supports to form the frame.
For the next part, I created the arch at the base of the tower.  Because the dowels are so small, they are pretty flexible and bend easily.  However, they still needed to give a little more for the desired effect.  I decided to soak the rods in water for 10 or 15 minutes before I adhered them to the base so that they would move more freely.  This worked really well.
While they were in the water, I gently coaxed them into the arch that I needed.  Then I dried them off and used clothes pins to hold the ends to the base.
See that piece hanging down inside the arch?  I cut that part right where it meets the arch and glued it right there.  Then I removed the pins and glued the sides.
This is what you are left with.  I added one more row of supports right above the arch, but I haven’t yet taken a photo of that.
The plan for tonight is to make a bunch of Xs on the left and right edge of each side.  Obviously this part is going to take some time, which is why you’re only getting half of this.  When I’m all done, I am going to spray paint it all black.  When I’m finished using it at the party I think I’ll stick it in the girls’ room.  After all, their bedroom is French inspired.  (are you seeing a theme here?)

Part 2:
Now all I had to do was the tedious stuff.  I have to say, this part was a bit time consuming.  All in the name of love, right?
Remember, the right and left edges that we created using the thin dowels?  We are going to use the same thin dowels to create the X pattern in that empty space.  Like always, I don’t measure.  In fact, this is what I do to get the sizing correct.

I will hold the stick up, put my finger where  need to cut, and then just cut.  It eliminates a lot of steps you’d use if you actually measured.  Of course, you’re left with a less perfect product, but really this doesn’t look JUST like the Eiffel Tower anyway.  It’s just my interpretation.  So I’m ok with some imperfections.  I hope you are too!
I started by cutting the edge of the stick at an angle.  Then, I held the stick up to the side where it was going to be glued, and marked it with my finger and cut that side at an angle as well.  I started by doing all the same leaning angles on the back side of the edge like this.  See if you understand what I mean.

See the right vertical stick?  See how the first part of the X falls behind that stick?  Do this all the way up that one side.

By gluing these sticks to the back, it leaves an open space for the second half of the X to be adhered, while at the same time, keeping the front edge neat.
For the next part, you’re going to again cut an angled edge, hold it in place,  and mark it with your finger, just like I showed above.  Instead, this time, you will cut the piece to fit inside those two vertical pieces.  Again, this leaves the front more neat.

I’ll be honest, though, you can really glue the pieces however you like.  I am just kind of anal and this is the system that I found worked for me both aesthetically and functionally.
For the area below the horizontal sticks, I just made two Xs on each side.  The final product, when all sides were Xed, looked like this.

You’ll see I left the top, skinnier part bare of the Xs.  I was honestly done doing Xs by that point.  I had burned my fingers 3 times with my glue gun and I just wanted to paint this already!
I have to say, I thought it looked pretty awesome the way it was, but it REALLY came to life for me when I began spraying it!  I just picked up the cheapest, HD brand spray paint for this project because it was bare wood, and there wasn’t a lot of it to cover.


I gave it a few coats, being sure to spray on the inside as well, and turning it upside down to get the underside edges.

I have to say…I  LOVE  IT!!!!!

I cannot wait to put this on my dessert table!!!!!
Yeah, so it took me a while, and I have the glue gun burns to prove it, but I’d do this one over in a heartbeat!  I am so very happy with the outcome.  And the fact that I didn’t have to spend $60?  Perfect.
Here’s how much it cost me:
$.19 x 12= $2.28 (small dowels)
$.20 x 4= $.80 (medium dowels)
$.97 for paint
$0 for glue on hand
Total cost= $4.05
$4.05!!!!! I’ll always take the less expensive price with a little bit of elbow grease every time.
Such a fun little model product. 

Don't you agree?
Is this something you would try with your kids or do on your own, I'd love to know!?

Read more...

Twiggy; Lanterns Guest Feature

08 May 2010

Okay, I love these for indoor or out, but since I am in a "outdoor party" mindset, AND I actually have some twigs in the back yard (score, that is pretty good for living in a tree-less wasteland newish development....  I have to show you this wonderful idea.  This was linked up to a recent party by Marianne over at Songbird.

(p.s. I actually had some of these at my wedding reception 9 years ago this week,  Happy Anniversary Us!, but they were not quite as cool as these, more rustic)  This is what Marianne had so say:

Twig vignette9 
Howdie, good folks! How a ye doing? Still enjoying Spring (or Autumn, hello lovelies down under)? We are in the middle of a climate change in these parts. Thursday we had Summer temperature, yesterday felt like an autumn day and I have been told Sunday will feel like winter again.
Well all the more reason to stay busy. While the whole country had turned orange yesterday on account of Queens’ Day, My Love and I stayed home and worked on various projects.
My Love had hired this big, mean, ugly machine to cut heavy weight tiles. He has been working hard on our new patio and the final stages are in sight. Just one or two more days of hard labor for him and I will have to start doing my THANG outside.

Twig vignette2
So I am real busy cruising the internets for inspiration on various outside decorating issues. So come around often this week, I will probably be asking your advice on everything from choosing colors to designing additions to the house…
But today I worked hard at trying to avoid My Love and his extremely loud and screeching machine all day. So I retreated to my peaceful attic and fired up the glue gun.


Remember my Twig Wreath? After I had finished that one, I still had a bucket full of cut-ups and branches left. And something inside of me, just couldn’t let me throw them away.
Heaven knows why, after all they were just a bunch of small branches and twigs, I have a garden full of them. So in order to control the chaos and not fill my house with the waste I removed from my garden,  I decided to make myself come up with a use today – within an hour , or throw them out.
Nothing like a good old self-imposed deadline to make the creative juices flowing…

Twig vignette1
And this is what I came up with. Two candle holders. Twig inspired DIY lanterns so to speak.

Twig vignette5
Now if I thought you would  need it, I would have gladly made a tutorial but really it is too simple for that. I took and old glass (whiskey style), cut the branches to size and stuck them on with hot glue. For the square box I used an empty Q-tip container.

Twig vignette7
Add some Spring flowers from the garden, and a new vignette is ready for the world.
I love how the light of the candle shines between the branches.
These little nature inspired, waste recycling, neutral colored lanterns really make my hard sing. 

Twig vignette6
So what do you think, was it a good thing I held on to those twigs? Do you love’em or hate’em? I want to hear your opinion here folks!

Twig vignette3

P.S.  Marianne your photography is STUNNING!  
and my opinion of the lanterns?  I LOVE them!  
...and I want your Hydrangeas too! 
(or are those Snowballs... either way, love um!)

Read more...

Live and Dine; Before & After! Party Highlight

05 May 2010

I saw these rooms and instantly fell in love!  I love the bright feeling of the dining/living room.  Thanks Samantha over at Walnut and Ivory  for linking up to the party.  Here is what she said


I thought I’d share the latest happenings at Walnut & Ivory homestead!
This is the living area before, with the previous owner’s furniture…
before01

And this is after a few ‘afters’ since I moved in, as I’ve now moved my dining table here as well! The walls are ‘Limed White’ Dulux and the back of my bookcases I painted ‘Pebbledash’ Nippon for extra depth and focus! I’ve also joined up to the leaning mirrors bandwagon which in my opinion works better when you have such heavy mirrors!
019

I decided that I should be arranging my house as to what works best for us, not how it ’should’ be. So I have used this large area as a living and dining as we simply don’t need so much space!
Please note the gorgeous round pedestal table and adorable chairs! These were my latest find from the thrift shop as I had been on the hunt for a round table for a while! In the spirit of a true DIYer, I was far too excited to remember to take a before picture so I had to hunt one down on the net. This is the closest I could find, the whole set was in the baltic pine colour of the top of the table..
before

I busted out my trusty spraypaint and only required a primer and top coat and they were ready to go! I also picked up some cute ‘ducks egg’ cushions to make them a little more comfortable… Here is the after!
003

I’m so pleased with the cosy ‘country farmhouse’ feel it has. I still do intend to sand down the top and stain it more a walnut tone, because MY NEW HARDWOOD FLOORS ARE COMING SOON!!!!!!!!!!!!!!!.. Sorry, a little excited there.  More pictures? Sure!
0010

The blanket box found it’s way out of our bedroom, it’s just too nice to keep hidden away! A little seating area for reading…
002

My very first ‘tablescape’. I went for a simple country theme to match the dining setting.
012

My own DIY cloche I made from upturning a cheap vase and a little wooden cheeseboard!
011
Beautiful wine glasses were an engagement present from my parents…
010

I love the detail of these little lanterns, they were on special at Spotlight a while ago,
I wish I had have bought more! Love lanterns!!
013

I’m really pleased with how the dining set turned out. Just how I had imagined, which is always a good thing!
006
I’m lovin that tulips are in season, found these pretty pink ones at the supermarket!
This is another before from a different angle… It’s amazing how dark the space felt looking back now!
before02
And after!
018
Please excuse the hulking air-con, I’m afraid it’s a necessity in Australia!
So that’s the new arrangement, I think it works better for us and I have always felt that a dining room should have lots of natural light, whereas the corner it was tucked into before just wasn’t providing it. As much as I would love a huge window in my office, I don’t particularly need one as I have lots of pretty things to look at on my computer (such as all your lovely inspiring blogs!!) :) Thank you to those who have joined up to follow my process, it means a lot and inspires me to keep making the most of my home! Much love!!


I love the white furniture!  
What do you think! 

Read more...

Blossoming Beauty; Party/Holiday Garland Idea, Guest

01 May 2010

Sara from over at Creative Jewish Mom has made some wonderful things.  And this little party/ holiday decorations is one of my favorite.  what do you guys think?  Simple and so beautiful.  Here are her insturctions:

Tu B'shevat Blossum Garlands chandelier 

Isn't this just dreamy? I don't know why it never occurred to me that the chandelier in my stair well, as well as the banister are perfect places to hang seasonal decorations! In fact, other than painting this space peacock blue, (which I still love even three years later) I have yet to figure out how to decorate the space, so some beautiful garlands certainly give the space some life!

Tu B;Shevat Garland on Stair Rail

Sure looks like Spring time in this stairwell! And these would be great party decorations for just about any occasion, though I won't try to deceive you and say they were quick to make, because making a large quantity like I did (maybe at least 12 meters worth) requires quite a bit of time, though well worth it!

One of the really interesting things about this garland project is the material that I used. Disposable tablecloth yardage! If you're not familiar with this creation, it's the same fabric used in hospital masks and bibs, only available in every color to suit your party decor.

The great thing about it is that it's not woven, so there is no unraveling, and it is semi translucent, so it looks a bit like tissue paper. And of course it's much cheaper than most fabric. And if you're lucky maybe you can even recycle some non-soiled ones from the next  party where they happen to be using such a thing. (Very common in Israel.)

Tu B;Shevat Blooms Garland


Here's How:
  1. Cut all kinds of shapes like flowers, circles, leaf shapes etc from disposable table cloth material.
  2. Shapes needn't be perfect, and you can certainly cut at least 10 layers of fabric at a time, so the shapes add up quickly.
  3. And now for the fun part: Sew the shapes together by running them through the sewing machine, quickly placing one after another, and not worrying about lining things up! The randomness is what makes them look like falling blossoms, at least to me!
  4. Hang strings of blooms vertically or horizontally and enjoy!

Thanks Sara for letting us show off your lovely project!
What do you all think?

Read more...

Armoire Makeover: Guest Party Highlight

17 April 2010

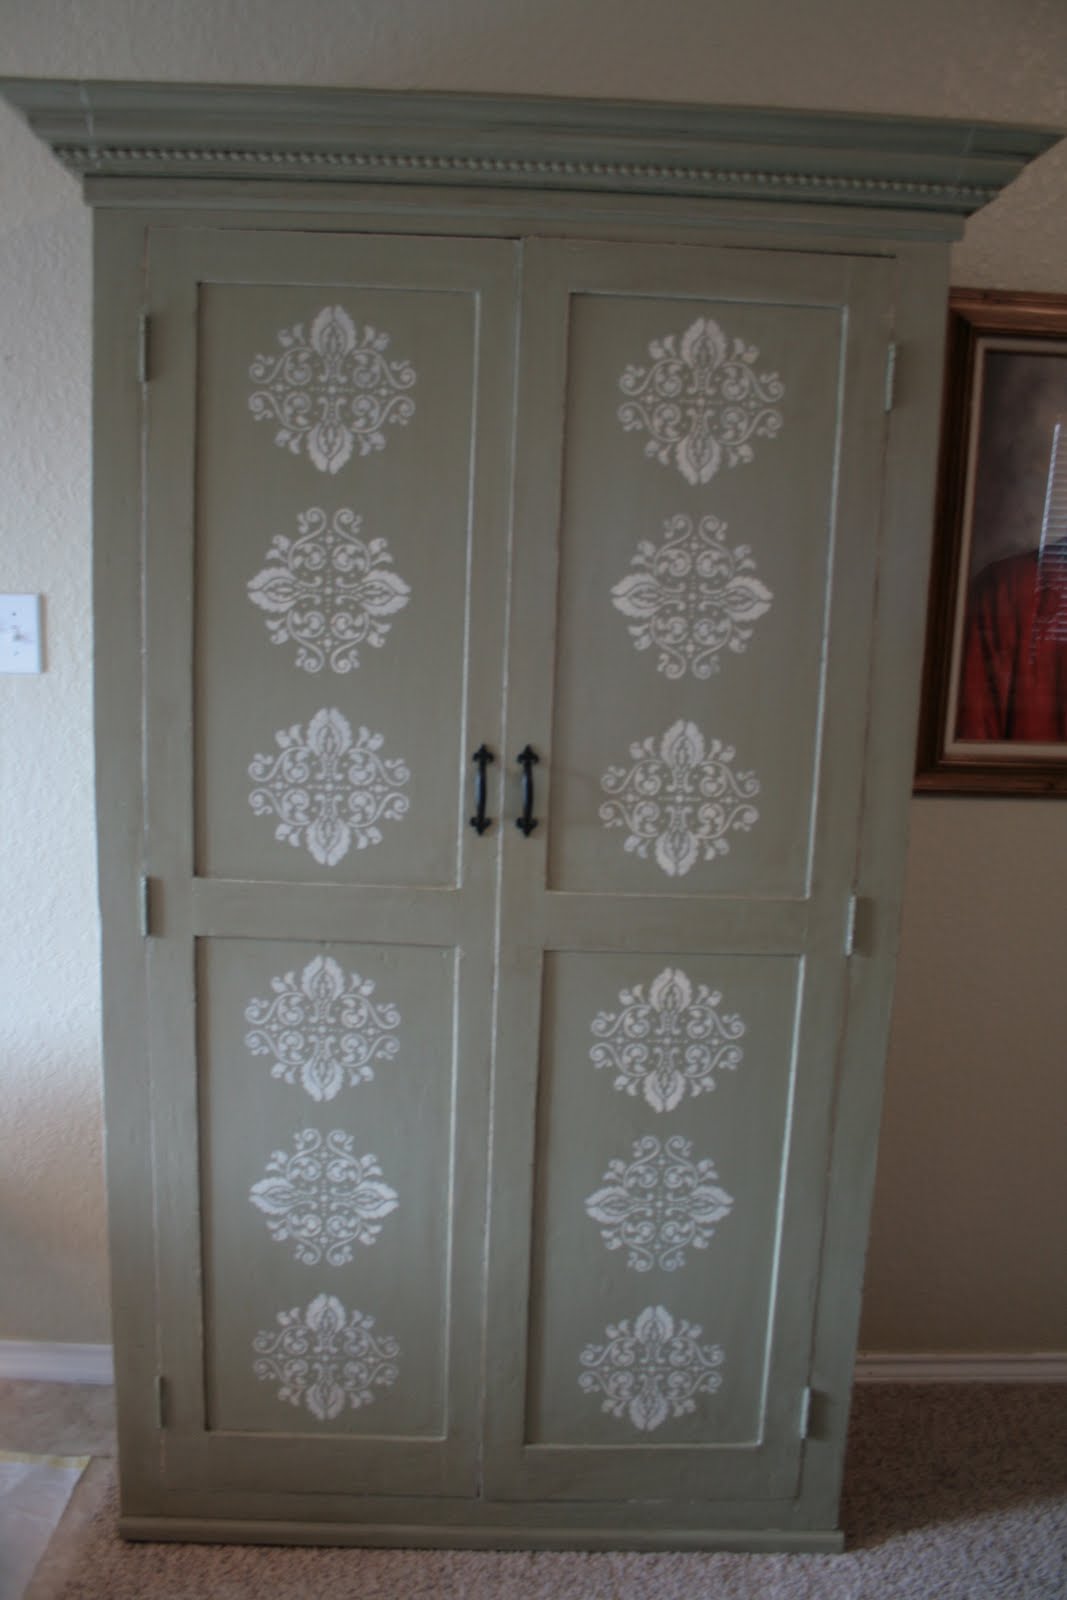
Another great project!  I saw this and had to share.  I love the new moldings installed around the top of the armoire.

They did a great job with this piece here at the clever chic.  Very clever indeed!


The Amazing Armoire Makeover


I LOVE armoires!  I think they are pretty and interesting and offer great storage behind closed doors.  I picked up this armoire for FREE from a school that was closing. Originally I was going to use it for supplies for a preschool I was starting. But we moved and the whole preschool thing didn't happen.  So I started using this as my craft cupboard.  It's perfect to hold all of my projects and supplies. 
Well, the brown just wasn't doing it for me, but I never got around to redoing it until now (a year after I first acquired the beaut).  It was suppose to be a quick, easy paint job.  But when is it ever easy?  The paint started chipping and I had to strip her down to the wood.  She had about four coats of various paint on her.  Can I just say that I HATE stripping paint?!  This whole process took way too long because I just didn't want to do it.  I started with a spray paint stripper, but it didn't do very much. So I picked up this awesome gel type paint stripper. 

It worked amazingly!  Plus, it smelled good (perfect since I was removing the paint from this thing inside the house).  Anyway, after lots of paint scraping and some sanding she was ready to be made over. Here she is primed.

 
 I added crown molding to the top.  She was just too plain jane to begin with.  Then I painted. 
And then I stenciled the doors.  After that I painted and wiped off a glaze over everything and finished with a coat of poly. 
 And finally, I added some bling in the form of hardware.  Phew!  Just typing it all makes me tired.
My husband is thrilled that I am done.  He's not a fan of the mess I make with my projects (neither am I ).  I'm thrilled that it's done because I was getting tired of working on it and it looks sooooo much better then it did.


Here is the before and after:


That's what I call an extreme makeover!


What do you think of their transformation?

Read more...
Related Posts with Thumbnails
Emealz - Easy Meals for Busy People!
Home & Garden Blogs Home & Garden Blogs - Blog Rankings

Blogging  tips, tutorials and SEO

From Here to Eternity

  © Blogger template On The Road by Ourblogtemplates.com 2009

Back to TOP