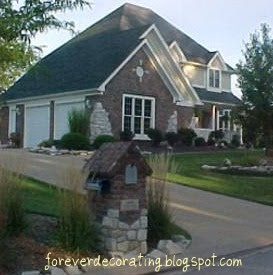
Easy Faux Carriage Door Tutorial!
27 April 2011
I am honored to be doing a guest post for Cassity at Remodelaholic. It's a pleasure to introduce myself. I am Terry and I live in western Illinois. I am married and have two grown children and we are recent empty nesters. I am also fairly new to blogging since November, 2010 with my blog foreverdecorating.blogspot.com.
It has been a learning curve and I have begun to train myself to think about my projects with blogging in mind; ie: before pictures and tutorials.
I was raised with parents that made everything they possibly could and forced to sew all my clothes at the age of eight (now I am thankful). So it comes natural to me that, I could and would, tear into any home renovation or make anything I could (or maybe it's because I am cheap). It's a hobby, a lifestyle and a joy for me to do these things. I believe that if you want it bad enough you will figure out a way to have it. I am blessed with a God given creative gene that I am very thankful for.
I recently posted on my painted carriage house garage doors, but with this guest post, I would like to give more of a tutorial of how I did this and why.
These finished garage doors came about one day when my hubby announced that he wanted to replace our existing garage doors with carriage house style garage doors. First, I must stress that nothing was wrong with our insulated garage doors.
Granted they were bright white when the sun would shine on them, otherwise, no problems. We also have three huge windows in the front of the garage with the garage doors being side entry.
Easy to do. I had clear stencil sheets, so I just drew and cut out my stencils. Then I used black acrylic paint in those small plastic bottles to paint these on the doors. I mixed some white acrylic paint with the black to make the gray for shadowing and painting the details of the screws.
With hubby happy, all I had to do was seal the acrylic paint with water based exterior sealer. It has been two years since I did this process and the doors look the same today as the day I painted them, so this sealer for exterior works great. It can be purchased at any hardware or paint store.
Total cost for this project was just the cost of paint and sealer...around $25. I'd say that's about a penny on the dollar of what real carriage garage doors would cost and hubby is happy!
Thanks Cassity for the chance to do this guest post. Please stop by and visit me at my Forever Decorating! blog.
Social Retargeting by Chango


13 comments:
I like projects like that. Did Hubby thank you for saving a ton of $$$$$$$$. That is the bonus. They look great. until I read the post I had no idea it was tromp l'oeil
Great post
Caroline
This is SO COOL!!! I've been wanting carriage doors FOR-EVER, and will totally be adding this to my list! Thank you so much for the post :D
Shelley
Thanks for the opportunity for my very first guest post! Terry
SOOOOOO COOL and inventive! We have wanted carriage house doors forever too. Luckily, (LOL) our orginal un-insulated garage doors developed a huge crack in the metal and we had to replace them...with carriage doors ofcourse! I LOVE what you've done, great thinking!
That's pretty cool!!
Genius!
Thanks so for featuring Terry. She is one smart lady.
Terry, Thank you for this awesome tutorial. I would never have thought to do this. It is like magic the way you created this. One more thing for my to do list.
Ginger :)
Cassity, Thanks for the feature of Terry. I am a new follower. Please visit my site. Hugs, Ginger
I absolutely love this! You are so clever and you saved a ton of money!
How stinkin' creative!!! I am in awe! What a simple way to fix a problem! :)
Terry, the doors look SOOO much better with the carriage look. Glad you guest posted. I signed up for your blog. I didn't see an email connection to sign up for. LOVE your home and look forward to seeing more.
So brilliant!
Oh.my.gosh...this is SO AWESOME!!!! I have seen other tutes where they put wood on the front - way too much work... Any way you would ever submit an uploadable a file for us non-creatives to copy your drawings???
Post a Comment