


Paper Christmas Decorations, Day 1
01 December 2009
....on the 1st Day of Christmas my blog friend gave to me....


Aren't they fun?
They are so simple to make.
Flower Ornament


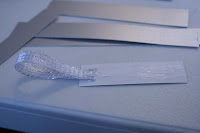
Cut 8 strips of card stock paper. 3/4 inch thick and about 4" to 6" long. It can be patterned or solid.
Take a quarter and trace 2 circles on card stock paper. This can be either the same or contrasting paper. Cut circles out. Set aside. ** You could make this more snazzy by embellishing the circles, with pretty things you have in your craft room, i.e. glitter, rhinestones, artificial flowers etc
Now grab a stapler, and loop paper strips like above and staple two ends together to create a teardrop loop. Repeat with all pieces.


Now take a small piece of ribbon and glue it to the side of a loop of paper.
Then loop the ribbon and glue that end down too.
Take a second loop and glue to first, so it resembles a heart.


Continue adding loops to circle with a little glue. Hold together with paper clips while glue sets.
- When flower is assembled, and glue is set, remove paper clips and add some glue to center, and place cut, embellished(optional) circle over the center of flower.

**I also tried a glued together option, which I don't recommend, but they would be cute as little heart ornaments. I thought I would show you the image.


Modern Ornament
Our second ornament is just as easy.

Step 1: First you need 8 strips of paper. 2 at about 3-4 inches to begin and then 2 each of 5, 6, and 7 inches long. (this can be longer or shorter depending on desired size)

Step 2: you need a loop of ribbon.
Step 3: Glue ribbon in a loop to inside of shortest set of pieces and sandwich together.

Step 4: Stack the pieces in this order 7",6" 5" sandwiched piece, 5", 6" 7". Now take the end of your stacked pieces and staple together.
Step 5: Repeat on other end, after you hold all the ends together which will push out the longer pieces to form the shape. And you are done!

The longer the pieces the more the shape changes, you can also crease the center if you want.


10 comments:
Thanks for sharing and for the great ornament ideas. My kids are going to have so much fun making these.
Very cute and SIMPLE! I've posted a link on childmade.com. Thanks for sharing!
Very cute... and so easy. I'm going to try these with my kids this afternoon!
Thanks so much! I can't wait to try making these.You have some great ideas!!!
Thanks so much for sharing your wonderful ideas!
Nicole
www.sobeautifullyinspired.blogspot.com
www.ourcountrychic.blogspot.com
These ornaments are simply elegant! I have had instructions to make these for a couple of years. You have inspired me to get going :)
Sweet place you have here and sweet family too. Nice visiting with you!
Kindly, ldh
so cute!! love the modern ornament iddeas
(this is lisa, lindsey's sister by the way, your blog is great!
I just made some of the flowers and they turned out so cute! Thanks for sharing. I used tacky tape to adhere each tear drop together and it was fast and simple and strong :)
Found your blog from One Pretty Thing!
LOVE these ornaments! this is a great way to decorate for the holidays! thanks so much for sharing!!!
I absolutely love this project! I would love to link to it on my site, AllFreeChristmasCrafts.com. On our site, we would provide a direct link to this project and post a photo of the finished product. If this is something you'd be interested in, let me know. My e-mail is jlitz (at) primecp (dot) com.
Post a Comment