


Kitchen of my dreams
17 August 2008
Almost! Okay, so it isn't quite the kitchen of my dreams, but it is pretty much as close as our budget can get us at the moment. I won't bore you with a big long explanation, I'll just put captions under the pictures for those that want to read them.

Before
The Plans
During 1
During
So, without further adieu, I'd like to introduce you to my new Kitchen (with a capital K):


 I have to get proof every once in a while that I work on the house. I am the informal, not so professional, self assigned documentor of our house remodeling projects so that means I am never in the pictures unless I take one of myself or request one. This one if funny because if you notice the bottom of my shirt is soaked. The tile saw soaked me and I was freezing the entire time I was laying the tile.
 This is the before picture of the upper cabinets before I tried staining them to match the other cabinets to match the existing oak.

 So here we are prepping the doors for paint, actually Justin is. I sanded and painted the body of the cabinets inside, while he faced the mosquito filled tropics of our carport. But while I had to use a brush he got to use our brand spankin' new spray painter.
Oh and by the way, I got this great idea for painting the doors off of This Old House (I LUV TOH)- You put small screws in the top of the upper cabinet doors and in the bottom of the lower cabinet doors then you attach wire to the screws and you can hang them so they don't get knocked and you can paint both sides at once.


I thought it would be fun to take a few pictures of details. I may add another post later when I have more time and more finishing touches ready to photograph in the house.


The original before (or click on the links for the full story!)

Before
The Plans
During 1
During
So, without further adieu, I'd like to introduce you to my new Kitchen (with a capital K):
We enlisted the local missionaries for more than their share of work, but they have been a dream in our time of desperate need! Thanks SOOO much Elder Crandall and Elder Bennion! They ripped out the second layer of vinyl after my shoulder and arms were so messed up that I couldn't hold a hammer any longer (before this I removed about 2000 staples from the first layer of vinyl and plywood, and each had to be hammered to loosen then ripped out with pliers the rest of the way)
The floor all cleaned off and ready for the new layer of junk we are about to install.
Here is the view into the living room, I think it is too funny! Our best Friends in college always though that we were mad for being able to live with the mess that remodeling makes, but it is a high that can't be explained. Besides when you've lived through this for 4 or 5 days when you finally get everything in order it is like a dream come true!
About 5 or 6 hours later we had all the cement board cut and screwed in place. If you look at the pictures you will notice that it has to be screwed about every 8 inches, and I think we went through about 15 screw heads, they just kept snapping off! Annoying!
Buddy is such a good helper! I think that he really likes how cold the tile is. As soon as I laid it down he came and made himself comfortable on the tile and didn't move for like 6 hours!
I have to get proof every once in a while that I work on the house. I am the informal, not so professional, self assigned documentor of our house remodeling projects so that means I am never in the pictures unless I take one of myself or request one. This one if funny because if you notice the bottom of my shirt is soaked. The tile saw soaked me and I was freezing the entire time I was laying the tile.This is the before picture of the upper cabinets before I tried staining them to match the other cabinets to match the existing oak.
This was almost immediately after staining. At first it looked great! But then the poplar got all wavy and irregular. (yes, I conditioned the wood before applying, but to no avail, it did nothing whatsoever)
So here we are prepping the doors for paint, actually Justin is. I sanded and painted the body of the cabinets inside, while he faced the mosquito filled tropics of our carport. But while I had to use a brush he got to use our brand spankin' new spray painter. Oh and by the way, I got this great idea for painting the doors off of This Old House (I LUV TOH)- You put small screws in the top of the upper cabinet doors and in the bottom of the lower cabinet doors then you attach wire to the screws and you can hang them so they don't get knocked and you can paint both sides at once.
Justin rigged a rope with a hook that got more elaborate as the day went on with more and more tarps to catch the over spray from the painter.
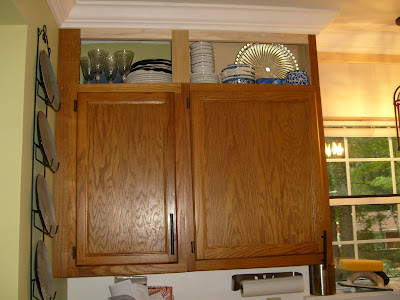
Now please don't focus on the mess inside my cabinets. (alas, you all just looked at it again) About a week before this project, I took down my extra, sort of ghetto looking, pantry shelves from the laundry room and shoved everything haphazardly back into my cabinets and anywhere else they could fit, ah, the joys of food storage. So normally they do not look this bad, but yet again this is just another example of what I can deal with in order to get a project done!
I thought it would be fun to take a few pictures of details. I may add another post later when I have more time and more finishing touches ready to photograph in the house.
Hey Mom- check out the cool piece of pottery you bought me! I love the color!
The view from the front room of the new improved cabinetry!
The full Kitchen!
Finally it is done! I can hear the heavenly host singing!
p.s. I thought I should give you an idea of cost.
flooring :
tile: A total score at $1.56 a box,
plus 2 free boxes (from the day before) because they couldn't find the price in the inventory
Cement board about $100 with screws, a million new screw heads etc.
Grout and thin-set : $50.00
Cabinets:
Reused master bath cabinet free.
Cut several cabinets in half, free.
boxes above cabinets, recycled wood from a local church, free.
Paint, Ace hardware water based enamel 2 gallons about $60.00
Hinges and handles, clearance approx. 100.00
Lighting:
above sink, Habitat for humanity $10.00
Above Table Lowe's Clearance 8.00 a piece
Counter tops
Prefab (ran out of time) approx $200.00
Paint on walls,
Back-splash left over from other projects
Green wall color, mis mixed 5.00 gallon
Valance:
I made from approx 1 yard of $5.00 fabric.
Faucet:
Lowe's approx $80.00
Sink:
Habitat for Humanity $75.00
Grand Total: Approx $715.00
I guess that doesn't include the price of the microwave, which I think was about 150.00 or less?
 Labels:
Before and After,
Downing House,
Kitchens,
Our Houses,
Painting,
Remodeling
Labels:
Before and After,
Downing House,
Kitchens,
Our Houses,
Painting,
Remodeling


26 comments:
Holly cow Cass...you guys did such an amazing job!! Yes, people WILL just walk into your house and say....I want this house. I love the drawer and cabnit handles, they are so cool! So worth all that hard work, now you can see the finished project!
Oh my gosh!!!! It looks amazing! You guys should start a TV show! I can't wait to see it in person. Good luck with the For Sale by Owner! I'd love to help in any way I can. Love ya!
Cassity you wanted my blog address here it is http://littlelanes.blogspot.com. The house looks wonderful thanks for the supplies they will be put to good use. Love Amaron
wow, looks like you've had your hands full with projects! so fun, it was nice of you to comment on our blog, keep in touch.
It looks so great. I really am super impressed with all the work you've done. Congrats on your new job and move.
The kitchen looks great guys! Good luck with the move and new job. Maybe now that you are a lot closer we will get to see you more!?!
Very nice. I've been thinking about adding sort of an open cabinet/display area above my cabinets so they meet the ceiling and it's so nice to see it actually done to get an idea of how it would look.
Incredible , i love the up to the ceiling storage
Chris
Beautiful! I've been wanting to extend my cabinets up to the ceiling, also, and have always wondered about doing the exact same thing you did up there. But I haven't been able to figure out how to do it! If you get a chance and you don't mind, would you email me and briefly describe how you built them up?
ampirlot at charter dot net
What a transformation! Great wall color.
Your kitch looks fabulous!! I am about to embark on my own "save the existing cabinets" kitchen re-do and I have a question, did you remove some cabinets and repurpose them? I have a penesula that will be a wee bit too long for the countertop I want, it is possible to remove only one of the cabinets to shorten it? Good Job!!!
Ann,
It may be possible, it just depends on how the cabinets are built. The older the kitchen, usually the more custom the cabinets. Which would mean, it will just be harder to take apart.
If your kitchen is newer (70's and on) then it is probably prefab peices, put in place on site. This makes taking peices out easy.
It just depends on the actual cabinets in your peninsula. Sometimes you will have a bank that is two door and two drawers, that is one piece. Or you will have a bank of drawers, or a one drawer, one door pice, next to another one.
How to tell: If you look inside the cabinets, and the inside is not open to the next cabinet, meaning it is it's own little box, then you should be able to take that section off.
The face frame will just be screwed to the next face frame, and the countertop too most likely, since you want to shorten it, I am assuming it is on the end.
If however, it is one piece, you can still shorten it. It will just require some tools, cutting, an basic understanding of cabinetry, and a bit of creativity, to clean up the raw edge. This is not a beginners project necessarily, but if you have a handy man/person, it could be done.
If you have a moment, email me a picture or two, and I will try to see if I can tell how they are built, no gaurantees, but I will try!
Came over from Better After. LOVE your new kitchen! It is beautiful.
What an improvement. It looks just absolutely fabulous. I love it painted white. The floor is gorgeous too. Hugs, Marty
Wow this is amazing!!! I have a very similar kitchen and this is looking like a great solution for updating!!
Oh and just stumbled along your blog and love it!
Great job on your kitchen remodel. I'm in the process of a kitchen remodel and should be finishing up in the next few days.....HOORAY!
Have a wonderful day.
Um, yeah. Totally amazing as promised! And all done for suuuuch a steal. You've added so much value (and beauty) to your house. Gorge! Thanks so much for the link.
xo,
Sherry (& John)
i really like the light fixture above the sink (so different!) and the open cabinetry at the top. i did some open cabinets here, http://tearinguphouses.blogspot.com/2009/10/before-after-pictures-pad-by-sea.html , next to the microwave, but i really like the way yours are above. especially neat for large items that you'd like to display, rather than the plates and cups that i used mine for.
kelly
I'm visiting via The Lettered Cottage. Your kitchen looks amazing! I can't even believe it's the same room. I especially love the cabinets and new hardware.
I just had to post a comment! This is gorgeous! Well done!
All that hard work paid off...it looks so fresh and clean. Great job.
Holy cow, I am addicted to your blog! You are so amazing. I am a person who always has to have a project going, but I never know where to start! That kitchen is amazing!
Wandered over while blog-hopping! Also about to try my own honey-oak to cute white kitchen. I may have missed it, but what color white did you use? I have white appliances that can't afford to be replaced yet....so you know....don't want anything to yellowy. Thanks. katiechase21@gmail.com
Wow, this is so inspiring. I am painting my cabinets this summer and can't wait! What color did you use on your cabinets? I'm not sure what color white to use and I think your cabinets look awesome.
Steph,
Honestly I can't tell you. Technically we had them mix a color to match from another store, but the guys that mixed it said there was so little color that it didn't really make a difference from the sample card, and they were right. So technically we did your basic brilliant white. We were going for a slightly softened white, I would just go find a bunch of white samples and see how they look in your space and with your light- pictures can be deceiving.
Good luck! OH and when I do this again, I am definitely going to go over the white twice with a satin waterbased poly to that it holds up to all the oils in your hands (especially when handling food!)
Cassity
I love your frugality. This was an awesome project. Simply adore how the kitchen turned out.......
Teri
Post a Comment