


Desk and Chair Facelift!
02 June 2011
Desk and Chair Facelift by Jen
Hi, I'm Jen! I'm a mom, a wife, a housekeeper, a cook, a decorator, a crafter and a blogger. My blog is a collection of everything that I enjoy from DIY projects, home decor, crafts and recipes to fun activities for the kids and our own family experiences. Hence my blog name: Scissors & Spatulas: And Everything in Between! You never know what you're gonna get!
I'm so excited to be here at Remodelaholic! Let me show you a peak at what I have in store for you today...

Would you believe me if I told you this desk and chair cost less than $20? Well, it's the truth!
One of my favorite projects is turning someone else's trash into my own new treasure. Particularly furniture. It's garage sale season and I am up and out early on Saturday mornings in hunt of some great bargains! I found this chair for just $5!

I gave it a good cleaning with the hose and let it dry out in the sun before taking my mouse sander to it. I roughed it up pretty well to make sure the varnish was taken off.

I used one coat of Kilz {water-based} primer and then three coats of Olympic Irish Cream
  {just slightly off white} in a satin finish.
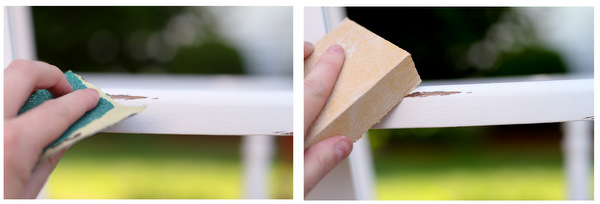
Then, after all that hard work, I took my sandpaper and started distressing it! I use a very low grit to remove the paint but then use a very fine sand block to smooth it out.

Here is a preview of what it looked like after distressing. You'll see the finished product in just sec. First let me show you the second part to this project.
My mother-in-law gave me an old sewing table a while back. Now I know I'm going to get some grief for saying this, but I removed the table top and sewing machine and replaced it with a large piece wood because I love the look of the legs, but the table top was not functional. It wasn't one of the nice ones with the drawers, just a flat table that unfolded. I wanted to use it for a writing desk and once the sewing machine was removed the original table top had a big hole in it. So i decided to make a new top all together.

Here is the stained piece of wood after I took my mouse sander to it. It had a thick coat of varnish on it, so it took some elbow grease to rough this baby up.

Then I took a hammer to it and it was actually quite fun! I softened up the sharp edges a bit and put some dings and dents all over the edges, sides and top.

One coat of primer and three coats of the same paint used on the chair .

Then again, I took my low-grit {rough} sand paper and started scraping away at the paint. This knot above is a result of the hammer. Love it! I wasn't quite getting the result that I wanted with the sandpaper, it was still too clean and white.

So out came my handy dandy mouse sander again and it worked like a charm. Sneak peak. . .

Okay, are you ready to see my new writing desk?


A huge thanks to Remodelaholic for having me today! I hope you all have enjoyed my trash to treasure transformation and I hope you'll come by and visit me at Scissors and Spatulas.

Social Retargeting by Chango
 Labels:
Before and After,
Chairs,
Furniture,
Painting
Labels:
Before and After,
Chairs,
Furniture,
Painting


4 comments:
Great set! I can't believe you found that chair for $5.. so jealous!
Thanks for sharing... now I am off to paint. :)
Beautiful! The sewing table is so interesting.
LOVE the sewing table desk!!!
-Ashley
www.DesignBuildLove.co
That's incredible just like everything she does! What a cute set.
Post a Comment