


Stenciled Drapery Tutorial
26 May 2011
Stenciled Drapery Tutorial by Heather
Hi Remodelaholic readers!!! I am so glad to be guest posting today, from one remodelaholic to another!!! I blog over at {twenty}something where I write about turning a builder beige turn-key into a home through lots of DIY projects and lots of great Pottery Barn and West Elm knock-off tutorials...all done on a teacher's budget!

My husband Rusty and I are both teachers at the same school, so we budget out our weekends and summers to cram in as much home remodeling as possible. Here are some of my favorite projects:

My White Mantelscape with shutters and a coffee filter wreath.

Pottery Barn Jewelry Holder Knock Off made form a thrift store frame and some jewelery wire. Cost totaled under $3.00 for me!

Pottery Barn Hundi Lantern Knock Off made from a thrift store light fixture and a glass hurricane from Michael's. Cost totaled under $30.00!

Oversized Pottery Barn Clock made from plywood and a homemade stencil. Project cost under $10.00!
Here is the project I am sharing today. I took my breakfast nook from this:


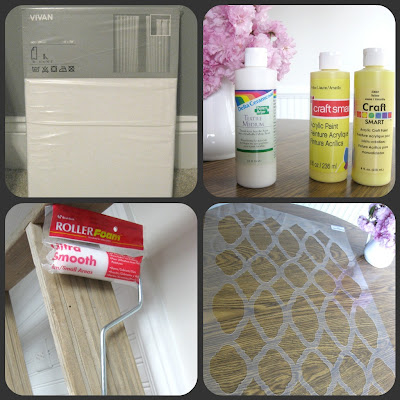
- Curtain panels (Ikea Vivan in white)
- Acrylic Paint (Craft Smart, Yellow)
- Fabric Medium (Delta Ceramcoat)
- Stencil (Zagora Allover Stencil from Cutting Edge Stencils)
- Foam Roller
- Brown Craft/Painter's Paper
1. Cover a large, flat working area with heavy paper to catch all paint that might bleed through. I used my breakfast nook floor.

3. The directions say to iron the curtains. Mine were not wrinkled when they came out, so I just skipped this step and smoothed and tugged out the wrinkles.
4. Mix your paint. You can use fabric paint, but I found that it was too expensive. I just bought acrylic paints and a product called Fabric Medium. You just mix 2 parts paint to 1 part fabric medium, and you will have tons of fabric paint for next to nothing! Play around with your shades by adding colors together until you get the color your want. I took my yellow to a more muted yellow by adding some leftover wall paint from when I painted my kitchen.


Now, here are all of the little helpful tips I learned along the way that I hope can help you out:
It is very possible for the fabric to misbehave and ripple under the stencil or behave perfectly. Both are fine because you can't tell when you are done!


When stenciling fabric (especially curtains), you will NOT get the stencil to line up perfectly because the fabric will pull all different ways and stretch. Stop stressing about this since they will hang and flow anyway! It's just like not shaving your legs in the winter...no one has to know!


In tight corners or edges, you can turn your foam roller sideways and use a tapping motion. This works well in the parts of the stencil beside where you have lined up with the last area you stenciled and you don't want to roll over any parts that are not matched up.

And here they are in all of their glory!!


Social Retargeting by Chango
 Labels:
Fabric,
Painting,
Sewing Projects,
Window coverings,
Windows
Labels:
Fabric,
Painting,
Sewing Projects,
Window coverings,
Windows


11 comments:
Hi,
Im a new blogger. Im ur follower! I really liked ur site!
Could u visit mine too at http://aliascreativelife.blogspot.com/
Great idea and great tutorial! Your breakfast nook looks cheerful and inviting.
What a fun and great project! They really turned out cute!
That yellow would wake you up, way before your coffee does!! Very energizing!!
Great job! :)
Love them!
I recently just did my own painted curtains too!
http://pbjstories.blogspot.com/2011/05/diy-painted-curtains-tutorial.html
I love the yellow though! {My newest obsession color scheme: grey, yellow and aqua... AMAZING}
Pamela @ pbjstories.blogspot.com
that is beautiful!
You. painted. those. curtains!!
Out of this world... AWESOME!!
I would never in a million years, thought of painting curtains! Inspired.
Love it. Love them. Love the yellow. I want to eat breakfast in your breakfast nook and feel the happiness of those curtains!
I absolutely love these curtains! You make this project look so easy to do that I'm already thinking what room I can try this on. I'm a new follower and I really like your blog. :)
Lisa
thebrittainhouse.blogspot.com
Great job! Thanks for sharing. Where did you get your stencil? kristy from www.apronsandapples.blogspot.com
Post a Comment