


Bathroom Remodel Reveal & Shower Certain How To
06 December 2010
Bathroom Remodel Reveal &
Shower Certain How To
Shower Certain How To
contributed by Sohl Design

Welcome to our new bathroom!
We couldn't be happier to reveal our extreme bathroom makeover. DIY Ohl style. I'll be the first to admit, it was a lot more work than I expected. But now that we are on the other side of it, I'm glad we went for it. We learned skills that we did not have before we started, and it challenged us to work as a team on a huge project. A true test of marriage! We're very happy with how it turned out. After months of planning, serious demolition, weekly (sometimes daily) trips to Home Depot and Lowes, rebuilding, installing drywall, painting, tiling, running electrical, plumbing, and everything in between, here's a look at our new bathroom.

The wall color is "Cosmic Rays" by Olympic paint, a dusty light blue. I really wanted a relaxing spa-like feel. Since the room is so small, my goal was to keep it light and airy. All the fixtures are brushed nickel.

This sink/vanity from Lowes was the piece that started it all. I saw it one day while shopping and I liked the dark brown wood with black granite top and deep white sink. It was a good price and perfect size for the room. It is slightly smaller in width than the old vanity, which provides a little extra space left and right. The black framed mirror was a great find at Kirkland's. I got it for $16 because it was the last one and had a tiny nick in it.

This tall narrow white shelving unit is the one piece we kept from the old bathroom. I purchased it at Christmas Tree Shops three years ago, when we first moved in. I love that it fits perfectly behind the bathroom door. As you can see, we store toiletries and extra supplies in the frosted cupboard.

This is my favorite new piece, that I couldn't wait to put in. When we removed the old closet door and shelves, I wanted to keep it open but still have something to store towels and bathroom items. Because the space was so tall and narrow (24.5 inches wide by 90 inches high) I had to do an extensive search for something that would fit. This wine rack, measuring 20 inches by 72 inches, was just what I was looking for!

I ordered it from BedBathandBeyond.com around Christmas time. It was on clearance and almost sold out! I had to act fast. Here is a look at it's intended design. I just didn't install the wine glass holders.

Baskets on top for storing extra TP and other supplies. New lighting, keeping in the brushed nickel and frosted glass style.
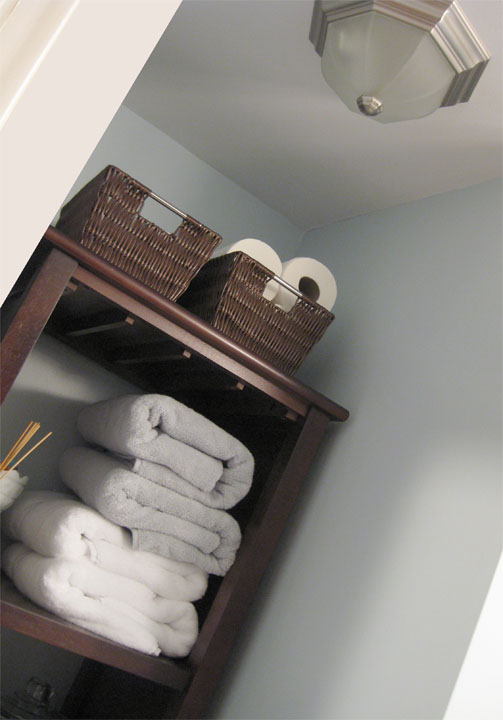
Here's a closer look at my decorative bath supplies. Washcloths tucked neatly into a basket. Bath bubbles. A large glass jar with extra puffs (poofs?) for guests. And my special hands soap dish(sans soap).

We installed a combination exhaust fan light. Much more attractive than just a square fan. We previously did not have a fan, so this required running a vent outside through the ceiling.
I was looking for a brown bamboo type of shade for our very long window. I found this one at Christmas Tree Shops for $15.99. It was affordable and easy to install.

This is my tablecloth-turned-shower-curtain project, that turned out even better than I thought it would. I found a tablecloth atMarshall's for $19.99, in the colors and a pattern I loved. It was just too wide. So I did some measuring, sewing, added grommets and voila! I think there will be an upcoming post on how to make your own shower curtain...

Here's a look at the shower curtain border detail, baseboard trim and fluffy white rug. I also got the rug at Marshall's, years ago and had not been using it. I like being able to utilize things I already have.

Did I mention that the tile floor is heated? Talk about luxurious. This awesome feature was all my husband's idea. He made it happen by wiring floor coils, pouring cement and installing a thermostat, complete with timer. The only reason I'm looking forward to winter this year, is to test it out on a snowy day. How great will it be to step onto a nice toasty floor?

And now, the heart and soul of the bathroom: the tub. This is what I was looking most forward to. The old bathtub was pretty old and gross. I could not wait to enjoy this 19 inch high deep soak Kohler tub. Kohler even has "Ohl" in the name! It is every bit as relaxing and wonderful as I had imagined.

And the shower is just as great. Here is a look at the fruit of our labor, installing approximately 460, 3 inch by 6 inch white ceramic tiles. And one corner shelf. This was definitely the most challenging portion of the entire project, in my opinion. We had never tiled anything before. It was so time intensive, messy, and precise, with all of the cutting and measuring involved. I think it took a total of 5 nights after work, just to stick all of the tiles on. Then came the grouting and the sealing on the weekend. In the end, it was worth it, because it came out beautifully and looks really nice.

The brick pattern white tile inspiration came from Pottery Barn(see below) and the incredible bathroom makeover done by John and Sherry at Young House Love. I really like how clean and fresh it looks.

Here is the upper portion of the shower. We tiled all the way to the ceiling to elongate the area and reduce moisture. Jesse, our expert, suggested adding a shower light, and we're really glad we did.

The light switch for the light is conveniently located next to the shower, near the window. We had the toilet paper fixture and towel ring, so they went back into the room.

And last, but certainly not least, the new toilet. We selected theAmerican Standard Mainstream FloWise WaterSense high-performance round complete toilet from Lowes. We liked that it came with everything needed for installation and is high-efficient and ultra-low on water consumption. It looks nice too.

One final detail... I have been waiting to use this decorative glass shelf for 5 years. Seriously. I got this pretty shelf 5 years ago when I worked for Chase-Pitkin, a local home and garden chain. But I never had any where to put it. It finally has a home. I love how it adds to the "spa" feel and is both functional and decorative. Right beneath two little art paintings I had, originally purchased at Marshall's for $5 each.

There it is, the finished product

Shall we take a look back at the before?

This is how the bathroom looked when we walked through, before buying the house. It probably looks better than it did up close.

You can see the old white closet door, which collided with the room door when both were opened. Also, a look at the old tan colored plastic shower walls/shelves.

Here it is stripped down in all of it's plastic white-ness. White peel-n-stick floor tiles, white plastic wall-to-wall tile board, white tub, white closet, white sink and light wood vanity. Not my style.

This is how I tried to dress it up and live with it for 2 1/2 years. I couldn't even paint the walls though, because they were plastic tiles. The floor and the cracks drove me nuts because it just never looked clean, despite my rigorous cleaning efforts.

The vanity mirror and lights were something right out of Hollywood. You needed your sunglasses to get ready!

The sink seemed like it was below normal height and I could never get the drain completely clean either. I didn't care for the light wood either.

Besides being door-to-door, the closet was a mess.

When you opened it, this is what you saw. Hand-made-white-contact-paper-covered-uneven shelves.

And a hole in the ceiling.

And exposed pipes and deteriorating wood below. Lovely.

Here is what it looked like when we started taking up the floor, and realized we would need to replace the entire wood floor base. What did we get ourselves into?

It was quite a job, to say the least. We couldn't have done it without the help of our remodeling expert, Jesse, who guided us every step of the way. And our friend Aaron, who helped us with the floor.
Most of all, I want to thank my husband, my hero, for making this bathroom remodel possible and for putting up with me! I'll share a bit more of the process in another post, and show some pictures of our journey from before to after. Click here to read how the project began, check out my bathroom mood board, and anupdate along the way.

What do you think of the transformation? I simply love it.
Shower Certain How To

Some of you wonderful readers have been asking how to make a shower curtain. I'm delighted to share my do-it-yourself guide, because I love you guys. I really do. Get your supply lists and creative juices ready.
After shopping around for a shower curtain, I came to the conclusion that I didn't like any of them enough. Especially since it would be a focal point in my new bathroom. I was thinking about making one.

One day, while perusing the aisles of Marshalls (oh, how I love thee), I stopped in my tracks when I saw this tablecloth. It was exactly what I was looking for! Unique pattern and the right colors. For $20, I knew I could make it work.
You will need some grommets, also known as eyelets. Joann Fabrics sells these little kits that come with little tools that you will need. I used extra-large rings. Just make sure they will fit over your shower curtain rings/hooks. Available in brass or silver, the kit comes with 10 grommets, but of course you need 12, so you will need to buy an extra pack of just grommets.


You will also need a hammer and a cement surface. No joke. I had to pound them together on my basement floor.

Some type of medium weight interfacing and an iron.

I used these great dual shower curtain hooks that my Mom gave me from JCPenny. They are also available at Bed Bath and Beyond.


Start by selecting a piece of fabric that will be large enough to make a shower curtain. Standard size is 70 inches wide by 72 inches high. It can be a tablecloth, duvet cover, sheet, window curtain, whatever your little heart desires or finds in the clearance aisle.
Using the shower curtain liner as a guide, make sure it is the same length and height of your fabric. Hem the edges and adjust the size if needed. My tablecloth was too wide, so I had to shorten it and create a seam. Luckily, the border pattern made it appear seamless.
Cut a strip of interfacing, about two inches wide and as long as your curtain. Iron the interfacing strip to the BACK side of your soon-to-be-curtain at the very TOP. This will provide reinforcement for your grommets. (Don't you love my palm tree ironing board cover?)

I apologize, I didn't photograph this step. Clip your liner and fabric together temporarily with clothespins (or other clips), with the liner on top. Using a pencil, trace each hole onto the interfacing of your curtain fabric. Make sure top and sides are lined up. Mark all 12 holes.
Using an x-acto knife or sharp pair of scissors, cut out a small hole where you made each mark on your fabric. Don't cut it too big. Use the tube part of the grommet as a sizing guide. You want the grommet to fit SNUG. Even if you have to wedge the grommet into the fabric a little bit, it should be fine. If the hole you cut is bigger than the grommet, it won't work.

Follow the directions on the back of the grommet kit for assembling the grommets. It takes some layering coordination. First, put the round little pedestal down on the cement floor. Then stack on top of it the grommet that has the tube. Then slip your fabric with pre-cut hole onto the grommet tube. Then put the flat grommet ring on top (make sure it is good side up). Then insert the long tool that came with the kit (short end in). Keeping everything centered and level, hold the tool in place and pound away with your hammer. This is where some elbow grease comes in. I would say try 15 to 20 drives with the hammer, then check to see if the ring has enclosed together. If not, hammer a couple more times. The tool may get stuck, but it can be wiggled out. If my directions sound confusing, the back of the box should help.
Repeat for all 12 rings.
When you're done, it should look something like this.

You're ready to hang up your new shower curtain!
I am so happy with how this project turned out. It's not too difficult, right? If you decide to make one, I would love to see the results. Let me know if there's any part of the process that you have questions about.
Happy shower curtain making!
 Labels:
Bathrooms,
Color,
Decorating,
Guest Projects,
How To,
Remodeling
Labels:
Bathrooms,
Color,
Decorating,
Guest Projects,
How To,
Remodeling


2 comments:
Wow... you did a FANTASTIC job on this remodel. Way to go!
Thank you so much! It was a tremendous amount of work and we luckily had help from a friend, but it was well worth the end result. If we could do it, anyone can!
Post a Comment