Build A Magnetic Board; Step by Step Instructions
From time to time my dear wife drops not so subtle hints about some project she would like me to undertake. After listening (or not listening) for months about how she could use a place to hang a calendar, family job list for the children, and other odds and ends, I finally suggested a magnet board. Unfortunately, after looking at the available options, there was nothing that didn’t exude “corporate office.” So I decided to design and build one myself, which in the end was much more satisfying and cheaper.
I decided to build this as a permanent fixture on our mudroom wall. The design could also be modified so that the magnet board could be hung, but we needed something that could withstand seven kids.
You will need the following from your local hardware store:
- Magnet board = 24″ x 36″ sheet of steel or tin (usually about 1/16″ thick)
- Header board = 1 x 6 (3/4″ x 5 1/2″) board cut to 41 1/2″ long
- Bottom board = 1 x 4 (3/4″ x 3 1/2″) board cut to 41 1/2″ long
- Top & bottom ledges = Two, 1 x 3 (3/4″ x 2 1/2″) board cut to 45 1/2″ long
- Side boards = Two pieces of 3 1/2″ window/door casing cut to 23″ long
- Crown molding = Small crown molding, 8′ length (may need more for mistakes)
- Bead molding = 1/2″ bead molding, 8′ length
- Construction adhesive
- finish nails (a pneumatic nail gun is recommended, but not essential)
- Sandpaper
- Painter’s tape (the blue or green stuff)
- Caulk
- Primer
- Paint
All told, you will probably spend around $50 if you have to buy everything on the list. Fortunately I had most of the supplies already from other projects and only had to spend around $20 to get the rest.
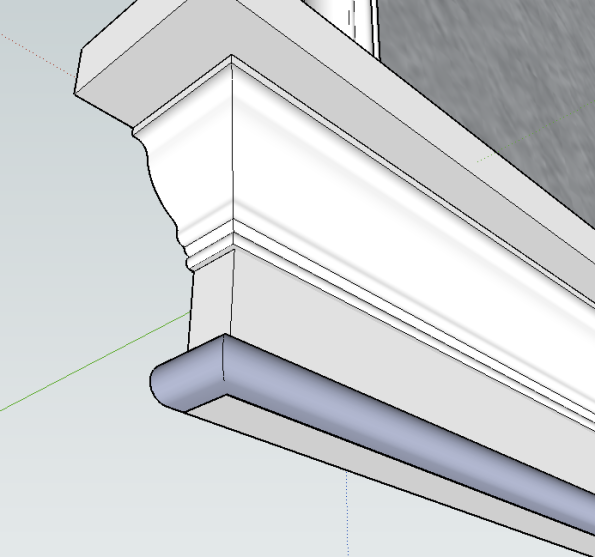
Unfortunately I did not take photos during construction, but I did recreate the project in Google SketchUp, which I hope you will find helpful. Step by step instructions:
1. Mark where you want your board to be on the wall. Hold up the metal sheet, making sure it is level, and trace around the sheet outline. Don’t worry about the lines- the molding will cover them up.
2. Apply construction adhesive to the area outlined on the wall as well as to the back of the metal sheet. Stick the sheet to the wall, being careful to smooth out any lumps from the adhesive. Temporarily secure the metal sheet to the wall with painter’s tape. Allow adhesive to cure before proceeding. *Note: your wall, like mine, is likely not completely straight. What this means is that there may be some waviness to your magnetic board. You can check for any wall imperfections by taking a board and lying it flat against the wall. If there is less than a 1/4″ gap, then you should be ok. If there is more than that, then you will either need to sand the wall so that it is level, or you may need to build the board so that it can be hung.
3. Attach the side pieces (casing) to the wall with nails and adhesive, overlapping the metal sheet by 1/2″. Note that the side pieces are only 23″ long, which means that the metal sheet will stick out 1/2″ above and below the casing. Make sure these are perfectly plumb (vertically straight).

4. Attach the header board to the wall with nails and adhesive. This should line up with your side pieces.
5. Nail the top ledge into the header board. Nail the bottom ledge into the bottom of the casing and wall. Note that the ledges are longer than the header and bottom boards to account for the crown molding which will be added later. The ledges overhang the header and bottom boards by 2″ on each side.
6. Attach the bottom board to the wall. The bottom ledge can now be nailed into the bottom board to more firmly secure these pieces together, just as the top ledge was fixed to the header board.
7. Cut, fit, and nail crown molding to both the header and bottom boards. If you have never cut crown molding before, you will want to practice as it can be frustrating at first.
8. Cut, fit, and nail bead molding to the bottom edge of the header and bottom boards.
9. Fill nail holes and caulk any unsightly gaps between the wall and the boards. If there are any gaps between the sheet metal and the bottom ledge, these can also be caulked.
10. Sand, prime, and paint!
Our magnet board was built in two days- one day for the actual construction and filling nail holes, and one day for sanding, priming, and painting.
Now I can take a break… until the next project.


2 comments:
I'm happy to have clicked my way to your blog! Lots of great ideas here!
That is great! What a good idea might have to hound hubby to make one for me. Traci
Post a Comment