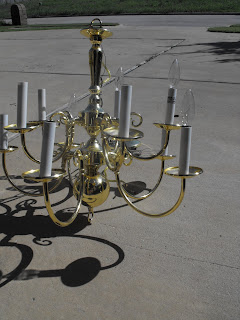
DIY Brass Chandelier Makeover
17 September 2010
Sarah at A Little Of This, A Little of That contacted me and wanted to show off how she made an old brass chandelier look stunning with a little paint and TLC. I think that what she did is great, and I love that she reused an old light that might have been discarded otherwise!
- Do a "Pre Install" to make sure the fixture works! You don't want to spend time fixing it up if it doesn't work! Light fixtures bought at a thrift store are always a gamble!
- After you make sure it will work......Remove the white covers
- Tape over where the electrical stuff is:
- Prime your chandelier (I chose Krylon primer. Any primer will do)
- Spray paint it. I went with Krylon's Ivory
- I then painted the white light covers (Krylon Ballet Slipper)
- Make a cord cover to hide the top of the cord
- Reassemble the chandelier with the white covers, and cloth cord cover
- I'm LOVING the contrast between the ivory chandelier, and the girlie pink light covers!
- I also loooove the feminine details of this chandelier....so many swirlies
- Here it is, hanging up in Miss J's room
- I liked it, but thought it was still missing something.....Crystals! This thing needed some bling :)
- Miss J really likes her "fancy lights" as she calls them.


14 comments:
Love it! SO girly and adorable!
I actually have a chandelier like this that I took down and I couldn't bring myself to get rid of it. (It currently resides in my shed.) Now I know what I'm gonna do. Thanks for the inspiration!
So elegant! I just love it (:
That turned out so pretty. A dream light for a little girl's room.
Beautiful!
WOW! Talk about a before and after... I couldn't see a beautiful end product from that before shot, but I'm so glad you could!
Adorable! I will be on the look out for a chandelier now! Thanks!
Fabulous !! I too transformed a brassy chandy last week!
http://www.centsationalgirl.com/2010/09/brassy-to-classy-my-free-chandelier/
One tip: no need to physically install to test. Simply splice the end of a cheapo extension cord, twist the wires together, cover with electrical tape, then plug in. If the lights go on, you're good to go!!
Kate
Oh so sweet! Love it! Great job!
These always intrigue me. I am going to make one one of these days. Yours is just too cute.
adorable! we did one it turquoise for the dining room and i playing around with idea of doing one in apple green for my daughters room....maybe! Yours is so very sweet
I love the pink on the candle part...How sweet! LEzlee
That is adorable! My daughter's been begging for a chandelier and I keep seeing those at the Habitat for Humanity store wondering how I could revamp them. Awesome!
We just found a faux brass chandelier at our local thrift store.....we painted it Ballet Pink and the "candle's" (light covers)white! I love the transformation!! My ten year old daughter and I added crystal beads hanging in long strands.
Thanks so much for the inspiration!
Post a Comment