


Coffee Table Made Into A Bench Tutorial
16 September 2010
Allison @ A Glimse Inside has done a fantastic job with her coffee table made into a bench project. She explains it all below, check it out.
What do you do when you want a bench but don't want to spend the money on a new one OR your hubby isn't in town long enough to build you one?
You buy a coffee table and turn it into a bench, of course!(I just want to warn you. This is a LONG, picture HEAVY post! So bear with me!)
We were out and about one day and made a stop at the Habitat for Humanity Restore and I came across this coffee table. I immediately pulled out my tape measure (have to carry a tape measure around) and measured it out. I examined it and even sat on it. :) So I called Travis over to ask what he thought. He agreed that it would work and that he could do what I wanted him to do to it. So... it came home with us for only a couple bucks.

It fit perfectly but... I wanted it a little shorter in length.
Call the hubby in for a consult... if you notice there is a drawer so can he make it shorter like I want? He said yes. Great!
The table was just shy of 40 inches and I wanted it to be 30 inches.
I told Travis I don't care if there is still a drawer (what would we use if for anyways?) but he wanted to challenge himself and said that we are keeping it. Alright, that's settled.
He was pretty excited about this project and got to work right away.

First up- cutting the table in half. He cut about 9 1/2 inches out of the center of the table to make it 30 inches.

Remember that drawer... yeah he had to cut that in half too. Here is the drawer cut in half and glued back together.
Time to make the table one piece again!

Here are the supplies that Travis used:
-wood filler
-small wooden dowels
-metal brackets
-wood glue

He measured out the center of the edges and marked every few inches. (He did this on both pieces.)

Then he found a drill bit that was the same size as the dowels, and drilled holes where he had previously marked. Pushed in the dowels with a little wood glue on the end.

Now, just push the dowels into the holes on the other side. Make sure to put wood glue between the pieces as well for extra hold.
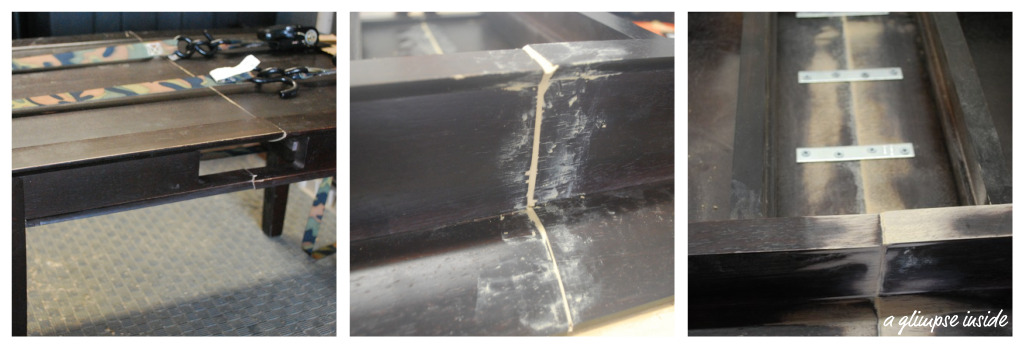
Once the table was glued, he used straps to hold it together tight until the glue completely dried.
Then fill the gaps with wood filler.
He then used the metal brackets to attach on the bottom to ensure that the table will not break on us when we sat on it.

Time to sand it all down! Halfway done.

This picture is to show how much Travis cut out of the center of the table.
Travis did his part super fast and well... I wasn't ready for it! So it sat, and sat, and sat in our garage for about a month.
My plan was to paint it and put a cushion on top but I had to find fabric first that I like and then buy the paint. I just couldn't find anything that I liked. Travis really wanted me to finish it so we drove up to Louisville Labor Day weekend to some fabric stores so I can find something to use. Which I did and he was thrilled about.
So time to finish!

I primed the table first and then bought cream spray paint. I also did a clear matte coat over the top for added protection.
On to the cushion:

Supplies:
-Piece of plywood (found at the H4H Restore for $1- the exact size we needed)
-fabric
-staple gun
-scissors
-Spray adhesive
-batting
-foam (For a cheaper route, I bought a cheap twin sized egg crate mattress and cut it up to fit instead of buying the large foam pieces.

To begin:
1.) Spread out the foam mattress and lay plywood on top.
2.) Pull the foam to stretch it out a little and make sure the whole board would be covered.
(The foam was folded so tight in the bag it came in, this was a must to make it all even.)
3.) Take a sharpie marker and outline the board.
4.) Cut on the lines.
5.) Repeat process until you cannot make a full piece.
(I got 3 full size pieces, and then used scraps to piece together a forth layer.)

Making cushion:
1. & 2.) Spray the adhesive onto the plywood.
3.) Place first layer on wood, bubble side up. Press firmly all over.
4.) Spray more adhesive on top of foam.
5.) Place next layer, bubble side down. Press firmly.
Repeat with as many layers as you have, alternating as you go.
6.) Trim off excess foam.

To give the cushion a smoother look, I wrapped the whole board in batting before my fabric.
1.) Place board in center of batting.
2.) Place one staple in center on long sides. Be sure to pull batting tight.
3.) Place one staple on center of short sides. Pull tight again.
4.) Staple all the way around pulling batting tight as you go.

For the corners:
1. & 2.) Cut off extra batting.
3.) Tuck in batting from the short end under the long side.
4.) Fold long side on top and staple down.
5.) Cut off extra batting.
6.) Complete.

Time for fabric:
This is pretty much the same steps as the batting.
1.) Cut fabric the proper size. Center cushion on fabric.
2. & 3.) Place one staple in center on all sides. Pulling fabric tightly.
4.) Staple all the way around, stopping before the corners.

1.) Gather fabric at the corner. Cut off extra- just not too much!
2.) Try to smooth out the fabric as best you can. The fabric will be folded in toward the center of the cushion unlike how we attached the batting. You can leave pleats/creases if you like or smooth it out .
3.) I choose to smooth the edges. I folded the fabric in, and then just tucked and pulled it until I got the look I wanted.
4.) Then staple down. Put one in the center near the edge. Then a few more about it to secure.

Complete cushion.
Time to attach it!

The top of the table was lower in the center so I bought a thin 1/8 piece of plywood from Michael's to help fill the gap for the screws.
Travis then took 8 screws and screwed up through the bottom into the plywood on the cushion.
And it's complete! :)

We have a very small but functionally drawer. I doubt anything will ever go in it but it looks good.

But I am so happy that I stumbled upon this table. It is a great bench to sit down at and take off those dirty shoes.
This just proves that just because something was given one purpose that you can think outside the box and give it a whole new purpose! :)
This is a great project? I love the end result of the bench and after cutting it in half to the desired demensions, very talented!
 Labels:
Before and After,
Furniture,
Guest Projects,
Party Highlight
Labels:
Before and After,
Furniture,
Guest Projects,
Party Highlight


3 comments:
I love this. I've been perusing craigslist for a bench to recover, but I've had no luck. I might give this a try!
Thanks for featuring my bench! Much appreciated!
I LOVE the new bench! You guys did a WoNdErFuL job! I think it's funny that your husband is in his uniform working on your project. That's the first thing my husband takes off when he comes home. ;)
Post a Comment