


How To Update A Hutch; Part 2
28 July 2011

Okay for the instructions, I say show not tell mostly because I don't have a ton of time to type out instructions, so this post is really not a tutorial. But I think that sometimes when we see how someone did a project it helps give us the courage to try new things we might not have thought of before. And since you may not have this exact hutch... it is likely you will have to adapt what we are doing if you try it. But the great part about this project is that we got to use what we had.
Okay, here is the way before:

We had the hutch sitting in our dining room untouched for at least 6 months, I tried adding some things inside to see what it would look like but like I said before we didn't' have any shelves, so I used random crappy wood scraps from the garage. In the end I just couldn't stand the huge brown monstrosity anymore so I thought we should give it a quick update for the mean time...(this is pretty much how all of our projects begin by the way!).
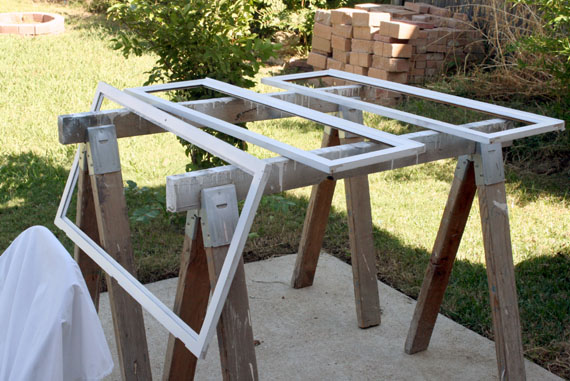
In the picture below we were starting to take it apart for the "quick update"

We took the doors off, and I was just going to brush it with paint. It is a laminate so I didnt' want it to chip and I bought an enamel of some sort... ( I will try to find the brand, I can't remember it off the top of my head) IT WAS AWFUL!

I started painting the base and a door, and the paint saw like painting with tile grout, thick, not smooth awful, I got only that far(below) before changing plans and the project got bigger... much bigger.

One of the original plans was to build a 3 drawer addition between the base and to hutch portion. The issue I had with the piece is that it was sorta squat-y and I am tall or sorta tall for a girl (5'10"). So I wanted to give the piece a little lift.. literally.
Justin built this little unit for the center:


Let the spray painting begin...


I didn't paint the bottom of the hutch because we replaced it with that little 3 drawer unit. And by the way, I had such bad luck with paint on this project, there was the original gloppy mess then when I switched to spray paint I think I went through about 10 cans literally just for the top, it just wouldn't cover. I don't know why we had such a hard time.


Okay now, this is an important little tip, if you have ugly painted junk on your windows it comes off... like buttah, with just a little razor blade, no chemicals required! See below:


For the back I decided to do a silver stencil over a the left over paint from our upstairs bathroom update. I got the stencil at Hobby Lobby. I didn't want there to be too much of a contrast between the colors so it is more of a surprise when you notice the stencil, which is hidden behind a lot of my dishes at the moment anyway!

Okay so hint #85, caulk. I know you have heard it before but caulk is a remodeler's BFF! See the image below, for proof, actually see our whole first house for proof, there wasn't a straight line in the whole 100 year old place, caulk was our only saving grace!
Before I painted, because of the dark color you didn't see cracks like this. But once it is painted they stick out like a sore thumb. Just a little bit of caulk done properly is the most important finishing touch you can add. I am always sad when I see a beautiful project with big gaping cracks that are obviously not supposed to be there, cuz they are so easy to fix! Say no to crack! 'nuff said.

See below for the difference when the caulk is added to that top crack.


This post is getting crazy long. So I am going to save the rest for later today. Come back at 5:00 ish for all the final instructions!
 Remodelaholic is written by Cassity and Justin. Cassity has a degree in interior design and Justin is a landscape architect, so we adore everything that makes up a HOME! We love to share home remodeling ideas and projects we’re working on. From huge kitchen renovation ideas to small bathroom remodels, there isn’t anything we won’t try to tackle (at least once!). We are in the midst of our third whole home renovation, (check out house 1 and house 2 as well, so there should be a lot more inspiration coming your way. We hope that you will stop by often for home design inspiration, tutorials, interior design tips, delicious recipes and what going on in our family life.


9 comments:
The whole cabinet is adorable but I especially love the hidden stencil work. Thanks for sharing!
I liked the brown one too, but white, like this, is beautiful. I like the interior the most. I would add a few golden elements on the outside too, but that's me... It looks great white only too big like
I've never used caulking. In your 5:00ish post can you give some tips? What kind to use? How to use it? Thanks
Wait, wait, I wanna read more - now. I don't want to wait to see how you redid the bottom doors and I love LOVE the drawers your husband added. (and I"m not a tall person) Who would have thought you could have transformed that ugly duckling into such a beautiful piece. Oh, and thanks for the tip about caulking the gaps.
Courtnee, I was actually thinking about writing a whole post on caulking! I will try to get to it soon!
That seriously is an amazing feat! I love the white and the extra storage you made. Great job!
The suspense! What are you doing to us? LOL
looks great. the stenciling is beautiful.
Gorgeous job! thanks for the reminder about caulk - I always forget to grab that :-)
Stephanie
http://junkernewbie.blogspot.com/
I absolutely love this!!! I have been looking for hutch and one day I hope to be grown-up enough to actually own one. Once I do...its' on!!!
Post a Comment