


Making The Master Bedroom Beautiful
19 May 2011

I'm a stay-at-home mom of 2-year-old triplets (yes, I said triplets!), living in the Pacific Northwest. When I'm not changing diapers and wrangling toddlers, I spend my time thriftily (is that a word!?) transforming our blah blah builder's grade house into a home with cottage charm with little nods to my love of the beach.
Originally I started our blog to document our progress as we worked to makeover our home, one room at a time. But seeing one room through to completion without getting side tracked in other rooms proved to be much harder than it sounds!
The first room we tackled was our master bedroom. It seems like the master bedroom is always the last room to get any decorating love, yet we spend so much time in there! So I thought I'd make it a priority and start my whole-house makeover there.
Transforming our room from this...
 to this...
 took us nearly a year to complete.
Why so long, you ask?
When you have a family of 5 living on one income, there's not much room left in the budget for decor...
so we scrimped and saved to buy some of the items,
we built some of the furniture ourselves,
and we gave new life to some old items too.
All of that takes a lot of time and effort to complete,
especially when you are juggling three babies!
We started by painting the room Benjamin Moore's Stratton Blue.

Read about the bed HERE and the nightstands HERE.


Up next was a new dresser to replace this old beat up hunk of junk...
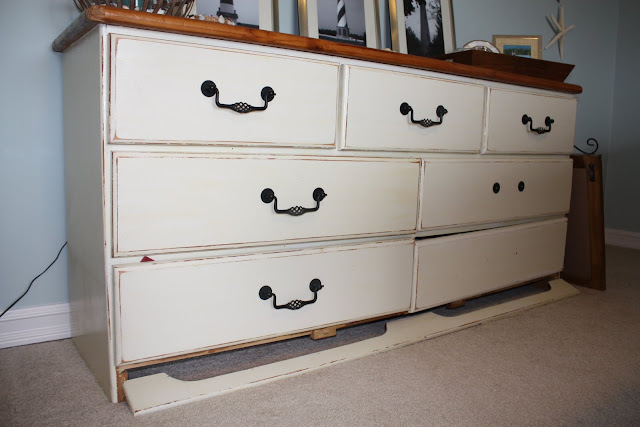
We couldn't afford to buy a new one, so I found a real beauty on Craigslist for $20.
 I worked for months stripping and sanding the horrendous paint out of every tiny little nook and cranny of that thing.
 Never again will I attempt to strip something so detailed!!!
But it ended up turning out really great :)You can read all about it HERE.


Once we had all of the main elements in the room, then we just had to fill in all of the holes.
Some things were made or repurposed,

 {You are my Sunshine art, painted frames paired with old art}

while other items had to be purchased over time.


 {drapes from Bed, Bath and Beyond, rod made out of long dowel, finials, and brackets from Lowe's - read about it HERE}
 {lamp shades from Ballard Designs, we already had the lamp bases, conch shell planter from Safeway}
And that, my friends, is why it took us a whole year to finish!
I was hoping to tackle a much smaller room next {like a bathroom},
but somehow got lured into the Family Room...
So be sure to check out 3 Meadow Lake Cottage to follow our progress!!!
Thanks for inviting me to guest post, Cassity!!

The first room we tackled was our master bedroom. It seems like the master bedroom is always the last room to get any decorating love, yet we spend so much time in there! So I thought I'd make it a priority and start my whole-house makeover there.
Transforming our room from this...


Why so long, you ask?
When you have a family of 5 living on one income, there's not much room left in the budget for decor...
so we scrimped and saved to buy some of the items,
we built some of the furniture ourselves,
and we gave new life to some old items too.
All of that takes a lot of time and effort to complete,
especially when you are juggling three babies!
We started by painting the room Benjamin Moore's Stratton Blue.

After saving up and buying all new bedding from Pottery Barn,
we built our own farmhouse bed and nightstands using plans from Ana White.Read about the bed HERE and the nightstands HERE.


Up next was a new dresser to replace this old beat up hunk of junk...

We couldn't afford to buy a new one, so I found a real beauty on Craigslist for $20.


But it ended up turning out really great :)


Some things were made or repurposed,


{At the Beach sign, click HERE to read the how-to}
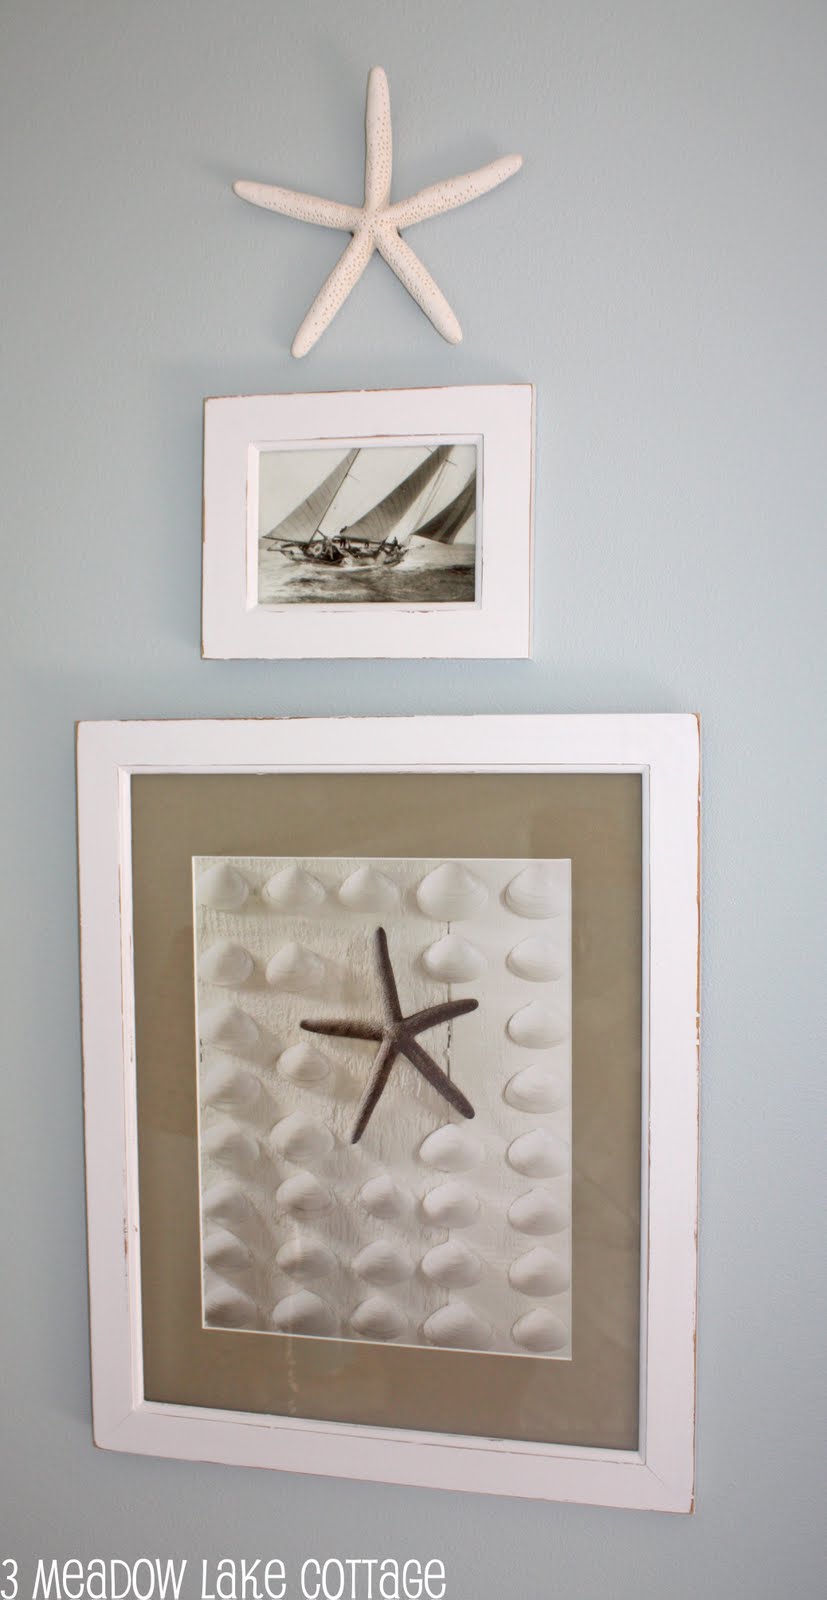
{Shells hung on the walls}


{aqua water jug from an antique store, frames from Aaron Brothers, shell art from art.com}
{baskets from Pier 1}

And that, my friends, is why it took us a whole year to finish!
I was hoping to tackle a much smaller room next {like a bathroom},
but somehow got lured into the Family Room...
Thanks for inviting me to guest post, Cassity!!
Social Retargeting by Chango
 Labels:
Master Bedrooms
Labels:
Master Bedrooms


23 comments:
How beautiful! It was worth every penny and second. It actually took my breath away when I scrolled down from the "before" to the "after". Absolutely wonderful room. I love, love, love the color of the walls!
Beautiful!
Susan
Wow, what a transformation! I love the new beachy feeling of this master bedroom. So cozy and comfy. I love the new dresser, took a lot of work, but I think it came out awesome! Well worth the whole year it took to create the room :)
Wonderful transformation!! You did an incredible job. Love the serene, relaxing and tranquil beach feeling.
Thanks for sharing,
Jeanette
That is a GORGEOUS room!!! You did an amazing job! I truly love decorating on a budget because you have to get a lot more creative to make it all work. You made it look so peaceful and I love that its comfy and beachy without an over the top theme! :)
Wow, straight out of a catalog! Breathtaking! You've got yourself a little retreat there!
this is beautiful! I love it! I am in serious need of doing a master bedroom makeover. You have inspired me, that it's okay to not have everything all at once. We are a family of 8, and don't have a ton of extra for decor. :)
Oh so beautiful! Your attention to detail is so inspiring. Our master is on the to do list; your before and afters give me a lot of excitement for when our redo can fit into the budget. Thank you KT.
Looks GORGEOUS! I especially love the refinished dresser. I completely understand the stripping/sanding fiasco and swearing NEVER AGAIN...I just finished stripping/sanding/restaining/adding hardware and crown molding to my kitchen! (Feel free to stop by my blog to take a look! diykindagirl.blogspot.com)
1 yr is not that long I'm still putting the finishing touches on my bedroom and don't feel its completely finished yet. You have done a fabulous job what a serene and peaceful room for rest (when the 3 bubs aren't crying for you!)
Absolutely lovely! Great job. And if it takes a little longer to complete, but you can say something about every aspect of the room it's definitely worth it. Looks fantastic.
We were looking at bedroom furniture today! I'm so glad I didn't buy some. Now that I've seen your room, I believe I've changed my mind! =0) Gorgeous.
absolutely beautiful!! if i can ask, where did you find the "you are my sunshine" print/embroidery? thanks!
Lovely and so inviting.....great job!
That. is. AWESOME!! I love the colors, love the decor! Love that you did it on a budget, too!!
Love the oars! What a sweet way to remember the date.
This is a lovely, lovely makeover! Beautiful room.
Great job! You inspire me - we're about to move into my first home with only one 2-year-old, but also on a single income, and it seems intimidating to think about creating a home out of it on little time and money.
Wow, just GORGEOUS and just my style too - I'm going to save this for inspiration for sure!!! You did a fantastic job, it's magazine worthy!!!
Beautiful! You did a great job!
Your room looks absolutely amazing. Not all rooms come together overnight, what's the fun in that! So much more satisfaction this way, you should be so proud!
Beautiful room!
Wholy Smokes Erin! That is so amazing! You should be super proud of yourselves. My husband and I tackle decor projects together too, it's a lot of fun working with the hubby on a project you can both enjoy. Any additional details on the curtains? I love them!
XO,
Candace
What an amazing transformation! I love what all you did. And, I love that you explained how long it took to redo the dresser. Some think it's an overnight job.
Post a Comment