


Dresser to Vanity How to; Guest Post
06 May 2010
I saw this on An Oregon Cottage and I had to ask Jami if I could show it off to you all, it is simply wonderful. And Jami explains how she did it, so that you can do it too! Enjoy!

I've always admired dressers converted into vanities. In our city bungalow there just wasn't enough room in either bathrooms for a dresser-vanity, so when it came time to remodel the bathrooms in our current house I was happy to see there would be enough room in the master bath, but just barely.
Although I do confess I did look longingly at some of the wonderful vanities that are available now. Especially the ones that look like...what do you know, dressers. Seems like others have admired the look, too.
Except that the price tags on these started around $300 and climbed up from there.
Back to the original idea.

Believe it or not, this was the "temporary" vanity we lived with for 1-1/2 years.
It started out simple enough- we were exhausted after spending all our free time in the summer working on both baths, I had to go back to teaching in September, and we were trying to get our new garage weather-proofed before the winter set in. We thought we'd get to it in the winter when we'd have a covered garage to work in.

With the rest of the bathroom completely finished, a curious thing that can happen to do-it-yourselfers at one time or another happened:
With the rest of the bathroom completely finished, a curious thing that can happen to do-it-yourselfers at one time or another happened:
We stopped seeing it. It just sorta became part of the room.
Hard to believe with that lovely pieced together top and golden sink.
I think, too, it was because we were going to have to make the vanity and we weren't sure how long it would take or how hard it would be.
When we finally got around to it a few months ago, we found it wasn't that hard at all and didn't take too much time.
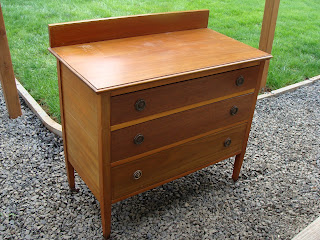
This is what we started with: a $79 dresser from the Salvation Army that I had originally bought to be my nightstand. I thought I needed the storage, but really didn't, so they sat empty. I sure hope you can score something cheaper, but I was looking for specific measurements, and you know how that goes. Plus, have I mentioned how expensive the thrift stores are here? OK, I'll be quiet about it...
This is what we started with: a $79 dresser from the Salvation Army that I had originally bought to be my nightstand. I thought I needed the storage, but really didn't, so they sat empty. I sure hope you can score something cheaper, but I was looking for specific measurements, and you know how that goes. Plus, have I mentioned how expensive the thrift stores are here? OK, I'll be quiet about it...
It wasn't a fine antique, though, and needed to be painted and the top refinished. The slats separating the drawers had been replaced with a lighter color wood and both of the side panels had big cracks in them that needed to be filled.

The top had a major scratch (top left in this picture) that went all the way to the wood.

We just got a basic 16-inch model sink for this dresser. All the others were too big. We seriously considered a vessel sink, but with the new faucet would've cost about $250 instead of $100 (we'd already been using a new faucet).
The top had a major scratch (top left in this picture) that went all the way to the wood.
So it was a perfect candidate, plus it was the exact size we had between the tub and wall.
Here are the steps we took to convert this dresser into a bathroom vanity:
1. Purchase the sink first to fit the top's measurements. Make sure to measure the true cabinet and not just the top- this dresser had an overhang of more than 1 inch, so I measured inside of this to get a small enough sink.
We just got a basic 16-inch model sink for this dresser. All the others were too big. We seriously considered a vessel sink, but with the new faucet would've cost about $250 instead of $100 (we'd already been using a new faucet).
2. Remove the top drawer, lay the template (comes with the sink) on the dresser top and trace around it with a Sharpie-like marker.
3. Take a deep breath and cut it out with a jigsaw. It's OK, you can do it...

4. Lay the sink in the opening and breath a sigh of relief when the sink fits in the hole.

No photos for these steps (poor planning...):
4. Lay the sink in the opening and breath a sigh of relief when the sink fits in the hole.
No photos for these steps (poor planning...):
5. Remove the sink and sand and refinish the top (if needed- alternately, the top can be painted). Paint dresser body and drawers, if needed too.
6. Using a water-based polyurethane (I like satin finish), apply 4 to 5 coats. Since this top had a short back piece, I made sure the joint between them was covered well so that no water from the sink would get between them.
7. When dry, run a bead of clear caulk (works much better with wood counters than white) around the rim of the opening and carefully place the sink right on top, pressing down lightly (you do not need to add caulk around the rim of the bowl after it's in place- that's a sure sign of a do-it-yourself job).
8. Attach the faucet and place the vanity, hooking up all the plumbing with no drawers in place.

Each drawer will be treated differently:
7. When dry, run a bead of clear caulk (works much better with wood counters than white) around the rim of the opening and carefully place the sink right on top, pressing down lightly (you do not need to add caulk around the rim of the bowl after it's in place- that's a sure sign of a do-it-yourself job).
8. Attach the faucet and place the vanity, hooking up all the plumbing with no drawers in place.
Each drawer will be treated differently:
9. You have a few options with the top drawer. It can be taken out entirely and made into a false drawer by cutting the front off and gluing it back in place. Or you can get one of those kits that turn sink drawers in kitchen cabinets into a flip-out with a narrow plastic holder attached.
I wanted more storage, so you can see from this picture that we cut out what was needed to fit the sink, and then built new sides to make small "drawers" on each side.
Of course, if you have enough room for a dresser with three drawers on top, you'd lose the center drawer and still have two functional drawers. That would certainly be the easiest.

10. The middle drawer took the most finagling, but basically we (of course you've probably guessed that this part doesn't really involve me...I'm using "we" merely to show my support) made a box to fit around the plumbing. This leaves plenty of space for toiletries.

11. The bottom drawer merely has a square cut out to skim around the drain pipe. This drawer lost no space at all.

And there you have a slightly stripped-down version of how to turn a dresser into a bathroom vanity.
10. The middle drawer took the most finagling, but basically we (of course you've probably guessed that this part doesn't really involve me...I'm using "we" merely to show my support) made a box to fit around the plumbing. This leaves plenty of space for toiletries.
11. The bottom drawer merely has a square cut out to skim around the drain pipe. This drawer lost no space at all.
And there you have a slightly stripped-down version of how to turn a dresser into a bathroom vanity.
What? You were expecting plumbing how-tos? Sorry, that's way beyond my skills. Brian does that with a little help from his friends (thanks, Dan!) and I stay far, far, away.
Especially because it was my idea.
Isn't that wonderful!
And is that a claw foot tub I See? Jealous!
I have loved this idea and always wanted to do it,
but never have the bath that is big enough! ...someday!
Thanks Jami!
and plans for an open table like vanity check them out!)


10 comments:
Oh how I love furniture as vanities. Very prettiful. :)
Man I wish I was this handy! Anyway I love this, and in response to your featuring my silhouette tutorial, I'd love it. Let me know if you need anything on my part. I sent you an email, it says basically the same thing, but now you have my email if you have any questions. Thanks! -Nancy
Oh I've always wanted to do this! Wonderful job!
hey thanks for the blog loving! feel free to feature any of my posts just link me up! :)
I'm glad you found this to post! That was a good tutorial. And it looks so good!
What a great project!! I just love how it turned out!! I am very impressed and adore the tutorial! Great inspiration!
xx-Gina
Wonderful, Wonderful Job!
Great vanity find!
Following from 'so very cheri'....
http://thewondersofdoing.blogspot.com/
Awesome! We just realized the vanity I have growing up will *almost* fit in the bathroom. We have to remove an inch off the top but it will be fantastic when we finally complete it.
Thanks for the wonderful tute!
GORGEOUS! That is such a good idea!
I've always wanted to do this, it's just lovely!!!
lifeofperks.blogspot.com
Post a Comment