It has been a few weeks but do you remember the first part of the stair remodel, check it out here
the whole process or
the before and after. Well, I am finally getting around to the second half.
Valentine's week has kept me totally busy! But back to the remodeling...
These pictures are a little out of order. It is the only way to make sense of the whole mess. Also, because the space was so small it was hard to photograph. I hope these images are clear enough to explain what we did. I thought to help you figure out the space, I would draw a very quick floor plan... not to scale, but you can see the actual space and the different thicknesses in walls etc.
Alrighty, now the before pictures. This really was the scariest place in the house, I was cringing while walking through it feeling very claustrophobic and that Freddy Kruger was going to jump out from around each little corner!
The walls were all over the place. Some were lathe and plaster some where a weird fiber board, and the seams were hidious and so obvious. All the walls had been wall papered and then painted over. The light was a pull chain. The light switch in the corner was a decoy... or maybe we just didn't find the secret room that it lit.
Also the ceiling was really strange, it was lower then popped up in the center to almost 10 feet tall and it made the space seem even smaller or at least completely out of proportion.
The whole space was small and "bendy" You couldn't walk in a straight line anywhere. We got to demolish A WHOLE LOT! (oh and there is a new hot hairstyle I am modeling for ya... I am not really loving it looking back, I guess mostly just the color, I still like the cut but i really loved it all at the time)
If you remember from
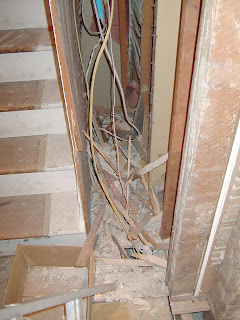
the master bedroom remodel we found that little closet hidden behind a book case. We chose to close it off, but we opened it back up into the hall. This space came in SO handy, as you can see for wiring, but it was absolutely heaven sent for adding new plumbing... (1/2 bath installation to come)!
Below you can see that we had a hole through the floor upstairs to the soon to be half bath.
The next demolition area was the wall between the hall and dining room, the plan for that wall was a total mess! If you look at the floor plan it jutted into the space and you always had to walk around it to get anywhere. A-nnoy-ing! It had to go! so I got out my hammer and beat the lathe out of it!
After the wall was removed, we framed a new one. It is important to note that this was not load bearing. We decided to cut out all the turns in this wall and just build a straight wall. This didn't take up any extra room in the dining room and it definitely opened up the hall. This is what the new floor plan now looked like:

I think if I were doing this house over, I might just frame the sides up and leave this space open. We decided not to, because all the heat went up the stairs, and it disappeared from there!.
Now the floor was a little strange. We ended up removing part of it because it was so creaky, this also helped us when we added the plumbing, but it was quite a surprise when we actually saw the joists.. at least the creaking floor now made sense.
Can you see the joists just kind of meet... scary. We had to add in some 2 x 4's on their side to bring up the height of two different floors. Also, you might notice the old door we found in the closet that the ladder is sitting on, we reused that later in the half bath.
Now on to the bathroom door, if you saw
that remodel, you will know that the room was teeny-tiny! Try 5' x 6' with a claw foot tub. You could soak your feet in the tub, while sitting on the potty, and washing your hands in the sink without moving your hiney - tiny!
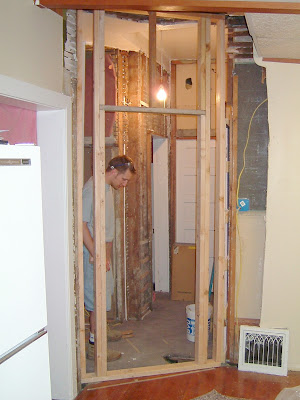
We have actually finished remodeling the bathroom at this point but we decided to put in a pocket door. That way more than one of us could brush our teeth at once. Since the interior walls done we used our trusty reciprocating saw to cut the drywall screws and nails off the studs, then pulled them out so we could install the pocket structure. This is one of our favorite tricks, we've actually done this three or four times.
When we uncovered that wall, it was pretty funny to see. The framing was a total JOKE! Check it out for yourself. They were 2 by 4's turned on their side and some just hanging in there connected to nothing! We had to fir out the walls to be able to use the pocket door, and feel good about the roof not falling in on our heads!
The great thing about pocket doors is the space you save and the fact that you can reuse the doors that you already have.
Next we decided to level out the ceiling and add some canned lights while we were at it, with guess what 2 switches... I know I feel like I have arrived... a 3 way switch, none of this pull chain junk!
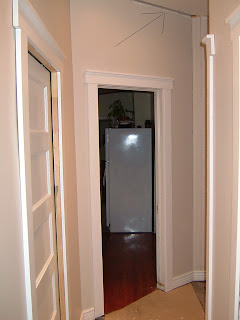
And installing the rest of the drywall, through out the hall. Here is one of the doors we salvaged from our friend's house. They had some great solid 5 panel doors. I think we did have to trim this down about an inch in width.
Once all the drywall was up we started installing moldings and the 10 bottles of caulk to hide cracks from uneven walls etc..
You can see in the picture below there is an arrow, I was pointing out our lazy way of finishing the walls on top, instead of having to drywall it all, we just put up crown molding, but I promise it always looked really good! I can't prove it though in this space cause I didn't get a picture!


Lastly, we had it all carpeted, it made it look like a brand new house. It was such a nice space.

Do you like it?
What is running through your head right now?
Are we crazy? wait, I am not sure I want to know...


6 comments:
I've said it before, You guys are simply amazing when it comes to remodeling projects. My mouth is open and all I can say is WOW! Absolutely stunning.
Niiiiiiiiiiiice! I love seeing these big posts about house projects. It's cool to see the whole job all at once - cause I know it didn't happen in one weekend did it:)
I would have sat down crying, bubububBWAHHHAAA! You did such a great job! It looks fabulous! Karyn
It would be so fun to walk through that house now since I had only seen it when you guys had just started. I too LOVE pocket doors and am trying to talk Randy into putting one in our master bath when/if we get to remodel it.
I love:
1) 5-paneled doors (so classic)
2) new carpet (and it looks multi-colored neutrals instead of a solid?)
3) bead board walls (and toile plates!)
4) less-awkward traffic pattern
5) linen closet...everyone loves storage
6) and the claw-footed tub, as a side note!
nicely done!!
erin
Absolutely beautiful. I don't know you two can do such a big renovation and still be together..haha. I think my husband and I would end up strangling each other before it was done.
Partly because I research everything and partly because he thinks he knows how to do everything already.
Great job!
Post a Comment