


Hall and Stairwell Remodel, Part 1; Retro Remodel
21 January 2010
This post will have to be a two part story, sorry about that, there is just too much information to get it all down at once. It will have to be the upstairs portion and then later the downstairs, which is actually how we did the work, so I guess that seems logical.
By far the biggest project in the house was the hall. I know a hall? Who cares about a hall? It is
By far the biggest project in the house was the hall. I know a hall? Who cares about a hall? It is
strange to put so much energy into it, but the space was at the very center of our home. It was the sole connection to all the bedrooms and the only bathroom.
It isn't a place that you linger in, rather you pass through on the way to your destination. And, putting so much energy seems wasteful. But is was very necessary, perhaps you will agree when you see what it looked like.
When looking at houses, it is important that there is a good flow. This house almost had that with a few problems. Let me list the pros and cons of the hall:
+ a wide stair way, with proper sized runners
+ no walking through one room to get to another, the additions made sense
-The space had a few funny little turns that were not necessary
-Several different finishes on the wall, in varying degrees of disrepair
-Pull chain lights, / not enough light.
-Low ceiling heights at top of stairs and very limited space
-Dirty beyond belief!
-no community storage, i.e. linen closet etc.
-the ceiling height was too low when walking up and down the stairs, I whacked my head hard a few times!
Okay, Be prepared for information OVERLOAD!
Before:


Let me explain:
This first picture is a view up the stairs. The portion of the wall that is the first story is lathe and plaster, but only on one side, the other is bead board.. All portions of wall above that is bead board that had been wallpapered and then painted. The big long string is "the light switch" It was a pull chain light, so they had a long sting that went to the top and bottom. You can also see the bookcase and short railing at the top
Secondly, sorry about the bad pic, this was before our digital camera joined the family. Each step has a different sample of carpet. Each sample was nailed down with approximately 1,159 nails. All these samples were on top of the original carpet, or something close to it, and under that was a horse hair carpet padding.
Also, we found a really cute letter from a little girl to her pen-pal, dated from the 50's. I should find that....


At the top of the stairs the ceiling sloped in at you which made everyone a little nervous and gave you a sense of vertigo. Someone had built these hand rails, that were only about 2 feet high, and were the perfect trip hazards. You can't really tell from the first picture but the door was only a foot away from the railing, so you had to sort of bend around it, with nothing to hold on to, so they had to go.

This is a little shelf that you saw directly at the top of the stairs. You can see that they "patched" something under the wall paper, who knows what exactly.
Let the demolition begin: (would you think I am strange if I tell you this is my favorite part?!! There is such an immediate change, and once you do it, there is no going back... so exciting!)


Here is the wallpaper coming down, or I guess it is down. The 2 x 4's are my bridge, scary, I weighted less back then.


Here is my mommy! What a trooper, this was all one weekend of crazy demolition. You can see the bead board now, but unfortunately there have been some strange patches like I mentioned before, so missing boards and sections of wall.


This is a shelf that was above the stairs. We frequently hit our heads on it, it was to short for code. You can see the walls uncovered. There were so many tacks and nails that we had to wear shoes for about two years. No matter how many times we swept or vacuumed we kept finding them, I think if there had ever been an earthquake the sheer number of nails in our house would have held everything together perfectly.
Once we cleaned up form this mess, we didn't touch it for a while. We worked on the bathroom and 2 upstairs bedrooms. But about a year later we were ready to really get to work again. The next thing we decided to get rid of was that book shelf. We only had a 2 ft landing at the top of the stairs and thought it would be better to have bigger space.


We took the bead board down carefully so it could be reused. This was the biggest mess we ever made! So, what did we do to commemorate? Take silly pictures. And what is more fun than taking a bunch of pictures of each other when you are sweaty and covered in crap? The answer to that question is a lot of things... But I can't not share, you have to have fun doing this kind of work, or it would be a nightmare!


The scariest thing we found was a bunch of LIVE wires that had just been cut and left sitting open in the insulation, obviously we were well looked after from a heavenly place while we lived in this house!

Here it is all cleaned out to the roof. You can see the old roofing boards, which is kinda fun, also the adobe brick insulation.


This picture is a view of the yellow room's closet. The wall was only made of bead board, although it was 3/4 of an inch solid wood, so I am sure there was some strength in it. We cleaned out all the mucky-muck. and actually removed the whole bead board wall to move it around a bit.


The only problem with solid wood walls was the fact that they left no way to get into the attic to re insulate, so over the years portions of the walls had been cut out to get back in there. You can sorta see the plywood board at the back of the closet, where they had cut out another portion of the wall.


This is what you could see when looking from the top of the stairs, to the back wall above the stairs (and the closet).


AT the top of the stairs on the landing where the book shelf had been we opened up the wall exposing the attic portions. We had to close off the space from our curious little kitty. And this is what it looked like in between. We just used old scraps of paneling from our master bedroom remodel.
The next step was to insulate. We made the mistake of getting an insulation that was a little too thick, and hanging the drywall was an awful experience. The screws kept popping out of the drywall and it was a back breaking, agonizing, torture holding it up... I was sore for DAYS!


We left the ceiling bead board intact, so we didn't have to deal with the sprayed in fiber insulation but we decided to cover it with drywall. That way we could reuse the other board to cover all the new walls we created. This hole is the space that we made for new can lights.

(Oh, oh, look, you can sorta see the doors that were upstairs, they were wonderful, an even larger version of bead board nailed together to create a door.)


Can you see what looks like 8,000 screws in that drywall, yep, half of those babies are holes from the drywall popping out.


Sorry that the last picture is fuzzy, it shows where we cut back the joists that kept trying to take out chunks of our heads. This was one of the best fixes we made on the house. Before this we could hardly get a mattress up the stairs to the bedrooms up there.

I had to throw this picture in of the little explorer, trying to check out the attic space! ( if you can even see her, the little solid black fuzzball! Love her!)


Remember how earlier I told you one wall was lathe and plaster and the other side was bead board? We decided to fix that, so we removed all the plaster, luckily the lathe made a perfect backdrop for nailing on new bead board. We had to buy the real true wood bead board for this project so that it would actually match the existing boards.
It was quite a bit more expensive than the bathroom wainscoting. It was almost a joke though, the new modern stuff was barely 3/8" of an inch thick and so flimsy, the old stuff was solid 3/4 inch thick wood as hard as nails. Needless to say it was a good thing to have the lathe behind there to strengthen it all up.
Here it is going up one little strip at a time. We should have bought a nail gun first thing... I think I had to drive in about 300 nail heads... BUY a finishing nailer if you have a lot of moldings to install, you will NEVER regret it.
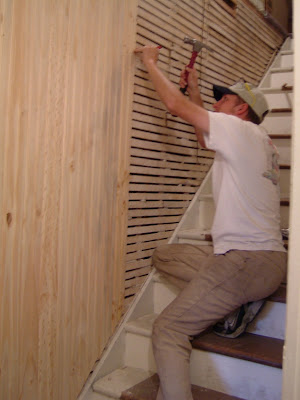


You can see that we were not very worried about keeping the bottom of the bead board very straight. Mostly because we were going to be covering it up and that way we didn't use more board than we had to.
Also, you may notice from the second image that the floor boards from the second floor are sticking out, there really wasn't anyway to cover this up at this point, and it looked like that on both sides, so we had to get creative, but we did it in a beautiful way... stay tuned for that.


Next we started framing in the wall that would be over the stairs. We decided to add a little set of doors to allow future owners to get back into the attic if ever necessary. Oh, and you can see that with all the work on the stairs we decided to build solid "bridges". They saw a ton of action for a few years, we used them all over the place.


And so we are now re-installing the bead board that we so carefully took down. This is obviously not a bearing wall, although the bead board could carry quite a bit of weight, really. Justin is hanging drywall inside the closet of the soon to be new half bath, that was so beautiful it makes me want to cry that I don't get to have it anymore.
Speaking of being sad about selling this house, I have to say that I was so excited to move when we left. Just so I could start a new project. With my schooling and internships under my belt I was ready to really put into action what I learned. I am a little more sad now, especially since we don't have such wonderful character in homes nowadays. I want to buy a hundred year old house again... but a 50's rancher first! ...so a few houses down the road. (end of tangent)
Speaking of being sad about selling this house, I have to say that I was so excited to move when we left. Just so I could start a new project. With my schooling and internships under my belt I was ready to really put into action what I learned. I am a little more sad now, especially since we don't have such wonderful character in homes nowadays. I want to buy a hundred year old house again... but a 50's rancher first! ...so a few houses down the road. (end of tangent)

This is the ceiling above the wall that will soon become the wall that will house the door to the bathroom.

I look kinda scary in this picture.... Anyway, painting bead board is the biggest pain ever, you have to get the coats even and in every single crack it is very time intensive and uses a ton of paint. But, the good news is I am now an excellent painter. Especially with a brush and I have quite a few tricks up my sleeve... Wait one second while I pat myself on the back. Anyway, I will have to share those tricks some day soon.
At this point we forgot to take any picture during the molding install, which was intense to say the least. The angels were all over the place, Justin ended up building the space in 3d so that he could figure out how to cut the moldings perfectly, We actually reused a small crown molding that had been in our master bedroom. Along with a bunch more moldings that we purchased, check it out.


You can see the little doors that we put in above the stairs. We called them the doors to nowhere. But we were able to reuse old hinges that were original to the house in an old closet in a room you haven't seen yet ( I made my entertainment center out of the doors to the original closet) And, now when the new owners need to get back there they won't have to cut through my precious bead board! Seriously!


I need to point out a little detail in the picture above. The stairs on the left side had a board that ran all the way diagonally with the stairs. We simply attached the base molding on top of it to finish it off. On the right side however they did not have this board, which looked a little stupid. To fix it we had to cut out individual triangles for each step to fill the space and have it look like the other side. See picture below.

At this point we worked on some other projects for a year or so. Then we came back to this and finished up the bottom of the hall and carpeted the whole space, and installed a new light.
This is what the final space looked like. ** We had planned on painting the stairs and just having a runner, but ran out of time and chose to have them carpeted. We did decide it would be worth it to have the nose of each step wrapped and it was worth the few extra dollars per step the look was much more polished.
This first picture shows the little linen closets that we added in the eves. Again we reused the original hardware from a closet in the house.

It was fun to see the different types of bead board. You can see that not only did we have the normal bead board (not shown) but the wide horizontal version and some v grove boards thrown in there, that didn't have the bead at all (pictured behind the mini paintings).


In this picture (below) you can see how we covered up the raw edges of all the bead board joints.


It was so beautiful.. sigh. If only...well, someday!
So, after seeing all that (which is only the half of it by the way...)
Do you think it was worth all the hard work?
What do you think of the space?
Check out our other Retro Remodel projects here.
 Labels:
Logan House,
Our Houses,
Remodeling,
Retro Remodels
Labels:
Logan House,
Our Houses,
Remodeling,
Retro Remodels


10 comments:
Niiiiiiiiiiiiice! Holy post Cass, I know that took you longer than 5 minutes. Nice work! I love seeing these Logan posts...it brings back so many good memories. I know I appreciated you making more head room up that stairwell:)
All hail the nail gun!
I never saw the finished beauty of the stairwell in person, but I remember you telling me what you were aspiring to. I think after all is said and done, it was worth it. How refreshing to walk upstairs, especially knowing all that went into it!
holy moly! Congratulations on an INCREDIBLE project. You should be SO PROUD of all your work.
Yowza!!! What a huge huge huge project! I am so impressed at the size of the project AND that yall did it. And uhh...yeah. It was TOTALLY worth it!!!
Definitely worth it, I love all the details and can't believe the work involved, a 3-d model, really!? That's just amazing!!
WELL DONE! I can't believe all the work you did, it makes me tired just looking at it. It also makes me appreciate my own(much easier) stairway remodel! Keep these awesome posts coming!
Gorgeous work, guys! Anyone who's bought a house you lived in is lucky indeed! And the previous owner's use of the carpet remnants is HILARIOUS (and kind of atrocious). Asheville misses you both (and Etta, even though we never got to meet her).
Oh my! What a task. The end result is fabulous!
Wow you have your work cut out for you! How do you find time to blog on top of this? It looks fabulous!
Please move back to Logan and help us with our house!!!!
Post a Comment