Yesterday I posted the first "re-use" idea for our old rundown artificial Christmas trees, a snowflake.
Here is the second idea, a square wreath:
I feel like the bow is a little small, but I just used some left over ribbon and that was all I had of it.
Here are the step by step instructions:
Take 4 branches and set them out end to tip in the form of a square
You will make 2 squares, so you need 8 same length branches.
I set the two squares up by laying the branches in opposite directions,
one started with the end and attached to the next tip,
while the other started with a tip and attached to the end. (does that make sense?)
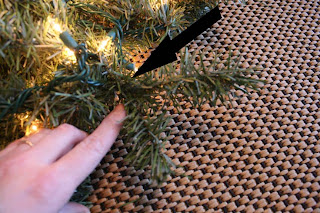
Wrap any uncovered portion of wire with a branch.
Use the extra bit of branch from wrapping to secure to the tip of the next piece.
Repeat for each corner. Use an extra little branch or two if necessary to make it strong.
Now it will sort of resemble a square.
Repeat with other four branches.
Wrap one of the squares with lights if desired.
Stack lighted wreath on top of unlit wreath.
Twist a bottom and top branch together tightly in the corners to secure the two wreaths together.
Then again in the center if it is loose. Until it feels secure.
Now you have a rather shaggy square.
The branches were a little too long, so I folded them in half and shaped it.
Here you can see what a difference it made to fold the branches.
Now you add any ornaments misc, that you like.
I ran to the dollar store and bought a few little things.
It cost $4.00 total, or you could just use what you have!
Here is the wreath all done.
Did I say wreath? Kitty thought I said bed!
Do you have any good ideas to recycle your old tree.
Post a Comment
I love comments! Thanks for taking your time to tell me what you think! I read them all and enjoy your enthusiasm for the work shown here!
Please remember that people have worked hard on these projects. Each person's budget and goals are different, so please try to make kind, constructive comments. Remember if it isn't nice, please don't say anything at all.
Please no business links. Remodelaholic reserves the right to remove any comment that we feel is malicious, spammy or otherwise inappropriate. Thanks.
Sorry there is no longer the option for anonymous comments, unfortunately people have been abusing that option!
Subscribe to:
Post Comments (Atom)


10 comments:
WAY TO COOL!!!! LOVE IT!!!!!!!!!!!
That is gorgeous! What an idea! Swinging from SITS!
So cute! I'm a new follower to your blog and I'm loving it!
Beautiful!
WAY COOL! Great idea! I also love the snowflake!
Thanks for linking! : )
I featured you today at:
http://firefliesandjellybeans.blogspot.com/2010/01/featured-friday-favorites-from-show.html
Oh I have an old tree...guess I know where I'm going to get next year's wreath! Kim
I love square wreaths. I am featuring this at somedaycrafts.blogspot.com
Love the square design! Great idea....it is way cute!
Listen to your kitty. She knows best. :)
Awesome idea. I did the same sort of twist this year with leftover garland. Cool way to create your custom sized wreath you wish for. Your lights sure added dazzle to this one!
Nicely done. And thanks for linking up to SNS.
FJ Donna
Post a Comment