


Paper Christmas Decorations; Day 4
04 December 2009
....on the 4th day of Christmas my blog friend gave to me....

3D Snowflake
This snowflake ends up pretty big. So I think it would be fun to hang these in your window.


I started with 6 pieces of double sided 6" by 6" scrapbook paper
(I also did smaller 2 1/2 inch square version, that I photographed).
Fold each of the 6 pieces of paper in half, diagonally.


Cut *several lines on each side of the triangle from the folded edge, parallel to the outside edge. See arrows above (do these cuts on both sides). They come close to the middle but not quite; leave a small space between them in the very center of the folded piece. (*the larger square of paper the more cuts you can make, for the small I did 3 larger size 5)
Optional: I cut a small triangle out of center so that it wasn't so solid in the middle.
Unfold your paper. Now, take the two inside cut pieces together to form a tube. put a little glue on the corner and paperclip two sides together to form a roll. You should see open triangle shapes on each side of the roll.


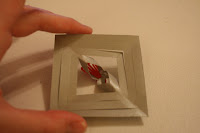

Turn it over and roll the next two cut lines in, gluing and securing with paperclip like before. After each roll is secured, turn the paper over and make another roll on the other side, until all the cut pieces have been joined. (side view below just FYI)


Repeat the rolling till all 6 pieces look like this (below). When glue is dry, remove paper clips.


When all 6 pieces are done you lay them out like below.


Take 3 of the completed rolled diamond pieces, and join them together at the center tip, glue and paper clip till dry.


Glue where the two outer loops come together ( where I pointed out above). Repeat with other three. When dry, glue the two center joining points together, and the side rolls together. And you are done.


I also think that a single section of the snowflake looks cool enough to be an ornament just on its own.
What do you think?


I will be back with Day 5 on Monday! I gotta get my craft on for the weekend, and it would also be nice to spend some time together as a family, (sans blog)!!


7 comments:
This is very cool and crafty, and I am loving the simplicity of it. Thank you for the tutorial...I will be trying these out this weekend.
Susan
Love! Have you seen the tutorial from Martha Stewart with the white paper lunch bag snowflakes? They're insanely huge! I haven't tried them yet, but gosh they'd be gorgeous hanging from the ceiling!
I posted a tutorial for a very similar snowflake yesterday. I used 12" x 12" paper. I like your middle better.
My son has been making them for a couple of years. They are very sweet!
We made these a few days ago, but they are secured together with tape and staples... But you can only tell if you get up close and personal with them! I made small ones for my tree and a huge one for decor. The kids loved making them, and are still requesting more... My whole tree will be paper decor this year.. It's so fun!
Great tutorial!!!
You've got a fabulous blog!!!
i loved your series on paper ornaments! i've made this snowflake before but never thought to use just a section... it looks beautiful!!!
We make snowflakes at work (SIMPLE ones), and display them. Two years ago I made that exact same snow flake on your blog, everyone was so amazed... like I walked on water. When I showed them how easy it was, they still sat there with there eyes-a-bulging! Now I get requests each year to make them, and how to make them. Love it... They can bring little humans into this world, but can't make a snowflake. He, he!
Post a Comment