We’ve Moved!


If you aren’t redirected here is the link:


Remodelaholic!


THANKS!

Showing posts with label Side Dishes. Show all posts

Super Fast Fruit Salad & A Recipe Link Up Party

01 May 2011

Hey ya'll.  This has been a good week- really busy a lot has been going on.  So, I have a super fast, super delicious fruit salad that I made on the fly, in about 3 minutes flat, one day when dinner (read: crock pot meal) was done and I had made no side dishes.  But it was so good and fast, it is my new favorite.

The amounts are not exact, since I literally just threw some things together, so add or subtract where you please.


Orange Banana Fruit Salad
Serves 4

1 orange peeled and chopped into dime or nickel sized pieces
1 banana sliced down the center and then sliced
1/4 cup (+ or -) coconut
1/4 cup chopped walnuts
1/2-3/4 cup vanilla yogurt

Mix them altogether gently so you don't crush the bananas, and serve!  Seriously good!  I promise!


Party Rules:
Please grab a button for your linked blog post 
Please become a public follower of Remodelaholic!
Remodelaholic


** ALSO - I would be really thankful if when you try a recipe, you’d please link to my post for the recipe.  That way people can find and join our party, and we will all benefit from some extra traffic love!   If the recipe is a guest feature, please link to the original author's blog post that is hyper linked at the top of the page!

Thank you!

Read more...

Yogis Welcome; Yogurt Recipe and Link party

06 June 2010

I saw Martha make some homemade yogurt a few years ago, and I have been wanting to do so ever since.
And now that Etta is eating it, the desire has grown.

Yogurt is a nice was to introduce some calcium, protein and good bacterias into your diet- BUT have you looked at the label?   Quick run frantically to your fridge.   Look real closely at the sugar!  ** I have to say I am not a splenda girl - it gives me headaches and I don't like the after taste so I dont' buy artifically sweetened versions, moving on.  Do you know how much sugar is in Yogurt?  The little single serving I have in my fridge, 27 GRAMS, a can of soda has about 39 that is NOT far off.  (especially considering quantity!)

With these types of thoughts brewing in my mind, while surfing (not on the ocean) the other week, I found a blog, called Common Cents Home.  They  had really great instructions to follow to make homemade yogurt. And I decided to try it out.  It worked.  It was easy... but I wanted a thicker yogurt,  (if you look at the label on yogurt, some of them add gelatin as a thickener....).  This first batch therefore become frozen yogurt *bonus!

Now that I saw how easy it was to make, I really started researching how to make thick yogurt and found a great article about how to make Greek yogurt.  So, I followed Common Cents home to make the yogurt then I followed the instructions from the Greek yogurt article to make the second batch.

Here is how to do it:

Thick Homemade Vanilla Yogurt:
Yields about 2 qts

1/2 gallon milk (I used whole for the baby, this also makes it hecka awesome creamy!)
1 cup plain yogurt with live and active cultures... (most yogurts have active cultures, it will say on the label)
1/2 cup sugar (or a bit less of agave nectar)
1 tsp vanilla

Pour milk, yogurt, sugar and vanilla into large crockpot.   Blend.  On low setting allow the milk to increase in temperature to 120 degrees (maybe my crockpot is slow but this took some time for mine, on low about 90 minutes, I was checking the temp every 10 - 15 minutes and stirring each time).  Meanwhile preheat oven to 175 degrees. When milk has reached 120 degrees pour it into sterilized mason jars (you will need 2 quart jars and one pint jar to save for your starter next time.)  Place mason jars in oven, without the lids, and turn the oven off. Leave jars in the closed oven, completely undisturbed for 8 hours. At the end of eight hours you have yogurt.


***Save the pint jar in your fridge at this point as your next starter.  

The next time you make it, you won't have to buy a new starter you can just use yours!


Now at this point you have rather thin yogurt, if that is what you like stick it all in the fridge and enjoy, if you want something a little closer to heaven follow the next instructions.   BTW if making yogurt seems to scary, you can do these next steps with any yogurt to make it extra creamy!)


Thickening the yogurt steps:

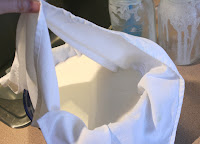
  1. Line a medium to large bowl with cheesecloth, a clean white dishtowel (or I used my white cotton cloth napkins cause I didn't have the other two options... just make sure they are link free, I used a lint roller to be sure)
  2. Dump 2 quarts of the yogurt into the center of the cloth. 
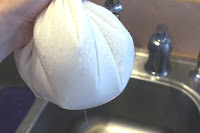
  3. Bring the four corners of the cloth together and lift the yogurt, make sure you have a good hold.
  4. Over the bowl or sink start to twist the load to tighten the cloth around the yogurt and squeeze out the liquid, it will bead through and begin dripping through the cloth.   (this whey which can be a good byproduct if you are into Nourishing Traditions (which is a very interesting book by the way.)
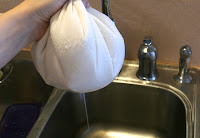
  5. Continue squeezing the yogurt under a bit of pressure to force the liquid out.
  6. When the flow of liquid slows down, tie off the top of the cloth just above the yogurt (so it is still tight) and place in a colander or strainer over a bowl.
  7. Place this bowl containing the colander in your fridge and let it drain for another 2-3 hours.
  8. After draining give the bundle one last squeeze over the sink.  Remove the tie... (this is the tricky part it might be good to have a little help so you don't spill it everywhere) and use a spatula to put the yogurt into a bowl for storage and or to eat right then and there!  It will be about as thick as sour cream. 


Can you believe I didn't get a final picture?  I know.  

I have made this several times now, I even tried it with coconut milk which was to die for!

Okay, time for your links, RECIPES LINKS ONLY PLEASE!

Read more...

Crusty looks... Artisan Bread Recipe

18 April 2010


I have decided to move my recipe day to Sunday.  I have a few great recipes to share and ready to go, but I must share this one with you first.  While visiting my family, a long time family friend brought over some bread she had made.  She said she loved the recipe because it reminded her of the European bread she had grown up in Holland.

(This was a fun revelation to me.  I have known Yvonne all my life, but we moved from my home town when I was 11, so I didn't really know her history, and I had no idea she was from Holland)  I was so excited, I immediately called Justin to come up and speak Dutch with her.  It was really fun to hear, and I am beginning to understand quite a bit which is nice.   It made us both really excited, because Justin is teaching Etta Dutch!...

Well, we cut into the bread which I am telling you is SO - SO - SO - SO - SO good.  It is the perfect bread, that you would easily spend 5 dollars a loaf on.  And guess what?  There are only 4 ingredients and those are cheaper than anything.   AND there is no kneading required!

I am asking you to try this recipe out, no special skill is necessary to make perfect crusty, chewy, perfect on the inside, perfect bread!  Did I mention this bread is perfect?

Perfect Artisan Bread- EASY!


  • 3 cups all-purpose flour
  • 1/4 tsp. active dry yeast
  • 1 3/4 tsp. salt


    • Cornmeal as needed

Directions:

In a large bowl, combine the flour, yeast, and salt. Add 1 5/8 cups water and stir until blended; the dough will be shaggy and very sticky. Cover the bowl with plastic wrap. Let the dough rest at warm room temperature (about 70°F) until the surface is dotted with bubbles, 12 to 18 hours.

Ingredients when first mixed

(12-18 hours later, below)


Place the dough on a lightly floured work surface. Sprinkle the dough with a little flour and fold the dough over onto itself once or twice. Cover loosely with plastic wrap and let rest for 15 minutes.

Using just enough flour (I went a little crazy with flour, which you can see from the images) to keep the dough from sticking to the work surface or your fingers, gently and quickly shape the dough into a ball. Generously coat a cotton towel, preferably a flour sack towel (not terry cloth), with cornmeal. Put the dough, seam side down, on the towel and dust with more flour or cornmeal. Cover with another cotton towel and let rise until the dough is more than double in size and does not readily spring back when poked with a finger, about 2 hours.

At least 30 minutes before the dough is ready, put a 2 3/4-quart cast-iron pot in the oven and preheat the oven to 450°F.  (We didn't have one of those really nice French enameled pots, but my mother had a pot that could be backed in so we used that.  Worked great!  When I got home I used a seasoned dutch oven, which was a little smoky but worked)

Carefully remove the pot from the oven. Slide your hand under the towel and turn the dough over, seam side up, into the pot; it may look like a mess, but that is OK. Shake the pan once or twice if the dough is unevenly distributed; it will straighten out as it bakes. Cover with the lid and bake for 30 minutes. Uncover and continue baking until the loaf is browned, 15 to 30 minutes more.

Transfer the pot to a wire rack and let cool for 10 minutes. Using oven mitts, turn the pot on its side and gently turn the bread; it will release easily. Makes one 1 1/2-lb. loaf.


When we pulled out I cut a piece and said, 


"Please don't eat this I have to get my camera..."


I ran  downstairs and when I came back I found this:


And this unnamed family member was chewing.... 

Beware this bread will be eaten fast!

Share your recipe links!

Read more...
Related Posts with Thumbnails
Emealz - Easy Meals for Busy People!
Home & Garden Blogs Home & Garden Blogs - Blog Rankings

Blogging  tips, tutorials and SEO

From Here to Eternity

  © Blogger template On The Road by Ourblogtemplates.com 2009

Back to TOP