We’ve Moved!


If you aren’t redirected here is the link:


Remodelaholic!


THANKS!

Showing posts with label DIY. Show all posts

Make Your Own Blue Glass Jars Tutorial

25 October 2011

Make Your Own Blue Glass Jars Tutorial


No, I'm not having crazy preggo cravings (cuz I'm not preggo)...and no, I haven't lost my mind either!  I just happened to make some candles out of some saved up jars that used to be in the fridge...holding food.
Honestly, most of these jars would typically wind up in the recycling...but I finally got smart.  You see, there have been times when I've said to myself, "self, that's a cute project that involves a glass jar!" But then I realize that I don't have any glass jars.
On one occassion (cough, cough, hint, bridal shower) I even bought some mason jars because I didn't have any on hand.  Boy was that silly!  After seeing the stash I'd collected in just a few weeks, I'm hoping that I've learned to go green and put those containers to new use, through one craft or another.
This project was something that I've been dye-ing to try!  LOL!  I crack myself up!
I'd heard it was possible to dye glass different colors using glue and food coloring, but I wanted to give it a test run.
Honestly, the most difficult part of this project was getting the stinkin' labels off of the jars.  I couldn't find my trusty Goo Gone, but I found soaking the jars in warm water to be helpful.
Once they were soaked, I peeled off what I could, and scrubbed with soap and water to remove the rest of the sticky gunk from the jars.
Then I went all out and spent a whopping $.50 on some school glue.
To get some color, I used a few drops of blue food coloring and a hint of green food coloring.  This created an aqua color, and in case you haven't noticed, I happen to be in love with aqua!
After one coat, the glass had a nice soft tint, but I wanted to go for something with a bit more pop.
The second coat was just what I was looking for.  I loved the color and the level of transparency!  These photos were taken when the glue was still wet...
...and these were taken once the glue had dried.... 
One word...L.O.V.E!
This project was so easy, so cheap, and the results are so fun!  I can think of so many fun things to do with this, but for this photo shoot, I just threw some candles in.
I tried to get some shots from different times of the day so that you could see the color in different lighting.  I loved how the color appeared soft in strong light, but more vibrant in darker light.  They looked pretty natural to me, but what do you think?
Granted, there were a few spots where I didn't catch the air-bubbles or the drips, but I never sweat the small stuff when I try a project out for the first time.  
I learned that I need to wait a bit longer in between coats so that the glue can dry completely first, but you might remember from this project that waiting patiently has never been one of my strong suits.
Grand total on this project...$.50, and a few hours.  A great project for some weekend craftiness on a tight budget!
So here's what I learned:
  1. Keep food jars! It's green and fun! This is just one of many crafts you can do with them.
  2. Patience is a virtue.  Wait longer in between coats.
  3. Don't sweat the small stuff.  Projects don't have to be perfect all of the time.  In fact, in many cases, imperfection creates an aged or weathered look.
  4. It is possible to craft for less than $1.00.  You don't have to spend a lot of money.  Use what you have around the house.
  5. This idea could be used to make cute gifts.  Fill the jars with bath salts, or even snacks.  The glue is on the outside of the jar, so it won't contaminate any food items!
So tell me, what would you do with these jars?  What color would you paint them?  I think I might try some red and orange ones next considering fall is just around the corner.  I'm so glad I tried this!

                                                                           
This project was contributed by one of our fabulous readers! We love to share your projects with this great blogging community. So, if you have projects from kitchen renovation ideas to small bathroom remodels, overhauled and repurposed furniture, spray paint updates you name it please send it in! Thanks for reading Remodelaholic!


Other fun DIY projects HERE:

Read more...

Beautiful Faux Capiz Chandelier Tutorial

04 October 2011

Beautiful Faux Capiz Chandelier Tutorial


Grab yourself a soft-drink, and make yourself comfortable.
Prepare for the details of the long-awaited chandelier project that I've been pre-posting about for the past few weeks.
I've teased, "coming soon" over and over again, and for that I am sorry. It wasn't deliberate.  I guess that's just what happens when a project takes longer than anticipated.  Much longer!
I am hoping that once you have read through this "how to" post, you'll have compassion on this blogger's soul (and her torn and tattered typing fingers that made hundreds of faux capiz strands)!
Let's start at the very beginning...
A few months ago, I was staring (enviously) at this dreamy chandelier from West Elm:
...and staring angrily at the $299.00 price tag.  I wondered, why must pretty things be so dang expensive?  
As much as I loved this little lady, I couldn't find it in my heart (or wallet) to take the plunge and commit. But then one day, I had a light-bulb moment, when I stumbled across a DIY'd faux capiz lamp project and realized I could probably make the fixture myself for an affordable price!  (And, yes...I think there was a little bit of dancing that took place during that moment..)

Read more...

Crib Turned Magnet Board Re-purpose Project

22 September 2011

Crib Turned Magnet Board Re-purpose Project

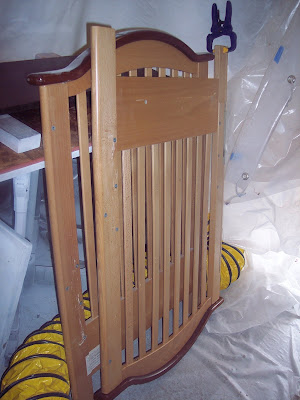
BeforeMy good friend Allison had a very clever idea to take the two ends of an old crib she had and repurpose them into magnet boards. And this is what Mike came up with.

Read more...

Painted Formica Countertop

16 August 2011


Painted Formica Countertop

My UGLY formica countertops were just SCREAMING for an Ambush Makeover!  But since I could not take them on a plane to the Today Show so Kathie Lee and Hoda could work their magic, ultimately, the responsibility fell to me!  Yikes!  I removed the purple, green and plaid wallpaper - actually it wasn't as bad as you might think.  The border was blue and purple and green hydrangeas so it really was quite lovely.  I was on a green and black and white damask kick so I figured - why not?  Once I got the walls and ceiling painted, the countertops stuck out like a sore thumb.   I didn't want to get new formica and I certainly could not afford granite - what is a girl to do when faced with a conundrum of epic proportions?  GOOGLE! 

 Here is what I was faced with:  Not completely horrible I am totally thinking Nate Berkus would just be brought to tears.


BEFORE! YUCKY!

Read more...

From Bathroom Vanity And Book Shelves To Entertainment Center

15 August 2011

From Bathroom Vanity And Book Shelves To Entertainment Center


Our last house had a built-in entertainment center, which was great!  We loved the fact that we never had to buy a unit to hold our electronic equipment.  However, it wasn't such a great thing when we moved!  We had a 52 inch TV that sat on our coffee table for months until we came up with an inexpensive solution for holding our TV.

We wanted more than just a console to hold our TV.  We wanted something that was aesthetically pleasing and that would hide a lot of our kids' toys and games.  One night, I found inspiration as I was looking through Craigslist ads, and came up with a solution that would meet all of our requirements.

First, we found these hideous bookcases on Craigslist for $60 for three!


Okay, so they're not THAT hideous...and please don't be mad at me if you have these same bookcases in your house!  The plan was to use two of these on each end of the TV compartment.

To hold the TV, we ended up purchasing an unfinished 60 inch bathroom sink base at a home improvement store.  Here it is while my husband was modifying it:


Read more...

Simple Ikea Bed Turned Chic

28 March 2011


Simple Ikea Bed Turned Chic
by Organized Design

Hey guys... I'm Jen from Organized Design. I love to blog about all things interior design and organizing. When I'm not busy doing the mommy thing, I enjoy creating functional finished spaces. My little girly is almost three and was in need of a big girl bed, so I took this bed...
and made it into this bed!
I am so pleased with how this bed turned out I can hardly stand it. I knew I wanted an upholstered bed for her, but wasn't finding anything I loved. They were either too boring, no style, or way out of a very descent price range. I first wanted to make the bed from scratch headboard, side rails, foot board and all, but wasn't mentally prepared for that undertaking. So I decided to take the easy way out and use a bed from Ikea. I started out by purchasing some particle board and cutting it down to the size of the headboard.

Read more...

DIY Paneled Wall Tutorial

17 March 2011

DIY Paneled Wall Tutorial
contributed by Decor Chick
Thanks for all of the love on my stepson’s new paneled wall!  We just love it, and so does he!
Ok, now on to the tutorial.  I have to give a special thanks to Rambling Renovatorsfirst and foremost for the inspiration behind this project.  If you haven’t checked out their paneled wall yet, you must do that.  They even went the extra step and added some pretty trim to each of the boards.  I LOVE the look.  We didn’t add any trim to our version so it’s a little more modern for the boy’s room, but both styles look great!
THE STEPS:
1st: Since there is no need to change what’s already a good thing, I used RR’s measurements for the boards and had them cut the same width.  I bought 2, 4×8 sheets of MDF a 1/2 inch thick at Home Depot for $20 each, and had them cut the sheets into 4 inch wide, 8ft long strips for me.
NOTE: If I were to do this again, I would splurge and buy primed MDF to cut back the painting time a little.  I’m not sure if the primed MDF is sold in big sheets like this, but I would think so?
2nd: Paint your wall white, or whatever color you will be doing this BEFORE you add the boards. Trust me. :)  You should also lightly sand the boards so they are very smooth and clean up any rough edges. And if you want to be super efficient, you could paint your boards before you nail them up too.  I didn’t do that of course. :)
3rd: I made a frame around the wall with the boards first, and just nailed them up with the nail gun.

Read more...

Living Room Renovation With DIY Entertainment Center for Flat Screen TV

18 February 2011

Living Room Renovation With DIY Entertainment Center for Flat Screen TV 
contributed by Glamorous Life


Well i didn't mean to take a bloggy break but we have been a little busy around here. I have been trying to upload these pics for this post for like a week and i think i just overloaded my computer or something because they would not work. finally after several separate uploads and moving the pics around i think i got it, beware there is lots of pics i had to show the whole process........


so lets start at the beginning


this was our living room when we first saw our house! yikes huh? the previous owners tried to build something on the wall it was a mess. the door on the left is our laundry room and on the right was a game room but is now our master bedroom (we had to remove a bar and a indoor BBQ grill in that room wait until you see that project!)
any way back to the family room....

so we took out the horrible pinkish carpet (that reeked of cat pee SICK!) and found like red stick on tile flooring. John ripped out all the stuff on the wall and it already began to look better {somewhat}


so there is the wall somewhat done it now looks SO much better right?
so here is the finished wall with our furniture and stuff in it. i love the TV on this wall but the TV looked so little on this huge wall and i never could decide to what to hang over the couch on this huge wall.
so in came some brain storming i wanted a entertainment center the size of the wall. John drew up a plan based on what i told him i wanted and begun this {fun} project =)

now this is a really large room and it has 8 large windows so lots of light. it also has french doors so where to place things can be difficult and the room can feel big (because it it) so i wanted the space to feel a little smaller and cozy since we do spend so much time in here.
John started by making this huge frame that weighed a million pounds, it was so hard to move because we have 3 ceiling fans in here (yes i know not very fashionable but it gets HOT in this room in the summer lots of light and 100 degree temps require ceiling fans) we had a hard time moving this thing.
in the mean time while building this (about 3 weeks since it was mostly done on the weekends) this is what our living room looked like
more pics of before
so here is the basic frame of the thing. it is very large and at this point i knew i would love it. doesn't it look better already?!
a up close of the thing, i love the bead board in the back it looks amazing!
and of course dad had lots of helpers in this project.....
ALMOST done! i mean a couple coats of paint and i could not wait to accessorize this thing.

and finally with the doors on! isn't she beautiful!!!
my husband made this and i love it!
the doors turned out so great too. i didn't want handles on them yet i may add them later but so far i like it this way.
here is one side. i ordered 2 prints from vol25 
i am so loving these prints the quality is great and i love that i wont walk into someone elses house i know and see it on there wall. i like to mix personal items, cute decorative and various other things for decor.
Johnnie gave me a great gift card to pier one so i got a few things there including the candle holder with the hanging lantern looking things. My friend Tara gave me that clocks and my bf made me that crossstiched footprints print in the frame, i love that i see these things and think of friends.

the opposite shelf has this great big vase i got at pier 1 i am loving this color! Another print (oh and i put these in frames i got for $12 at wal-mart and on a frame holder from Kohl's that i got buy one get one free holla!)
A cute picture of Liz and a metal holder with decorative balls in it.
i also love to decorate with books and Nate Berkus suggested on a Oprah show a long time ago to always turns some books on there backs and some right side up for a neat look and i always do that now.
I put several different vases on there too the one on the top used to have a ivy plant in it and we got it when our son Matthew passed away from my friend Marissa's family (yes i remember random things like this) the purple vase was from my bf for my bday one year etc.
the spaces that are behind the doors are so large, i actually got some big canvas baskets from target last week and put a bunch of the kids toys in there which is nice because they aren't hiding under there beds anymore and they can play in here all together

i put the couch in the middle of the room to make it more cozy and a little closed in. and i also put my green chair on that wall to the left it is nice because we ALL can sit together and watch a movie or hangout. That coffee table is nice there because the kids can play or dance {haha} on top of it.

in the back corner of the room under the collage picture wall i brought in my zebra chairs from the formal living room (i will show that room soon i love it in there too) and threw some solid purple pillow on them. I used our old TV stand between them and put a couple of lamps on it makes a nice little corner to read at....
i put a all kind of pillows on the couch and i am really loving that. i us ally shy away from them because hello 5 kids and 11 pillows can cause a bunch of pillow fights and pillows that become napkins but i threw caution to the wind and brought every throw pillow i could find ;)
and something i decided IT IS MY HOUSE and i can mix whatever colors i want there doesn't have to be design rules for mixing things i love right?
the big pillow on the green chair is from pier 1 it is a floor pillow and was on clearance for $12 and change regularly prices at almost $50!
here is a view from the other direction. i still need to work on the desk on the right side but that is another day.
hope you enjoyed my LONG post sorry about that.

Read more...

Under $100 Carpeted Stair To Wooden Tread Makeover DIY

08 February 2011

Under $100 Carpeted Stair To 
Wooden Tread Makeover DIY
contributed by Cleverly Inspired


For about a year I have been thinking about redoing our stairs. Should I?Can I? Would I dare? Rip up carpet??

Almost 7 years of wear....stains that can't come up...


 I just don't know. It would be the largest project I have ever done. The hubs was completely behind me." you can totally do that. It is just carpet. It the wood is bad we will deal with it. Go for it!"
So I did. And here is how it went down.... By the way, thanks for the support. It sure does make a girl feel good!!


Read more...
Related Posts with Thumbnails
Emealz - Easy Meals for Busy People!
Home & Garden Blogs Home & Garden Blogs - Blog Rankings

Blogging  tips, tutorials and SEO

From Here to Eternity

  © Blogger template On The Road by Ourblogtemplates.com 2009

Back to TOP