We’ve Moved!


If you aren’t redirected here is the link:


Remodelaholic!


THANKS!

Showing posts with label Holiday. Show all posts

Candy Corn Decor! Getting Ready for Halloween!

23 September 2011

Did you guys see the adorable candy corn cones Sarah from Thrifty Decor Chick made?  
 I LOVE them.... click over to see her instructions!!


P.S. If you like candy corn decor, I made some HUGE candy corn pillows two years ago... check the tutorial out if you want!  (Sorry the picture quality is so bad...)


Remodelaholic is written by Cassity and Justin. Cassity has a degree in interior design and Justin is a landscape architect, so we adore everything that makes up a HOME! We love to share home remodeling ideas and projects we’re working on. From huge kitchen renovation ideas to small bathroom remodels, there isn’t anything we won’t try to tackle (at least once!). We are in the midst of our third whole home renovation, (check out house 1 and house 2 as well, so there should be a lot more inspiration coming your way. We hope that you will stop by often for home design inspiration, tutorials, interior design tips, delicious recipes and what going on in our family life.

Read more...

Falling for You! Fun Fall Decorating Ideas

12 September 2011

My favorite time of the year is fall!   And this past week the weather actually dipped down into perfect zone for the last 6 days.  We have spent the last three nights just playing as a family in the back yard after dinner until dark!

But I thought it would be fun to show off some of the great fall projects we have featured here over the last few years...  (p.s. there should be some good Michael's coupons this week on the blog.. be sure to print yours out, I want to go buy some of their baskets!  50% off is a total gift!)

 (wow, the stairs have come a LONG way!)


Fall Mantel Ideas


Read more...

Happy Independence Day Y'all!

04 July 2011


Happy Independence Day! 
(to my fellow American bloggers...
 and a great day to the rest of you who don't get the day off!)


If you would like some great last minute 4th of July Ideas please check out Polly Want A Crafter.

I am taking the day off, but if you would like to participate in the a crafty link party on my other blog click the link!

Read more...

Mother's Day Fun

08 May 2011

Happy Mother's Day!
(I got this in an email this year, and what could be cuter than baby Kitties so I had to share it!)


For those of you that have a hard time with today, know that you are not alone!  I will be thinking of you!

And because it is Mother's Day, I'm not cooking!  If you are please link up!


Read more...

Valentine Decor Ideas From Online

01 February 2011

Just surfing for ideas, although I don't have time to decorate our house, because then I would have to clean it up after...... I know I am such a slacker.   But in my defense cleaning up decorations and week old babies don't really live congruently in my house, so instead I will just embrace the fact the it is fun to look, and save great ideas, that I can use another year!

(see last years inspiration post for more great ideas, or check out our valentine's day week from last year)

** for more info or directions on how to make or print featured stories,
click on the link beneath each picture!

Yarn Pom-Pom Flowers

Wrap yarn around a small square of cardboard.  Slide off and tie bundle in center.  Cut loops and fluff out. Add a dab of hot glue to the end of a thin twig and insert into each pom-pom's center. Hold in place until the glue dries (about 10 seconds) and arrange.  Be careful not to burn your fingers!!

Read more...

Happy Thanksgiving!

25 November 2010

Hey Ya'll,

Happy Thanksgiving! 


I am taking the day off- to be with my family, cook, and eat, eat, eat!

I am thankful for you all reading my blog!

I hope for you to have a great day, and that you get the chance to be around people you love, eat some food, and thank our creator for such wonderful blessings- and if things are hard for you now to hope for good days to come!

Read more...

Happy Halloween! & a Recipe Link Up!

31 October 2010

Happy Halloween!!

Hey, I know I am really lame lately on the recipe sharing lately sorry... I really haven't been cooking anything that wonderful, if it takes longer that 10 minutes I don't make it.  And so we have had some pretty random meals lately.

So today, I thought I would show you our AWESOME (if I say so myself) Halloween costumes.  (what is up with uploading pictures on blogger, it is totally not working urgh!)

This is another one of those costumes we have been wanting to do for years.  I almost didn't do it, but since Justin and I went on our first date on Halloween, it is an important holiday for us, and I really like to go all out.

I will have a ton more images on my family blog soon I am sure, check it out if you like.

Live Long And Prosper!
Long live the Trekkies!


Our little Klingon... (I thought the name was very appropriate!)


Okay, now on to the recipes.  What have you all been cooking?

Read more...

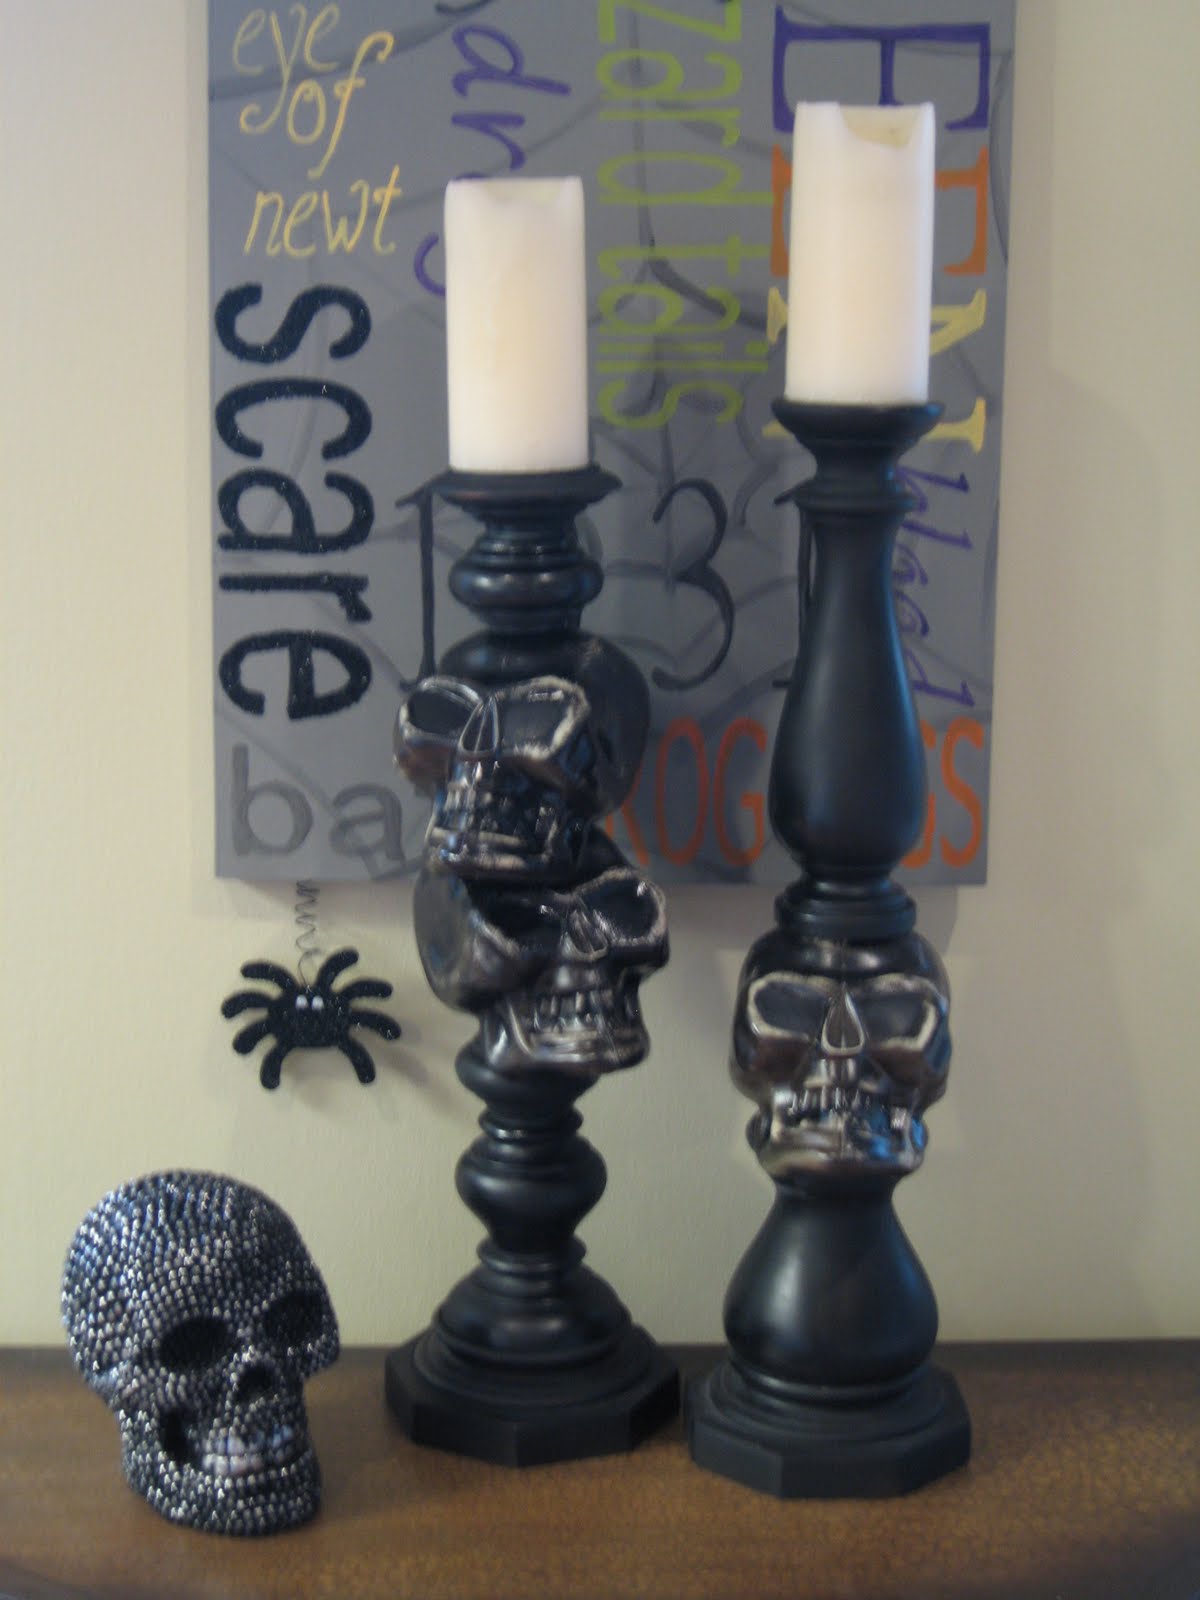
Spooky Candlestick DIY Project

28 September 2010

Hey!  This is Sandra for Sawdust and Paper Scraps here to show you one of my recent projects!

I bought about 5 old lamps when I was shopping for items to make my Halloween Candelabra tutorial.
I only used 2 for that So I had a couple left to make these Spooky Bad Boys.


Remember I said I had a project in mind to use up the other half of the PVC and threaded rod?

Well, this was what I had in mind...
only I didn't actually end up using either the PVC or threaded rod
 so now I have to come up with another project altogether!
Darn!  

For this project I used :
-2 lamp purchased at Goodwill (about $3 each) 
-3 plastic skulls purchased at the dollar store ($1 each)
-1 can of satin black spray paint (the cheap stuff from Lowes- $1)
Oh yeah!  You know I alway have about 5 projects going on at once!

1.  Take your lamps apart and paint the pieces
2.  Drill holes in your Skulls.

3.  Mess around with configuring all the parts until you find a design your happy with.  

I put these together about 6 different ways before I decided on this particular arrangement.  I used the lamps original rods, which are threaded both ends, so I had to play with adding and taking away pieces to make them just the right height.

4.  Paint the SKULLS!


5. Distress.

6.  Put them back together.  
You could drill a hole in the tops that are deep enough for the nut to fit down inside
 so the top is flush.  I didn't want to take the time so I just screwed it right on top.

My candles are a little concave and it doesn't matter a bit.  
If you're candles are flat on the bottom, just melt a little wax away to make room.

And that's it folks.


Total cost- $10
No, that does not include the studded skull on the left, I just threw him in for decoration.  
But I still think it's quite a bargain!

Read more...

Fall Decor, Lighted Rag Garland Tutorial

25 September 2010

This is a post I did from last year, just re-posting cause we are sorta busy at the moment!  Hope that is okay!

Within my home I have two banisters.  It is fun to have them decked out for the holidays.  I had all sorts of spooky stuff for Halloween and when I took it down, it felt bare.

I wanted a fall inspired garland, but couldn't afford to buy one so I started to look around. 

Here is what I found, and how I used it

2 Bleach stained towels
2 Strands of white Christmas lights
Several scraps of fabric in different fall colors (about 1/2 a yard of about 6 colors, slightly more of some)
Masking tape
Fall leaf sprays (optional)
Scissors
A bit of time (and a lot of hulu shows later)

The inspiration for this idea is a window treatment my friend Kim did in her daughter's room.  The hard part was coming up with a bendable "bar" type string.  That is where the towel came in.  I cut some old towels into 1/3's length wise.  Then sewed them end to end, (although I realize now that I could have just masking taped them together for those of you without a sewing machine.) 

Step 1. I measured the banister and cut the (now sewn/taped together) towel piece to length.

Step 2 Then I rolled it up width wise, and secured the roll with masking tape.  See picture below:

Step 3.  Wrap lights around towel roll.  Make sure the lights work!!! Then divide the roll and string in half to help you get an even distribution of lights.  Secure with masking tape when necessary.
Step 4.  If you choose to have a leaf spray at the end tape that in place at both ends of garland now.
Step 5.  Take your fabric of choice and cut them into strips.  I cut mine into strips approximately 1/2" -1" wide and 10" to 15" inches long .

Then begin tying the fabric strips randomly onto the towel roll.  Until the towel is completely covered

Hang up where ever you would like.  And plug it in.  It is so festive and fun at night!  I love it!

Read more...

DIY Raffia Wreath Tutorial; Holiday Decorating

12 September 2010

I think this is such a cute simple project and you can never have too many ideas for wreaths right?  This on e comes form Amanda at The Hand Me Down House and It is such a great creative idea check it out!


I absolutely LOVE fall -- it's one of those seasons that has completely grown on me.  Ironically, as a kid I HATED fall -- it meant we had to go back to school, stop swimming outside, and start wearing jackets.  But now I adore the change -- the crisp air, the rustling leaves -- all of it.  And this year it feels like the season came overnight!  It got chilly really fast.

So to celebrate the autumn season, I decided to make a Fall Wreath to hang on the front door.

I used some decorating raffia, a wreath form and my glue gun.  


 I got this raffia at Michael's for around $4.00 with my 40% off coupon, and I managed to find the straw wreath form at Goodwill for $2.00.

First I took thee or four strands of each color raffia and glued one end of the bunch to the wreath.


 Then I wrapped them around the wreath tightly.  I glued the end of the stands to the wreath and then started another bunch of raffia, overlapping the end of the previous bunch so no ends would be sticking out.  


 I continued doing this until the whole wreath was covered with raffia.  

At the end there were a lot of loose ends and pieces sticking out.  I trimmed as many as I could with scissors, and then the ones that I couldn't trim short enough, I glued down (I tried to do most of my gluing on the back of my wreath where it wouldn't be seen).


Now that my wreath was done, I decided to make raffia flowers.  First I took the purple colored raffia and grabbed five to six strands. 

 
I wrapped it around a cardboard form (or you could use your hand) so that it is uniform and even, like this:


 Then I wrapped another piece of raffia around the middle and tied it in the back to secure it like a bow.


Then I made another "bow", exactly like the one shown above and glued them on my wreath in an "X" to make a flower.


Finally, I hung it on the door and admired it. :)


What do you think??  I wish there was less pink and purple in there, but I still like it -- it still says, fall, right? :)


Isn't that fun?
Is this a project you might try?

Read more...

Silver Painted Pumpkins, Halloween Decor Ideas

09 September 2010

Over at Nice Girl Notes she made some beautiful silver painted pumpkins, that I absolutely had to share because who doesn't love fall and Halloween?  

The Pottery Barn catalog is like crack.  No, like an abusive boyfriend.  (I told you I was bad at metaphors.)
I love Pottery Barn, but it doesn’t love me back.  I legitimately get angry if they bump me off their mailing list for going longer than three months without purchasing something. It’s simultaneously sad and pathetic. I sing their praises, but they’re not perfect. Their prices and shipping costs can be cruel and bitter.  (Oh, but I do love the words “Out for delivery,” don’t you?  I love you, UPS.  I do!)
I made this Pottery Barn Kids knockoff, but wanted to try something from the Big Kids store.  Fall’s coming, and I’m faced with a decorating predicament.  I’m a creature of habit.  My entire house is bathed in lattes, browns, whites, reds, and blues.  I’m predictable.  And patriotic, apparently.  Fall is full of orange.  Full of it.  Orange pumpkins, orange leaves, orange candy corn, orange Oompa Loompa faces.  Orange doesn’t fit here.
I was surfing the PB site, and I fell in love with these:


They’re $24 a piece, but they’re actually pretty small.  At six inches in diameter, you’d probably have to buy the three as a set.  One small, solitary pumpkin would seem a little disjointed in my living room.  So, I thought I’d try to copy it.
1)  Acquire some pumpkins.  The orange and white ones are foam.  The other two are ceramic.


2)  Spray paint the acquired pumpkins.  I did a coat of white paint first, to act as a blank canvas for the good stuff.  Better already.


3) Spray a coat of silver paint.  I actually did this while the white paint was still wet.  I wanted the white paint to “move around” a little bit and give the pumpkins some texture.  It worked, I think, although it’s hard to tell from these pictures.  My original plan was to cover them with silver foil leaf to add a little depth, but I liked them so much that I skipped that step.


I’m actually digging silver these days.  When we first bought our home, I was all about the oil-rubbed bronze.  But, I think silver looks so fresh and bright.  And I especially like it with white.  So I played around with some ideas.


Like them?  Materials for making six silver pumpkins totaled at $10.  Three at Pottery Barn cost $72.  I win this match, PB.  I win.
Oh, did you catch that hurricane candle holder accompanying my blingy pumpkins?  That’s another Pottery Barn Knockoff.  Check it out here. :D
It’s still very much summer here, so I’m packing these decorations until… um, when?  Where’s the Emily Post of decorating etiquette?  I’ll at least wait until Labor Day to put fall stuff out.  I think.

How lovely those silver painted pumpkins look!
  Very classy!  What do you think?

Read more...
Related Posts with Thumbnails
Emealz - Easy Meals for Busy People!
Home & Garden Blogs Home & Garden Blogs - Blog Rankings

Blogging  tips, tutorials and SEO

From Here to Eternity

  © Blogger template On The Road by Ourblogtemplates.com 2009

Back to TOP