We’ve Moved!


If you aren’t redirected here is the link:


Remodelaholic!


THANKS!

For Sale By Owner 42, Shop Link Up Party

19 March 2011

Please Welcome to our Newest Sponsors!  Yea!

Removable Vinyl Wall Decals
A design company specializing in removable vinyl wall decals - the hottest new trend in commercial and home decor! They are so excited to bring you high quality graphics with the best selection in design. No matter what your style, they've got a design for you!  And if they don't have exactly what you want?  Let them customize a decal that will be perfect for you. Or they can easily resize any of the designs to fit your space.

Custom Made Hand-stamped Jewelry-
They would love to design a beautiful, custom, hand stamped item for you.  Remodelaholic readers receive free shipping on all orders by using coupon code: remodelship11.  Be sure to follow our blog for additional promotions: www.pumpkinpiedesign.blogspot.com."


If you would like to become a sponsor click here.
Okay now, this link up is mainly for cottage industry shops. Families working at home etc. 
A way for people to find what you are selling. It doesn't have to be an etsy shop just FYI!
Rules to participate-
Please become a follower or subscriber of the blog. 

1. It is required that you be the owner/operator of the shop (doesn't have to be etsy!) that you link up.
2. It must be a family friendly items for sale. 
3. This party is not for DIY projects, if you would like to link a project go here.
NO business opportunity post links, thank you.

If this party helps to build your business, 
I hope you will consider advertising on Remodelaholic, 
check out this link for prices and options.

Please try to continue to spread the word so that we can keep this party going. Write a post about it on your blogs with a link, and let your friends with shops know about it so they link up too.  Whatever helps!  Thanks!


Read more...

A Dirty Little Devil!

18 March 2011

Spring is coming... THANK HEAVEN!  

It is beautiful outside for us Texans!  Our plum tree in the front yard has bloomed a ton of beautiful white blossoms and brand new chartreuse leaves are budding out - I feel like breaking out into song,

June is bustin' out all over
All over the meadow and the hill!
Buds're bustin' outa bushes...
(name that movie)


The weeds grass is are already starting to grow (I guess we were a little to late with the pre-emergent weed killer, whoops!!)

But my husband has been itching to do some work outside and luckily the great folks at Dirt Devil let us choose a product to test out, that made us both happy- A Pressure Washer!!! SCORE!  Can I say exciting?

I picked this:
Dirt Devil® PressureFlex™ 1600

Here is what the folks at Dirt Devil had to say about it:  Taking the brand beyond floor care, the PressureFlex line of Pressure Washers is ideal for outdoor projects. From smaller projects like automotive cleaning and small outdoor deck space, to larger ones, like driveway and garage floor cleaning, PressureFlex™ Power Washers produce 1.6 GPMs and 1800 to 2000 PSI, and are easy to maneuver with a sturdy wheel base. Each unit features a convenient ON/OFF switch, electric rotary aluminum pump, GFCI and auto reset motor protection for safe, simple, and reliable operation. Equipped with a detergent bottle or removable detergent tank, PressureFlex™ Power Washers offer a spray gun with adjustable nozzle varying from narrow to wide spray; giving you the power to easily wash away dirt and debris.


So Justin, started with a quick project of cleaning off the brick by our front door.  We don't have gutters, URGH!- I would love to get some especially for rain water harvesting...  But anyway, whenever it rains the brick catches all the water, and dirt splashes etc.

Before, yucky junk on the brick...

During, my hubbie at work:
 
 
30 seconds later...
After, mostly dried off:

I can't believe how easy it was.  It came right off.  He also, cleaned off (part) of the garage door, I will have to get on him to finish the rest- he wanted to let me see the difference...!  

And he easily took spilled, dried paint off the sidewalk!  WOW!

What else can I get him to clean?... hummm....
I will work on lengthening the "Honey do" list, (just what he needs)

What projects are you all working on?

Read more...

Remodelaholic's Anonymous 63; Blog Link


We have a button for the party.  The code is in my sidebar! Please add it to your blog or the post somewhere so other people can find out about the party and join in.  I would be very thankful!


Grab a feature on button if your were featured.  Not sure if you were featured?  Just scroll back through this weeks posts.  (if you have ever been featured, please feel free to take one too!) 

By linking to the party you give Remodelaholic full permission to feature the full or part of the linked post on this site or one of our sister sties.  All featured posts will be credited to the original author and linked to said post. 

Here are the party guideline/rules:

1. Please become a follower or subscriber of the blog FIRST !!

2. Please link to something that is relevant to this blog's topics (up to 3 links per blog). For example, a remodel, before and after, recipe, craft, DIY project, show us what you are working on. Please no businesses or etsy shop links.

3. Link to the specific post, not your homepage!

4. Add my button to your blog's sidebar or the post so more people can hear about the party... The more people that see the button, the more people that will see your posts and blogs!  


Remodelaholic

5. Please check out the link before you and make sure to leave a comment!   On that same note, I want to apologize for not being able to comment on each and every linked blog.  I have come to the decision that in the interest of my daughter/mommy time that I can't comment on each link.   I hope you will be understanding!

***Please don't repeat the same link each week!! try to keep the info new thanks!!!

Read more...

DIY Paneled Wall Tutorial

17 March 2011

DIY Paneled Wall Tutorial
contributed by Decor Chick
Thanks for all of the love on my stepson’s new paneled wall!  We just love it, and so does he!
Ok, now on to the tutorial.  I have to give a special thanks to Rambling Renovatorsfirst and foremost for the inspiration behind this project.  If you haven’t checked out their paneled wall yet, you must do that.  They even went the extra step and added some pretty trim to each of the boards.  I LOVE the look.  We didn’t add any trim to our version so it’s a little more modern for the boy’s room, but both styles look great!
THE STEPS:
1st: Since there is no need to change what’s already a good thing, I used RR’s measurements for the boards and had them cut the same width.  I bought 2, 4×8 sheets of MDF a 1/2 inch thick at Home Depot for $20 each, and had them cut the sheets into 4 inch wide, 8ft long strips for me.
NOTE: If I were to do this again, I would splurge and buy primed MDF to cut back the painting time a little.  I’m not sure if the primed MDF is sold in big sheets like this, but I would think so?
2nd: Paint your wall white, or whatever color you will be doing this BEFORE you add the boards. Trust me. :)  You should also lightly sand the boards so they are very smooth and clean up any rough edges. And if you want to be super efficient, you could paint your boards before you nail them up too.  I didn’t do that of course. :)
3rd: I made a frame around the wall with the boards first, and just nailed them up with the nail gun.

Read more...

Kitchen Remodel; Complete Overhaul

Kitchen Remodel; Complete Overhaul 
Rearranging the floor plan for a new kitchen!!

My husband and I were on the hunt to find an old house that we could make our own.  In early 2009 we found the perfect house.  Well, actually, it was anything but perfect.  It was a giant mess, but it was in a great location and it had the space we were looking for.  So we took the plunge and stared the renovation immediately.  The entire house was gutted to make way for new electric and plumbing.  Since all the walls had to go, it was a great opportunity to reconfigure the space so that it would work for our family.

Like most families, we spend the majority of our time in the kitchen.  We knew we wanted a big, open, casual kitchen.  Before the demolition took place, the kitchen was a small room with tile everywhere, even covering the ceiling.  There was a small door that lead to a huge dining room with tons of natural light.  Working with our architect, we decided it would be best to take out the wall in between the two rooms and switch the areas.  Since we're not formal people, we knew we didn't want a huge formal dining room.  We just wanted a large table to gather around with our family and friends.

Here is the previous kitchen.


This is the previous dining room. (That's my husband playing the part of Vanna White).
The wall he is pointing to is the one that was removed.


Here is the new kitchen (view from the dining room into the kitchen).


This is a view from the mudroom into the kitchen and dining room.


We had our cabinets made by Steve Cline of Woodwork Designs.  I was surprised to find, after getting several bids on stock cabinetry, that custom cabinets were quite affordable.  Not to mention, it was such a great experience getting to work so closely with Steve on the design and construction of our cabinets. 


Here is our new casual dining room. (This was previously the tile covered kitchen) 


The cabinet front Sub-Zero refrigerator was our big splurge in this room.  
We were able to buy a floor model from an appliance store which saved us big bucks.  


Rather than having cabinets built in here, we opted for a open, airy piece of furniture.  It sits back in a cove due to plumbing in the wall on the right and a structural beam running along the top.
It fits perfectly there.


Again, we decided to use an antique piece we had, rather than having a built in desk here. 
It's a great spot to go through school papers and pay bills. 


Right off the kitchen is a mudroom (my favorite room in the house). 


It's the perfect place for the kids to drop their coats, shoes and backpacks when they 
come home from school.  The entire first floor of the house is hardwood, except this room.  
We went with a durable dark colored tile floor (to hide dirt, of course).


We charge our phones, cameras and I-pods in here as well. 


There is a great sized pantry in the mudroom also.  
We didn't have a pantry in our old house,  so this was a nice addition for us. 

Here are a few of my favorite details in the kitchen.  It's all in the details, right?


Hope you enjoyed the tour. 

Read more...

Recycling Glass Insulators Into Pendant Light

16 March 2011

Recycling Glass Insulators Into Pendant Light 


Oh how I wish I had all these fabulous colors!!
  
Ever wonder what you could do with those old glass insulators??
How about a pendant light!?

Read more...

The Maillardville Manor Home Tour


First off Thank you so much to Cassity for asking me to do a house tour!!! I am so excited to be sharing our Home with all the fabulous Remodelaholic readers.

Second, let me introduce myself. I'm Ashli, and my Blog is The Maillardville Manor. Over at The Manor we believe our homes can be simple, organized and green, all at the same time, while not breaking the bank.
Give me a minute and I'll show you what I mean.

Read more...

Updated Powder Room With Fancy Mirrored Vanity

15 March 2011

No More Brass Hardware: 
Updated Powder Room With 
Fancy Mirrored Vanity
contributed by View Along The Way


Finally! We have some "after" shots of the house. I'm going to post these one room at a time, starting today with our powder room!

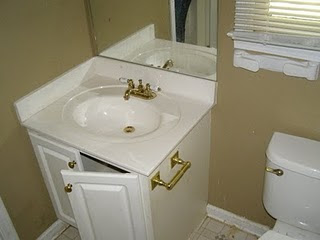
Let's take a little journey back in time... to a time when you had to use THIS if you wanted to powder your nose downstairs:


The brass fixtures were a little less gleaming now than I imagine they were back in their heyday. The cabinet door was broken. There was a mysterious paper towel holder next to the vanity. (That's a new one for me. I guess the paper towels were there in case things got a little messier than usual?)

The grunge build-up on the laminate floors was enough to make you bulimic. And if you used the toilet (which we avoided), you quickly learned that it wasn't really screwed in to the floor, and rocked back and forth so you felt like you were on a fantastic roller coaster ride while taking care of your business. Not ideal.

You can't really tell in the picture above, but inside the old cabinet was a massive pile of hair. Er, weave. NASTY! And the walls were a much grosser color than they look here. I'd name it Green Baby Poo.

And then I'd throw it away.

Read more...

Houseography Home Tour; adding on a home addition of 1800 sq ft!!

Houseography Home Tour

Welcome to Melissa of Houseography.  She is here today to give us a house tour Yea!

Our house looked like this when we bought it in 2002:
 

This is what our house looks like today.


In 2009, we started a major remodel including renovating the existing house and adding a large extension on the rear of our house that would double the size of our living space and solve 95% of the house's problems (at least in our minds at the time). Our main goal in the design was to make the new an old spaces flow seamlessly together, so that people inside the house would have difficulty discerning where the old house ended and the new house begins. We think we succeeded since many of our friends have a hard time remembering what our house looked like before! (Side note for anyone thinking about a major remodel: I wrote a step-by-step blog about our renovation process which you can check out here.)

Let's start the tour! As you enter our house, you come right into the living room (and the family room beyond to the right in this picture). 

Read more...

Goodbye Wallpaper Yacht Club Boarder, Hello Crown Molding

14 March 2011

Bye-Bye Wallpaper Boarder, 
Hello Crown Molding
contributed by Hazardous Designs

Ahhhhh, heaven. 
That's how it feels after finally spending a night in our new bedroom after nearly 8 weeks of tearing down wallpaper, repairing plaster, painting walls and trim, and installing crown molding. Bye bye yacht club, hellooo Hotel Hazard.
Here's a reminder of what the room looked like before: 


And now... 

Read more...

Best, Most Complete Wainscoting Tutorial Ever!!

Best, Most Complete Wainscoting Tutorial Ever!!

Read more...
Related Posts with Thumbnails
Emealz - Easy Meals for Busy People!
Home & Garden Blogs Home & Garden Blogs - Blog Rankings

Blogging  tips, tutorials and SEO

From Here to Eternity

  © Blogger template On The Road by Ourblogtemplates.com 2009

Back to TOP