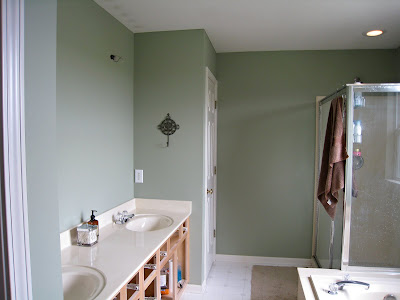
Master Bathroom Before - After (and in between!) by Alyssa
Hi, I’m Alyssa from
Sweet Sewn Stitches! I have been blogging for a few years, but just recently have been inspired to kick it up a notch and dedicate more time to my story.
I hope to share what is real in my life - as a wife of an amazing hubby, a momma of two under three, who still loves ME time, someone who thirsts for unique tutorials and artsy projects, as a planner, and as a momma who is always looking for more inspiration!
I am absolutely thrilled to have the opportunity to share on Remodelaholic! Giving our master bath a facelift was on the ‘to do’ list for a LONG time. I despised the ‘dressing room’ lightbulbs, the 6 feet long, wall sized mirror, and the grubby acrylic shower with etched and corroded glass enclosure. It was finally the pregnancy hormones and nesting instincts that sparked motivation to remodel the space. Here is a peek at the transformation!
 |
| BEFORE |
 |
AFTER
|
I had a lot of help from friends and family. My Mom is an amazing woman with tremendous talent to share. She is a painter, wallpaper hanger, tiling master, quilter, and artist. She dedicated many hours and shared endless knowledge on this remodel project.
The project began in 2008 with painting, refinishing the cabinets, replacing the panel mirror with smaller framed mirrors, and replacing plumbing and lighting fixtures. The cabinets were refinished from a birch color to a darker espresso using a brown tinted, water based glaze. It was combed to mimic wood grain and then coated with Minwax satin polyurethane. The large mirror was cut to fit open frames found at Michael’s Craft Store. Our remodel stopped there when our little man was born.
 |
| AFTER the FIRST REMODEL in 2008 |
The project resumed in 2009. The condition of the acrylic shower was revolting! I wanted to enjoy my master bath again. My Mom volunteered to pitch in with the remodel and traveled to our house for a few days each week for 5 months to help her pregnant daughter {me} complete the project.
 |
| BEFORE |
 |
AFTER
|
We started by hiring my sister’s boyfriend, Doug to demolish the existing shower, flooring, and bathtub surround. He also framed the shower to include a threshold and small step/seat {because I need a place to shave my legs}! Lastly, Doug installed cement board in the shower, bathtub surround, and floor as prep for tiling.
Most of the late nights and long hours were spent tiling. There was a lot of cutting tile in the garage {because it was winter in Indiana}, mixing thin set, laying tile, grouting, and sealing. We chose an amazing ceramic tile from LEA Ceramiche that mimicked stone, but is not as porous and also more durable.
As with any remodel, we had several hiccups. This was our first experience prepping a shower pan for tile {versus an acrylic shower pan}, which proved a tedious process.
1} Prep the drain and lay concrete floor mix as base
2} Lay membrane liner and allow for sloping of next layer of floor mix. We used Goof Proof Sloping Kit.
3} Reinforce the threshold using metal lath. Prep with floor mix and add ¼” slope for proper drainage.
4} Install cement board on surrounding walls down to the shower pan.
7} TILE! Grout and seal…Ta Da!
The shower niche gave us fits! I chose a large niche from Redi-Niche. It installed well, but using the provided adhesive to cover with tile did not work. We were able to pull the tile off the next morning! It was a rough road, but we purchased more of an epoxy adhesive and FINALLY had a finished niche!
It was also a challenge to lay the mosaic muretto tile we chose for the shower accent wall and tub surround. The muretto pieces were backed with paper mesh instead of plastic. Once the mesh became moist from the wet saw, the panels began to fall apart! This made hanging the muretto on a vertical surface extremely frustrating. We persevered, and I would not change it for anything!
Once the tile was finished, we chose a piece of scrap granite for the shower threshold, bench seat, and return ledge. Once we installed the granite, it was finally time for the last step ~ the shower enclosure! We opted for a semi-frameless style in brushed nickel finish to match plumbing fixtures. The glass is also treated with ShowerGuard that prevents corrosion of the enclosure.
A few finishing touches and this was the magnificent end result!
We have enjoyed our master bath now for over a year and it still makes me smile. I absolutely love it and am so glad we took the plunge to remodel!
Thank you again to Remodelaholic for having me! I hope you have enjoyed our master bath remodel, and invite you to stop by
Sweet Sewn Stitches anytime to see what's new!
If you like this post please check out some of our other bathroom remodels:


1 comments:
What a wonderful reno!
Post a Comment