We’ve Moved!


If you aren’t redirected here is the link:


Remodelaholic!


THANKS!

Baby Boy Nursery With Wall Stirpes

07 October 2010

I just wanted to show off this sweet little baby boy nursery.  It is a party link from House of Ficek.  I think they did a great job, check it out!


Okay, so I already have my baby toddler.  Gulp, BIG gulp and a little tear.  I just had to post his room because it is the only room in the house that is absolutely, completely, without a doubt done!  (I lie, I really should have added drapes).  When we moved in there were really old shutters mounted outside the frame and closet doors that wouldn't stay up.  Embarrassingly enough the room was in this state until we found out we were expecting and had to get our butts in gear.


Here are the new blinds that I got at Home Depot and cut down to size.


I wanted a nice upholstered glider, but I was 8 months pregnant 
and my husband won the battle after about 3 hours of debating in the store.

 We opted for these floating shelves from Ikea instead of your standard bookcase.


This is the picture in the white frame on the shelf.  I think it is my favorite picture, I adore my boys!


I didn't want anything too pastel and babyish so we went with a vintage baseball theme (I usually hate themes, but this is toned down).  I love the way it turned out, even over one year later.


I love the stripes and the shelves!
Also, if you notice in the first picture there is a 0 and a 9 framed separately for his birth year, and I love that idea!
What do you think?

Read more...

Quick Simple Living Room Updates; Before and After

This living room is from Merritt @ So It's Not Perfect?  I love the simple updates and how it makes the whole room feel so inviting!


Since the day we moved in to our new house, one of the rooms that has really bothered me was the living room. Sure, it was big, but it really lacked any character at all.


It always felt to me like it lacked any definition, and was reaaaaalllly boring. So after 6 longs months and countless hours of convincing Hubs that beige (even Ralph Lauren beige) isn't a real color, we finally decided to tackle the living room.

Like night and day! I was telling Hubs the other day, it feels like someone just turned on a light!

We decided that in order to create character, as well as some architectural interest, we added a chair rail.

We weren't sure what the "official" chair rail height was supposed to be, so we just eyeballed it to the height that looked best (it turned out to be 44 inches). Then we painted the bottom half Valspar's "Ultra White" in a semi-gloss finish, and the top half Martha Stewart's "Heavy Goose" in a flat finish. It was my first time using Martha Stewart paint, and I'm really happy with it. I'll definitely be using it again.


Then we attached 1x4 pine boards to the wall with a nail gun and filled in the nail holes with wood filler and sanded it back to smooth before we painted them white. Originally, we weren't going to use really good wood for the chair rail (we were thinking more along the lines of MDF), and honestly, this was kind of an accident. We went to the lumber yard to try to save some money on the wood, and the guy there assured us that we wanted "clear" wood, which just means is has no knots in it. That sounded good, but we had no idea what he was talking about. He was asking us all kinds of questions and saying all these things that I'd never even heard of. Our response was "uhh, ok. Whatever you think is best..." Seriously, no idea what he was talking about. It looked great on the walls, but not really the way we thought it would, it looked much fancier!
Unfortunately, the walls aren't level and bow in and out in some spots, so putting it up was more difficult than it should've been. Yes, I could've torn down the drywall and fixed it, but we were so close to being done! I couldn't stand the thought of starting over. Between the uneven walls and the great looking wood, we scrapped our original idea of board and batten and just stuck with the chair rail. The wood for the whole room and the hall cost about $50.

I wish these pictures did it justice, but it just FEELS different in the room. It's so much lighter, cleaner...more peaceful.


I really pared down the accessories in the room, I wanted it to feel less cluttered. I only used the items that I absolutely loved, the rest were put away. I got the starfish at one of my favorite antique/cool stuff that you can't find other places store. They were $1 each! The bell is from Marshall's and "Boats" sign is from TJ Maxx. I can't remember exactly how much they were, but they were less than $10 each.

I dry brushed the buffet with Martha Stewart's "Driftwood Gray" (it used to be black). I haven't decided whether or not I'm going to sand the edges, I'm really loving the worn look it has now. I'm also really happy with how the fireplace looks now. I know everyone says to not have a whole bunch of pictures on your mantle, but I don't care. I love my pictures, and I think it looks cool. I think especially since they're all black frames, it really looks de-cluttered. The mirror is the same one that was on the fireplace before, just repainted.

The white chair is the Pottery Barn Charleston chair. Now before you think that Hubs has lost his mind and let me buy a $1000 chair, let me just say that I paid a whopping $30 for it. Yes, you read that right, $30! Craigslist, baby! It's the most comfortable chair on the planet, and probably the best $30 I ever spent.

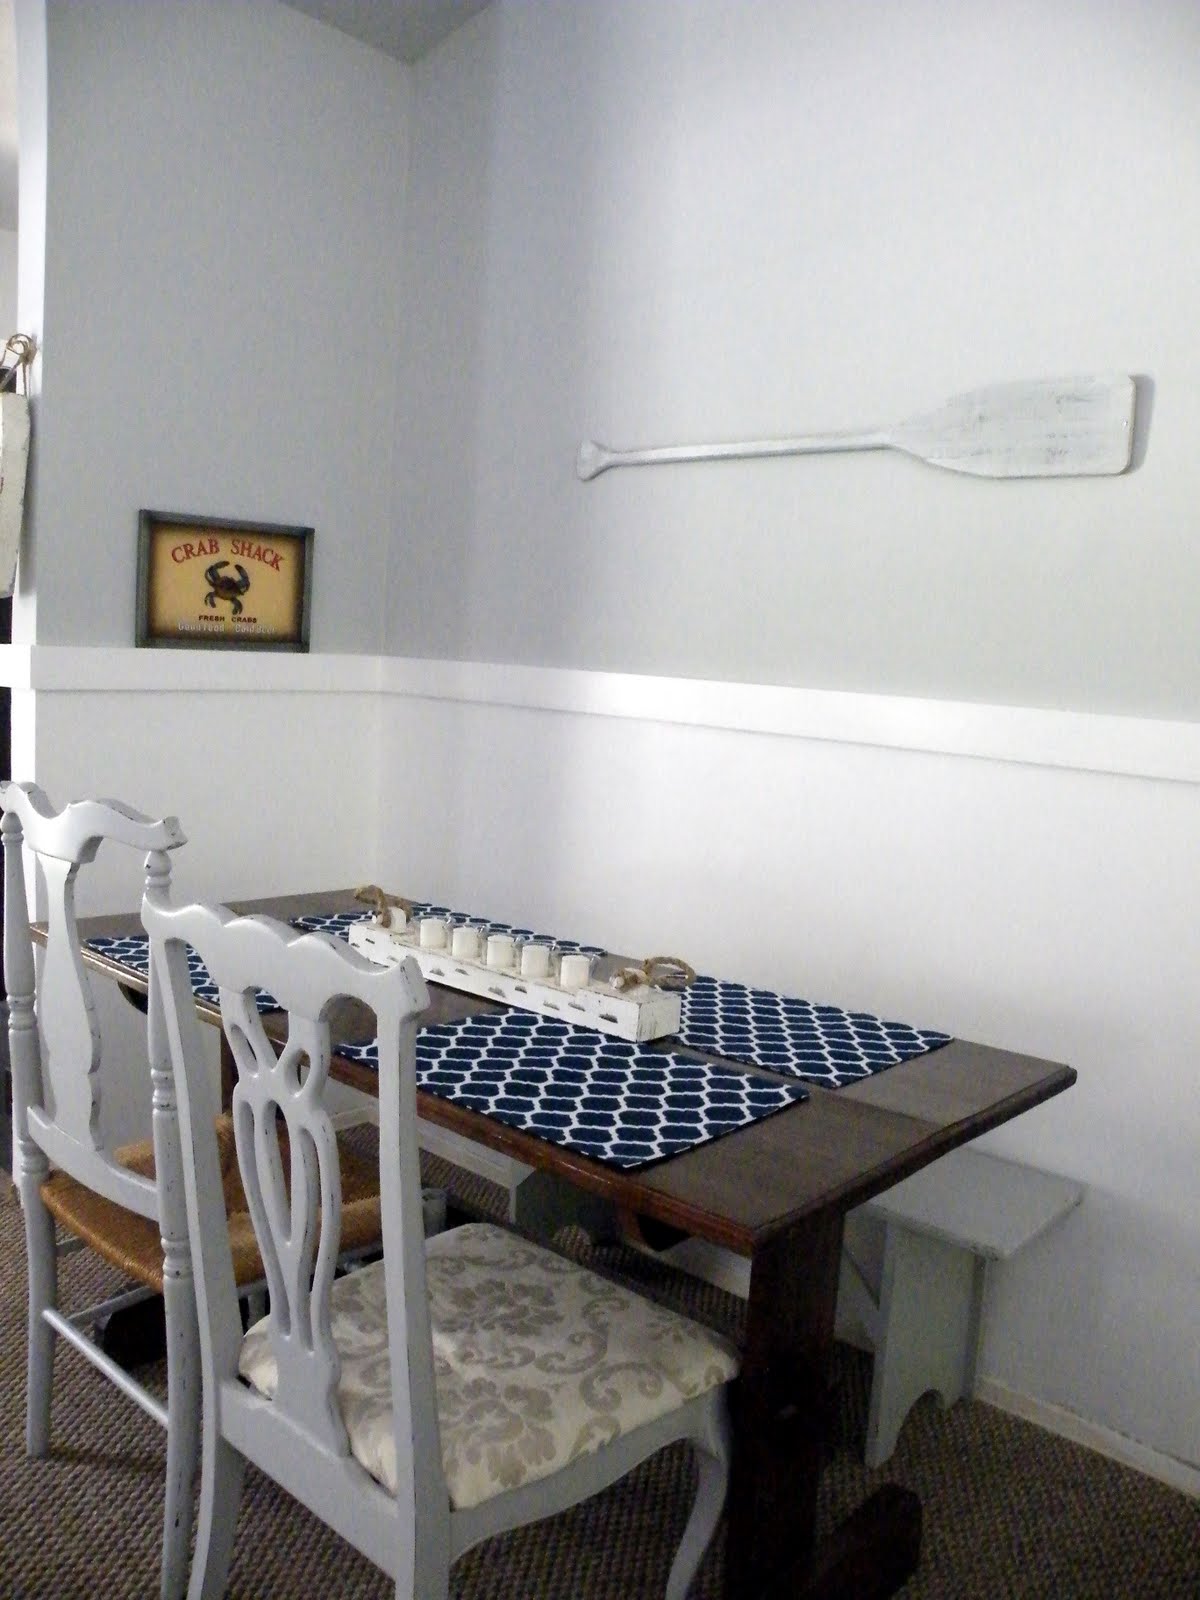
The other major thing we did was make a dining room area. The living room was certainly big enough, and it was totally unused space before. It also means now I have room in the kitchen for an island/breakfast bar (a project which I haven't tackled yet!).

The "Crab Shack" sign is one of my favorite things, it's from Virginia Beach. We were there 2 years ago for my daughter's cheerleading championship, and I saw in the window at night as we were walking down the street. The store was closed, and it was our last night there, so I sighed and resigned myself to the fact that it wouldn't ever be mine. The next day, Hubs made sure we were waiting outside when the store opened and begged the lady to sell it to him (it was the last one). He's pretty awesome like that. The bench and chairs are both from a consignment store, we paid less than $50 for all 3 of them. All I did was paint them and distress the edges. I can't remember the name of the paint, all I know is it's Glidden. I threw away the can and didn't even write the name down. Sorry :(
The table is is from an antique store.

It's made from an old church pew from Saluda, South Carolina. We love it, it's the perfect size, not only for the space, but also for the four of us. I love how it's so rustic and simple but so pretty all at the same time.

So there you have it. My new living/dining room! I still have some touch-ups to do, and we're still figuring out what to do with the floor molding, but I love it so much. It's so much better than I'd even imagined! I have to say though, there was no way I could've done all this without my husband's help. He was the muscle behind this one, and he's like a surgeon with a nail gun! (except for when he nails it through pipes in the wall!)

Didn't they do a great job adding some interest and bringing the space together!?!
What do you guys like the most?

Read more...

Repainting an Old White Dresser; Awesome Craig's List Find

06 October 2010

Erin at 3 Meadow Lake Cottage has made a wonderful change to an old white dresser.


FINALLY finished the rehab project on my Craigslist dresser.
It was hard work.
But it only took me 3 months :)

Here's a reminder of how it looked when I bought it...


It was in such sad shape: peeling paint, missing knobs, red stains from an unknown substance, and drawers that didn't work. 

But it had great bones. 

So I scraped
and scraped
and scraped.

Then I sanded
and sanded
and sanded.

  
Then I painted two coats of primer and three coats of semi-gloss white paint on it.


I managed to fix almost all of the drawers glides by using a screw driver to some WD-40.
I only had to replace one of the glides because it was beyond repair. 
Thank goodness because they run about $5.00/each for new glides!

After scrubbing the heck out of the insides of the drawers to get them clean, 
I added some contact paper {from Target} to the bottoms to make them look super crisp and clean.


I picked out and ordered some classic oil rubbed bronze knobs and handles off of Ebay 
{Ebay has GREAT deals on cabinet hardware if you are ever in the market for some!}.

I chose hardware that looks really simple and classic since there are a lot of details on the dresser itself.

And after ALL of that hard work, here is how the dresser turned out...


Here is a before and after for comparison...


Oh and here's my old piece-o-junk that it replaced...


Much better, don't ya think??
{Hopefully I can get someone to buy that old thing!}


I am so in love with how it turned out.
Thank goodness I didn't toss in the towel half way through the project.
In the future, however, if I see a piece of furniture that needs massive rehab like this one did, 
I probably will run the other direction!


Here's the cost breakdown:
Dresser: $20
Stripping Supplies: $36
Paint Supplies: $37
Knobs/Pulls: $20 {included shipping}
Contact Paper: $5
Drawer Glide: $5
TOTAL: $123

My new dresser kinda reminds me of the one of been drooling over at Pottery Barn... 


 Except that one is priced at $1,199.

I think I like mine better anyways.

Wow I can't believe the savings!  Wait, I can!  
Great job on the white dresser rehab!

Read more...

Laundry Room Oak Cabinet Upgrade

Elisa at Re-Designing Real Life updated her plain oak cabinets with a nice coat of paint!  Doesn't paint make almost anything better?


Here is the Before shot.


Here is the before pictures. When we had our cookie cutter house built, we had them install cabinets in the laundry room, but went with the basic, simple, oak cabinets that are in every other house. One of the things on my to do list, is to change all the cabinets, but instead of buying new ones (that is SOO not in the budget), I want to redo them all. So, I started with the Laundry room. And I LOVE the outcome. First of all, the room is SMALL, basically only room for the washer and dryer. And it felt as small as it looked. And we were using every nook and cranny for storage in that room. It was really starting to bug me having the clutter up on top of the cabinets showing. So I used a tentsion rod, and some fabric out of my craft room to hide the junk up top. The fabric is actually a clearance shower curtain I found at Ross awhile ago for like$1.99 or something crazy like that. I also made a curtain to go on my folding table that used to be a bookshelf, to contain more items being stored in there. And I Love the bright color it adds. I have always been a fan of the color yellow. It is such a happy color, and when you are folding laundry, you need to have some happy reminders. I used some leftover blue paint from one of my friends projects (thanks Jess!), so that was free. The bookshelf turned folding table was given to me by my sister in law, so that was also free. The paint was used for another project, so you can say that was free to! I did have to purchase The soap jar (goodwill for $5), the polyurethane ($9) and the deglosser ($6). (More on painting cabinets soon) So the grand total for the makeover was around $22. Not bad, I think. And the room feels soo much bigger, and put to better use.


Here is the bookshelf turned folding table. The cute words are a gift from my mother (Thanks Mommy!)
I added some command hooks to the side to dry items that shouldn't go in the dryer.
And these cool pictures, are real adds cut ouf of magazines when my grandmother was younger. When I inherited them, she had just made some cardboard frames for them. So to preserve them better, I had my other Grandpa build me some custom frames, because they were odd sizes. These may be my favorite part of the room, just because of the story they tell. The frames where painted black, but I decided they needed to be white to match, and I think I like them better!


What a nice change in the space.  I like the curtain 

that hides necessary storage and the vintage art.

How do you like the changes?

Read more...
Related Posts with Thumbnails
Emealz - Easy Meals for Busy People!
Home & Garden Blogs Home & Garden Blogs - Blog Rankings

Blogging  tips, tutorials and SEO

From Here to Eternity

  © Blogger template On The Road by Ourblogtemplates.com 2009

Back to TOP