We’ve Moved!


If you aren’t redirected here is the link:


Remodelaholic!


THANKS!

Take a look: Mirror Project; Guest

03 July 2010


I thought that this project from Ashlee at I'm Topsy Turvy was a fun one.  Take a look:

frosted writing on mirror bathroom
I was actually inspired by Roadkill Rescue at Infarrantly Creative.  I read her post and thought what do I have that I got for free that I can re-make?  And I remembered this mirror that my sister in law was going to give to DI and my husband rescued thinking I'd like it.
old mirror roadkill rescue
First I taped off the mirror and spray painted the frame black.  Then distressed it a bit.  I'd like to rub a dark gloss onto it, but don't have one available.  When I get some I'll go back and finish off the frame.  
old mirror paint
I don't have a vinyl cutter, or a Cricut, so I planned out the mirror words and printed them off on paper. I ran them through my Xyron machine to turn then into stickers and stuck them together.  I couldn't find my sharp craft scissors so I had to use normal ones.  I cut out all the large words, but without the super small and sharp ones that was the best I could do, still trying to get it done in one day.  
words bathroom mirror
I used bathroom related words and changed fonts and sizes for every word.  After cutting out what I could I took off the backing and stuck it to the mirror.  You can see the smaller words that didn't get cut out.  I'm hoping to go back and re print and cut out those words later.  I used bathroom related words and changed fonts and sizes for every word.  
words cut out sticker mirror stencil
Then I pressed the sticker/paper to the mirror using a credit card, just like you would do with a vinyl stencil.  I didn't want any bubbles that the etching could get through and mess up the words.  
mirro stencil sticker cut out bathroom words
I taped off every part of the frame so the etching couldn't get through.  
mirror frame preperation
And instead of using etching cream I discovered and fell in love with this great new product.  Frosted Glass in a spray can!  Crazy easy, looks just like etched glass AND the best part if I don't like it later I can clean off the "frosted glass" and do something else!  I'm counting it as #71 because what I wanted from this goal was something that looked like this, not necessarily having to use the cream to get it.  Yup a rare picture of me.  Gotta love pictures taken by kids that you find on your camera later.  Like the new cut?  Not that you can see it.  I'll try to remember to take a new picture to update the sidebar one.  
frosted glass spray paint words mirror
It's a smallish basement bathroom so it's hard to get a good angle for a good picture.  You can't really see the writing, but I LOVE it!  It makes the room feel bigger having a mirror on both sides of the room.  And it's super fun having these bathroom mirrors.  

frosted writing on mirror

So I have been joking to myself that when I build my wall mirror, up the side of it I want to have a quote that says "Dang! You look good today!"  I guess now I know how to do it!  Thanks!

Read more...

For Sale By Owner 6, Shop Link Up Party


This is mainly for cottage industry shops.  Families working at home etc. 
A way for people to find what you are selling.


Rules to participate-
  I invite you become a follower or subscriber of the blog. 
1. It is required that you be the owner/operator of the shop that you link up.
2. It must be a family friendly items for sale.  
3. This party is not for DIY projects, if you would like to link a project go here.

If this party helps to build your business, 
I hope you will consider advertising on Remodelaholic, 
check out this link for prices and options.

We are tying this linky party out. If it goes well we will continue, if not, then we won't. That means if you want it to continue, then you need to spread the word.  Write a post about it one your blogs, and let your friends with shops know about it so they link up.

Read more...

Check Mate! Painted Checkered Kitchen Floor: Guest

02 July 2010

Erin at Perfect Sentiment has created a beautiful floor with paint.  Can you believe it?

The kitchen floor is done.
D-O-N-E.
Take a look:


Well, okay. Here's the whole truth... We still haven't moved the refrigerator back into the kitchen, so the make-shift kitchenette in the breakfast room still remains. We have a few touch-up areas, and we're still deliberating on a protective coat. (The paint peeps say we don't need one with the floor paint enamel, but it just seems like we should. Thoughts?) We haven't put back on the molding around the baseboards yet. Butconsidering my kitchen floor isn't in it's original state any longer, or in some unfinished limbo stage in between, I'm calling it a successful (almost) completed project! I'm sure if you've hung out with me here for more than a few days, you've figured out that I don't move all too quickly in the big-decision department. I have what I've learned is called analysis paralysis(Thanks, Ruth, for that great term!) I tend to think and rethink and consider and research and talk about and weigh my options and... Nothing ever gets done, speaking about my kitchen at least. So I am thrilled! As is my ever-so-patient husband.

Take a look at our process (pretty much followed This Old House's step-by-step, except the measuring part: we started in the middle of the floor.):


2. Paint first color over entire floor. Our choice: Sherwin Williams Porch and Floor Enamel in Van Dyke Brown.

3. Deliberate on pattern, other color, and hem-ha over the tough decisions. Cutting out poster board squares in varying sizes helped me to visualize. We decided to go with 16 inch squares laid on a diagonal in a checkerboard pattern.


4. Measure, draw, and tape off the checker board pattern. This step took quite a bit of time and math skills. Yes, that is a glass of wine in the picture because, yes, that is a head lamp and straight-edge I had to use. It took some t-i-m-e, and hey, it was a Saturday night.

5. Paint second color of Sherwin Williams Macademia. We used the method of painting over the tape, starting on the tape and dragging the brush onto the square. Then using a small roller over it all. I will say that Frog Tape is so great! (And that bright green is such a delicious color, don't you think?) We only had a few spots seep under and I think that was due to the tape job, not the tape itself.


6. Peel off the tape before the paint has dried, and I chose to pray the whole time too. It worked!

7. Brush on 2-3 coats of water-based polyurethane. We deliberated on whether or not we needed to do this step. It made a world of difference in the ease of cleaning and durability.


I really do love the way it turned out. I think if I were to redo it(which I'm not) I would choose less of a contrast between the colors, but really I'm not disappointed at all. I'm on the hunt for a fun rug to put down in front of the sink.


And now it's on to cabinets and countertops and all kinds of fun stuff. Maybe, just maybe, we'll step up the pace. We'll see... Don't hold your breath.

I love the painted look!  It looks so good!  
What a great option for flooring.  
Do you like the checkered look?

Read more...

Framed out; Window Art Display; Guest


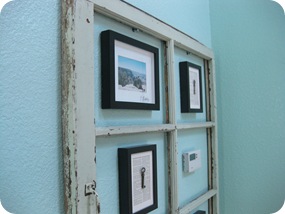
I love this project!  Simple, yet so nice.  It comes from Julia at Open Hands Full Heart.

This art wall literally is a “side” project as it’s off to the side of our entryway.

Ingredients needed: one old window your husband has begged you to find a use for as of 2009. Some family photos and old projects you put together. A thermostat that is begging to be hidden.

So an empty wall, again decorated for what we’ve got lying about the house:

IMG_1067
IMG_1065
Yup, my thermostat is pretty fab.
IMG_1066 
As is the texture on this old window frame.
This was a quick, fun project that I love the results of!

I too love it!  I love how it hides the thermostat in plain site!  
Perfect, wouldn't you all agree?

Read more...

Remodelaholic's Anonymous Meeting 26


We have a new button for the party.  The code is in my sidebar! Please add it to your blog or the post somewhere so other people can find out about the party and join in.  I would be very thankful!

Grab a feature on button if your were featured.  Not sure if you were featured?  Just scroll back through this weeks posts.  (if you have ever been featured, please feel free to take one too!) 

By linking to the party you give Remodelaholic full permission to feature all or part of the linked post. All featured posts will be credited to the original author and linked to said post. 

Here are the party guidelines:

1. Please become a follower or subscriber of the blog FIRST !!

2. Please link to something that is relevant to this blog's topics (up to 3 links per blog). For example, a remodel, before and after, recipe, craft, DIY project, show us what you are working on. Please no businesses or etsy shop links.

3. Link to the specific post, not your homepage!

4. Add my button to your blog's sidebar or the post so more people can here about the party... The more people that see the button, the more people that will see your posts and blogs!  

5. Please check out the link before you and make sure to leave a comment!   On that same note, I want to apologize for not being able to comment on each and every linked blog.  I have come to the decision that in the interest of my daughter/mommy time that I can't comment on each link.   I hope you will be understanding!  

Read more...

Oversized Rosette Pillow: Guest

01 July 2010


Patrice at Lemon Tree Creations created a beautiful over sized rosette pillow.

Rosettes have been floating around out there for a long while now, and I must say while I think they are completely fabulous, I hadn't really tried my hand at anything similar. I had played around with the shapes using ribbon and what not, but had never settled on a reason for needing them, nor was I completely satisfied with how mine turned out. All of this changed, however, when I decided what I needed for my couch was just one more pillow. I wanted a small pillow that had a lot of character, and I settled on this:


For obvious reasons I have been calling it my GIANT rosette pillow. While the pillow only measures about 10inx10in, the rosette is still close to 10 inches in diameter. With just a little thread, needle, leftover fabric and hot glue (of course!) it was very simple to create.

First I hand stitched a pillow 10in x 1oin and filled it with cheap Walmart stuffing, ($3.00). The thing I like about this pillow that it is made from upholstery grade fabric left over from a rocker I upholstered. Just being slightly thicker than other fabrics I have used in the past, it give the rosette some added depth I think.

Next, I cut my remaining fabric into 2 inch strips. The rosette took SEVERAL of these to complete.


With the strips cut, I began the rosette by kind of rolling the outsides of the fabric together to create a sort of fabric tube. This made the 'petals' a little more voluminous.


Next, I just began rolling the fabric inward, twisting it as I went. You have probably seen a lot of tutorials on how to best achieve this. I cannot say that I really used any one technique, but more just went with the flow. This is where, for me, the hot glue came it. I do not proclaim to be a seamstress. Hand stitching a pillow is about as good as it gets. Therefore, I was left with other adhesive options for securing my rosette, and turned to hot glue. I do not have a picture of the places where I put hot glue. I can just say its easiest to to dab a bit, around the bottom of the rosette petals, about every inch or so. As the rosette gets bigger, it works best to apply the hot glue in thin strips around the bottom of the fabric.


When the rosette became to large to hold, I then attached it to the pillow (using hot glue, I know I am a cheater!). I secured it to the pillow with hot glue in many places, pulling at the rosette as I went to test for stability.


Below is a picture of the where I got my fabric inspiration. While the colors in this great fabric matching NOTHING else in my living room, the play off of each other from across the room. Now the fabric choice seems to make a little more sense. (And trust me, they are not staying together, that matchiness would probably just eat me alive!)


I can't wait to share with you how I rescued this antique rocker, along with some other upholstery ideas in the next few weeks.


Hope you enjoyed my 'late on the scene' version of the rosette.


What a nice addition to the couch!

Do you love it?

Read more...

Shady Places; Pergola Update; Anything Pretty

Hey I'm Jenny from Anything Pretty, I am so excited to be over on here today and am so excited to share you all my cheap and quick way to get some shade in an outdoor space.

Our deck was hot and sunny….a combination that did not bode well for spending time out there.  Especially because I am not a fan of sweating.  We had a rickety pergola that the previous owners had installed but the slats were so far apart that it did not do much in terms of providing shade.  Oh yeah we also installed lights when we moved in for some ambiance.  I still love the light set, but our installation method…..well let’s just say it was straight and rigid.  Not exactly evoking feelings of summer casual fun.  Behold the before-
Before/After sailcloth project
But how could we get some shade without adding a roof or another layer the the questionably stable pergola?  Ultimately we would like to have plants climb it and provide shade, but that will take years.  And patience is not one of my virtues.
And then when I was admiring the famous drop cloth curtains I had an idea.  Why couldn’t we use cheap paint tarps as the canvas to cover the pergola with?  Brilliant!
So I head to the nearest home improvement store and bought two 4x15 drop cloths.
IMG_1175 I worried that if I left them this size that rain and wind could have negative consequences.  So I sliced them in two and did a quick seam in heavy duty thread.  No measuring or preciseness…..I cut where they were folded.  I am not fast on the sewing machine and got four done in in 35 minutes.
Then I added two grommets on each end to attach to the pergola.  Again this step did not take very long at all.
With the husbands help, we took down the lights and wove the four strips of drop cloth into the pergola all the way across.  They were attached with screws through the grommets that can easily be taken down in the winter.   An “above” pic from the window.
Before/After sailcloth project
Again no measuring was involved….we just eyeballed the spacing.  Then we added the lights back in a more casual way to get this- Before/After sailcloth project

Before/After sailcloth project

And at night…
IMG_1200

The table is now shady and we can pretend we are in a fun restaurant when we are just eating in our own backyard.  It would have been easy to add another two strips to bring the shade to the end of the pergola…..but you see that green tarp?

Before/After sailcloth project

That would be the BBQ and I do not think flame and canvas are a good mix even in the name of style.
The entire project cost less than $50 and a 2 hours of time.  Will it fade…..yes but I do not care as a lighter color will still work.  Will it last 20 years….no but it was cheap and easily replaceable.

Well worth it for some shade and ambience in my opinion.  And even if you do not have a pergola in your backyard, drop cloths could still be used on other structures or even between a couple of poles.  Who knew that they could be so multi-functional?

Read more...

Bathing Beauty, Bathroom Renovation; Guest

30 June 2010

I got this great bathroom renovation from Lezlee at Prior.   There are a lot of great touches check it out!


We have Three bathrooms in our home.  All of which had to be gutted, knocked down, or built from scratch. The first I will show you is the Master Bath; it is in the knocked down category.  Formerly a boarded in front porch, turned into a closet and bathroom and for the longest time the only bathroom for all seven, yes, seven of us!  We knocked the front porch renovation down, rebuilding a master bathroom with a hugely fantastic closet, well, maybe it isn't grand by some standards, but I live in a house with virtually no closets soo..., and a separate closet for the guest room...


This shelf is built from an old door. 
LOVE how Joshua miters the corners!

The thermometer is from the Eubank Funeral Home which is still in business, though it has been many years since our phone numbers were written as TU 7.  The Eubank family is where the bank part of Mabank is derived.  The old Avon bottle was my mother-in-laws and the coral came from Okinawa, the coral island, where we were stationed two separate times, for a total of seven years.  Japan is also where I bought the Johnson's Baby Powder; I love the artistic Japanese writing.    

                                                
I don't have a  cut flower budget around my place, occasionally buy supermarket flowers, so I really enjoy and try to take advantage of the luscious wildflowers here in Texas!

More shells from Okinawa and a tiny lighthouse my youngest picked up for me at First Monday, years ago.  

 The window casing used for the curtains were the original ones on the outside of our house...We had to put all new windows in, saving the seven windows original trim work.  My husband does most of the building, but Joshua gets to do the fun stuff. He finished these with hooks and trim if they needed it, and gave each of my husband's 5 siblings one. They use theirs for a wall hanger, but I loved mine for the window trim...since this is a new add on, it doesn't have the trim work as found in the original house, so I tried to think of easy, unique ways to add in the character. 

The floral prints came from Goodwill. Notice the latch for the screen still attached to the trim. I made a Texas Flag from one of the old screens.
Love the handle on the old medicine cabinet...
                                                  It came with the house...     
 

This vintage telephone nook's PRIOR residence was the  farmhouse where I grew up. My husband salvaged it, as a surprise, before the old place was torn down; He also saved some doors.  I made the button bouquet and put it in a Nu Grape bottle... The Q-tip holder is a faceted snuff glass placed in a 10 cent garage sale stand.  

 We had a dresser we were thinking of using for the vanity, but in the end this one from Lowe's was quicker and cheaper. The mirror is recessed in the wall to conceal the medicine cabinet. and I use an old planter for the towels and extra TP.


The fixtures are rubbed bronze. Most are from Lowe's, but I bought the towel bar set at Wal-Mart. 

I love this tiny fan and it works wonderfully.!


The shower is very large. It has a rain shower head, a hand held, plus a body jet. Our ceilings are nine foot tall, so I can't even touch this shower head. My husband trimmed it out...while I was the helper. Our kids painted most of it, but I think I painted the trim. We've painted so much I can't keep track. My husband's nephew did the tile work. Any of you that have done some of this remodeling recognizes the process... 

Remember, if you are still with me from way in the beginning of this post, I said this used to be the front porch...Well, it had two awesome front doors on the porch, leading to two different rooms. When we made part of the remodel a closet for the guest room, the gorgeous door was hidden inside, so Joshua took off all the trim and put it on  as my new closet door, inside my master bath... and we salvaged an old french door, from a house being torn down here in town... The blank space trimmed out a transom, which is still in the guest room, so I had this blank space... I had thought about writing the words for closet in lots of languages, a huge clock, or some metal work, but when I went shopping at the Red Shed Antiques, I spotted this spray of flowers and thought it would fit perfectly and I think it did?!  It would work well in many places, if I decide to execute one of the other ideas. 


Thanks Red Shed Girls!

Now, for the unfinished, uglies... We weren't sure if we would keep this door for the bathroom, because it is half glass, besides we hated to hide it away in a non public part of the house... so we haven't done a thing to it; I'm thinking we will keep it here. I like it and it matches everything else so well... We also need to do the crown molding... 
This door will need a little more than soap! 


I LOVE, LOVE, LOVE that old door!  
And I admit I have a collection of hand sculptures
(Does that make me sound weird? - wait don't answer that)... 
so i am a bit jealous of that last image!  To cool!
Great Job Lezlee!

Read more...
Related Posts with Thumbnails
Emealz - Easy Meals for Busy People!
Home & Garden Blogs Home & Garden Blogs - Blog Rankings

Blogging  tips, tutorials and SEO

From Here to Eternity

  © Blogger template On The Road by Ourblogtemplates.com 2009

Back to TOP