
Kitchen Cabinets Makeover!
Yes my friends, you read the title correctly! My kitchen cabinets are DONE! Had you given up on me? For those of you stopping by for the first time, I started my kitchen cabinet transformation almost three months ago. Meaning that this reveal has been a long time coming. I knew it would take awhile, but did not anticipate it taking this long. I thought a couple of weeks at the most. Whew, this was a project {to say the least}. As usual, I knew exactly what I wanted the finished project to look like, but it took a lot of reading, inquiring, trials and errors to get these cabinets the way they are now. I won't lie, it was not an easy task. We hit a lot of speed bumps along the way where things didn't work as we had planned which caused major delays. Are you ready to see? Of course you are!


If there was anything in the house that made me doubt our purchase, it was the kitchen. Oh the kitchen! There was nothing, not one thing, that I liked about this room. It was everything I wasn'tlooking for during our search for a new home. But it was a great layout and it had some serious potential. Luckily I have an eye for these things and I was able to overlook the ugliness not so great features of this kitchen in order to see the kitchen I could create.
So here it is, our kitchen circa 2007
{these pics were taken during inspection using a point and shoot, so excuse the crappiness}
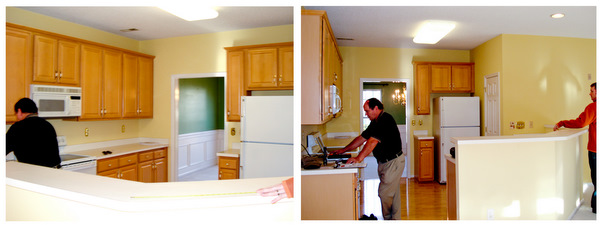
Dislikes {umm, everything}:
- White linoleum counter tops. I had once lived in an apartment with white linoleum counters and swore it would never happen again. Well here we were, once again, with white linoleum. Hubby promised granite - at some point- so I agreed to live with it {for 10 months too long}.
- White appliances. I used to really like white appliances, but now I preferred stainless steel.
- The big, bright fluorescent light on the ceiling. I am not a fan of overhead lights, particularly bright fluorescent ones.
- The Pergo laminate flooring. It sounded hollow when we walked on it and it looked as if someone had ice skated over it. In other words, scratched.
- I didn't love the raised bar. I really wanted an island or large counter workspace. Plus I felt it closed off the room.
- The color. Now there's nothing wrong with yellow, I just didn't want it in my kitchen. But paint doesn't scare me. It's an easy fix.
- Two-tone, gold and white cabinet hardware and gold switch plates so shiny you could use them as mirrors.
Need I say more?
The kitchen remodel was complete in November 2007 {about one year after moving into the house}. Let me remind you that all the renovations were done by hubby and me, with the exception of the counter tops. It was not something either of us had done before, we learned along the way. Here's what we did:


- Granite! Good-bye white linoleum, hello Santa Cecilia granite!
- Stainless appliances, all of them.
- A new, hanging light fixture. This took some work because there was a large rectangular hole in the ceiling when "Big Fluorescent" was removed. Hubby had to patch it up with drywall and spackle and then of course, paint.
- Beautiful Teak hardwoods.
- Did you notice the raised bar is gone? Best idea EVER! After removing the laminate in prep for the granite installation {tip: HUGE money saver if you remove it yourself}, hubby cut off the drywall used for the raised bar so that it was level with the counter top. The granite covered all imperfections and is supported {because the solid slab is so heavy} with a corbel* and four stair posts.
- On the walls: we painted the walls with Ralph Lauren Tangier Island & Country Cork, added beadboard under the bar and travertine tile backsplash under the cabinets.
- We changed the cabinet hardware to nickel-finish knobs and pulls.
- Nickel finish switch plates replaced the gold.
Everything was just how I wanted it, except the cabinets. Unfortunately, new kitchen cabinets were not an option for us. If I wanted a different look, I would have to do it myself. I kept putting this project off because I knew that it would be a lot of work. Finally, on March 9, 2011, I started my kitchen cabinet transformation. {No Turning Back Now}. The dishes came out, the doors came off and I was ready to go!
I plan on doing an in-depth tutorial on painting the cabinets, including supplies, what to do andnot to do, etc. But for now, in a nutshell, here are the steps for re-finishing the cabinets:
{you can also look at my previous posts for more details: cleaning, sanding and priming; painting and beginning construction of box; more box construction; mistakes and painting doors; antique glazing}


- Remove cabinet hardware and doors. Clean all surfaces to remove grease and grime.
- Sand surfaces well to rough up the finish.
- Prime.
- Lightly sand to smooth any brush strokes or drips.


- Paint 2-3 coats, allowing to dry 24 hours and lightly sanding in between coats.
- Apply and wipe off glaze to give an "antique look."
On top of the painting, we also added glass doors, replaced the cabinet above the microwave with a decorative box and shelf that touched the ceiling and changed the cabinet hardware.


Like I said, this was by no means an easy project. Many times throughout the process I cursed and hollered that I would NEVER do this again. But now that I'm finished, I would do again in a heartbeat! I absolutely love how my new cabinets look! The room looks so much bigger and brighter and the and the accents like the antiquing, new hardware, glass doors and box with molding really bring the whole look together.
Now it's perfect! Except that I would still like a Viking range, double ovens and a Sub Zero fridgesomeday! I am so happy with all of the changes we have made. And what I love best is that we did it all ourselves and saved TONS of money!


 This project was contributed by one of our fabulous readers! We love to share your projects with this great blogging community. So, if you have projects from kitchen renovation ideas to small bathroom remodels, overhauled and repurposed furniture, spray paint updates you name it please send it in! Thanks for reading Remodelaholic!
If you liked this remodel we hope you will check out some of our past kitchen features:
This is fantastic! Great work- worth all the effort. I especially like the antique look of the cabinets.
ReplyDeleteOh my goodness, this is an *amazing* transformation! It gives me high hope for my own kitchen remodel someday. :)
ReplyDeleteIt looks great!! And, having done the same thing to our kitchen you are totally right, it's a heck of a project while you are doing it, but so worth the effort! :)
ReplyDeleteWOW!!! I crazy love love love it....I just told my hubby I want that kitchen...Thanks for sharing!!
ReplyDeleteBEAUTIFUL!!!!
ReplyDeleteI have a pass/thru but it doesn't have an overlap for barstools. I want to add cabinets to the back and make the whole thing level like what you did. So he just sawed the top off? wow. I'll have to talk to my contractor about that idea when I have more money. We did a minor kitchen remodel a year ago and now need to wait for more money. Looks great!
ReplyDelete